
DIY | poured mason jar candle
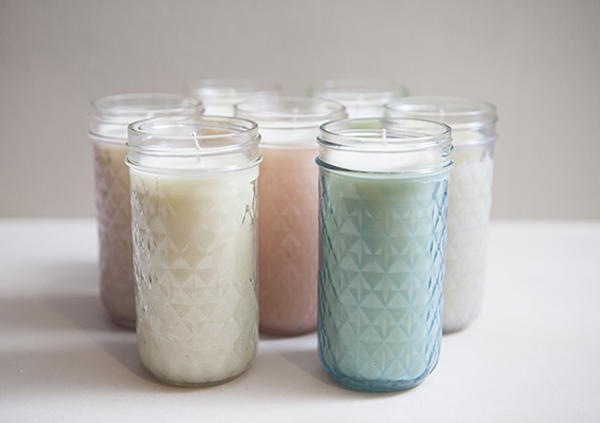
I am so excited to share today’s DIY with you! For one, because I have a new DIY logo… and two, because I absolutely love making candles! Last christmas I made a candle for every single lady in my family and a few of my close friends, which came to around 45 candles… which was so much fun! Shopping at thrift and vintage stores to find cool and unique glass containers… melting the wax, coloring it, and wrapping them all up… I want to do it all over again! Here I am sharing a super simple way to make your own Mason Jar Candle gifts. These steps are not for mass candle making, just easy at home crafting that is perfect for wedding favors or holiday gifts.
Where To Buy Supplies:
Update: 9/8/15 – Let me start by saying this tutorial is old, lol. When I created it in 2011 I had a fantastic seller on Ebay who I bought these supplies from. Sadly he is no longer selling and so you cannot get the colored wax beads anymore – you will need to use color chips or blocks to color your candles. My new favorite online supplier is CandleScience on Amazon. You can find individual links to all the items you’ll need to make this project at the end of the post.

SUPPLIES:
- 1 lb bag of soy wax flakes (very easy to work with!)
- Wax colorant; chips, bars or in liquid form
- Candle pouring pot
- Medium sized wicks and wick stickums
- Wick holder sticks
- Wooden spoon
- Scent oil of your choice (optional)
- Pint sized mason jar
- Cute material or card to finish off your candle
Before you get started, make sure you have all the supplies below and that whatever glass you choose to pour your candle into is nice and thick, thinner glass can crack from the flame of a candle.

For this project we won’t be needing that inner seal part of the mason jar lid, so you can remove it. Wipe out the inside of your jars to make sure you have a clean surface to pour your candle wax into. These pint sized mason jars (5″ tall by 3″ wide) take almost a full pound of wax flakes each.

Add Your Wicks
Some wicks are shipped or packaged looking a little wild or crooked – no need to worry – run your fingers along the wick to smooth it out. Simple as that.

Next, take your stickum and apply it to the metal base of your wick – this then sticks to the bottom of your jar to firmly hold your wick in place.

Then drop your wick into your jar and center it as best you can. I used the end of my spoon to push the stickum down firm on the bottom of my jar.

Wick Holders
Next up, the wick holders. These are basically two little wooden dowels with tight rubber bands on each end. Used to pinch your wick and hold it taut in the center of your jar while you pour in your candle wax and while it is setting. Do your best to balance your wick right in the center of the jar, otherwise it will be crooked once the wax is set. This is only one style of wick holder – there are many out there.

Melt The Wax
Now the best part! Melting your wax! There are many different ways to do this… so here is my simplified version: start by keeping your flame on the lowest heat possible through this whole process. It is best to keep the wax warm enough to melt, never hotter and never boiling. Stir and stir until all your wax melts down. White wax will look slightly yellow once melted.

Candle Color + Scent
As I mentioned above, you can no longer get these wax beads to color your candles. You’ll need to buy color chips, blocks or liquid dye. For chips and blocks, you can break them up with a knife (like you would chocolate) to resemble the small bead pieces.
Now for the color and scent! You can make multiple colors using the good old primaries, red, blue, and yellow. Since the ratio of pure white wax to these little beads is like 10 to 1, my colors always turn out pastel – which I love. If you want a bright colored candle you’ll need to use more colorant. If you want a specific color, you will definitely need to practice. I wanted a muted turquoise color to match my ‘pool‘ colored card stock from Paper Source… using the color wheel, 2 parts blue + one part yellow = teal. For your specific candle colorant, always refer to the instructions on the packaging ~ or experiment. Add a little, see what it looks like and then add a little more. The amount of color added won’t harm the wax base of your candle. Next, you can add your choice of scent. Almost every major scent is now made for candle making oil. For this candle, I chose Warm Vanilla Sugar.
The typical fragrance ratio is 1 ounce of scent to 1 pound of wax.

Pouring Your Candle
You are supposed to wait until your wax is the consistency of a Slurpie from 7-11… before you pour it into your jar – which normally takes about 20-30 minutes to cool to that desired texture. Unfortunately, the day we did this DIY shoot it was over 90 degrees in beautiful Southern Cali and after sitting for almost an hour it was still beautifully clear. So I poured it anyway, because we were running out of time and light. Wax always looks darker when it is the molten state.
CRAFTERS TIP: Since we aren’t being specific here and using a thermometer, waiting till the wax cools down is an important step so that the center of your candle doesn’t crack or sag while cooling.

How To Clean Your Pouring Pot
If wax has cooled and is left stuck inside your pot, throw it back on the heat for like 10 seconds. Once nice and melted again, I take a paper towel and my spoon and wipe the inside clean. Over and over until there is no residue left. That’s all there is to it – no soap or water needed.

Batch number two! Soft pink was the desired color and the scent was Pink Sugar.

***Remember to let you wax cool until it looks like a slurpie from 7-11! The day I shot this it was over 90 degrees and my wax wasn’t cooling, so we had to pour it clear. Waiting till the wax cools down is an important step so that the center of your candle doesn’t crack or sag while cooling.

Huge difference in the final color right!!! Because the day and night was so hot, it took almost 24 hours for these to cure completely. It never takes that long. But you should let them set at least 24 hours before lighting. Now you will need to trim the wicks to about a 1/2″.

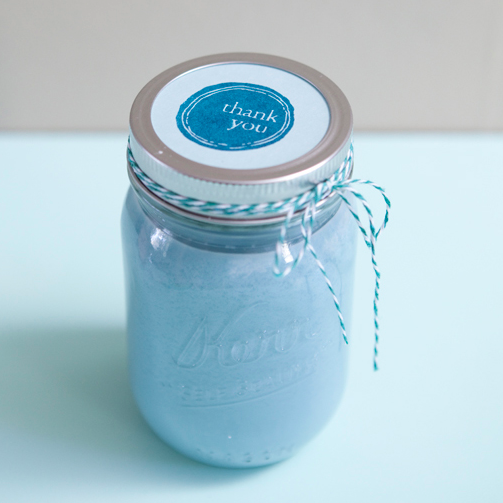
I think these would be perfect ‘thank you’ gifts for bridesmaids or if you are feeling really crafty they could be favors. Maybe use smaller jars if you choose these for favors – to cut down on cost and production time. Here are two different and cute ways to say ‘Thank You’.
Supplies:
- Thank You stamp – mine is from Paper-Source
- fabric
- stamp pad
- scissors
- bowl to trace around
We are going to make a fabric cover for the top of the jar. Trace an appropriate circle for your mason jar lid, onto fabric and cut it out.

Now stamp your desired design onto the center of your fabric.

Next, drape your fabric circle over the top of the jar – with no lid. We will use the lid to seal the fabric over the jar. Screw on tight and tug at the fabric from the sides until it’s even.

If you choose, add a little twine and tie a bow. SO cute!

Option #2: stamp on cardstock. Same supplies except we are exchanging fabric for card stock. Trace the removable lid onto your card stock and cut out the circle. Then stamp your design right in the center of your card stock circle.

Place the cardstock inside the lid, replacing the seal.

Screw on tight and add your twine bow. Adorable!


That’s it! This candle making tutorial can be used with any type of jar or glass… the possibilities are endless! I absolutely love making candles and I hope that this DIY will help you love it too!

Brand New Candle Tutorials:
If you loved this poured candle tutorial… then you will love our latest versions of this project!
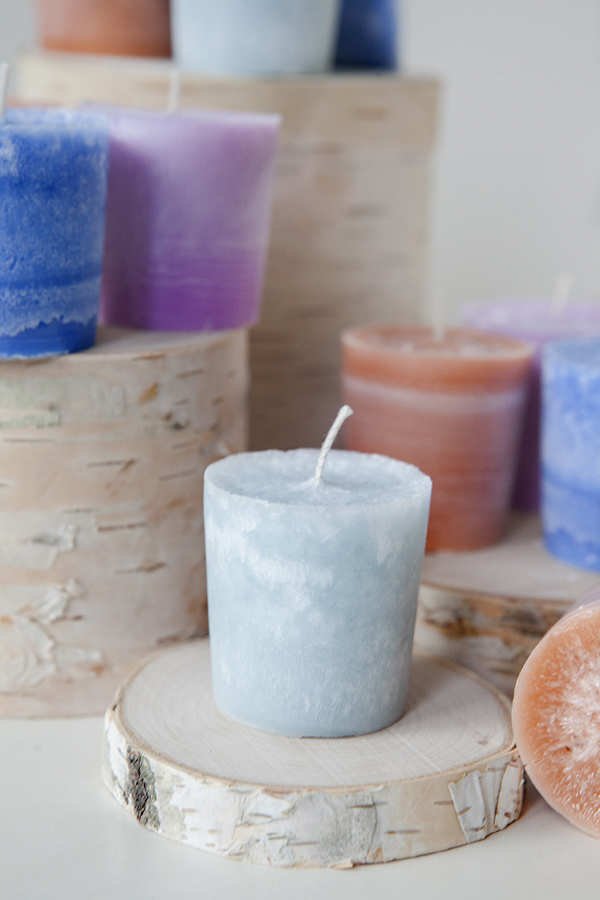
The Tinted Mason Jar Candle and the easy votive candle!
Easily tint the jar instead of coloring the wax… and if you’d like to make inexpensive favors – the votives are for you!!!
As with all our DIY tutorials, if you create one of our projects please send us a picture or a trackback – We Love Seeing Your Creativity! If you use Instagram or Twitter please use the hashtag #SomethingTurquoiseDIY. Happy Crafting!
DIY Tutorial Credits
Photography: Something Turquoise Photography for SomethingTurquoise.com // DIY tutorial: Jen | Something Turquoise // // Pint mason jars: Amazon // All candle making supplies: Tandj999 on Ebay (no longer selling) // Thank You Stamp: Paper-Source // material: JoAnn’s
Find the items you need to make this project from our affiliate links below:

Comments