
DIY | votive candle favors
Sharing DIY projects is our absolute favorite thing to do… especially when it’s a project like this!!! Today we will be showing you exactly how to make your own votive candles! Which of course is a very classic wedding favor, but when they are purchased (and not handmade) – they are just boring – so we know that our DIY brides will be thrilled to make their own! These little votives are very easy to make, it’s just a melt and pour kind of thing and you get to pick your color and fragrance! Ok, enough chatting, let’s get down to business…

Supplies:
- candle wax, we used Crystal Palm Wax from CandlesandSupplies.net (love!!!!)
- pouring pot
- old wooden spoon
- wicks
- votive molds
- wick pins
- flutter dies
- fragrance

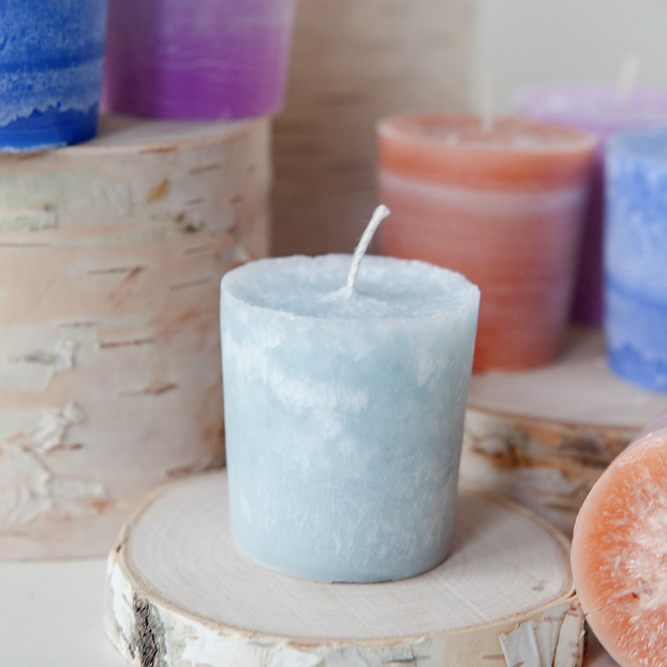
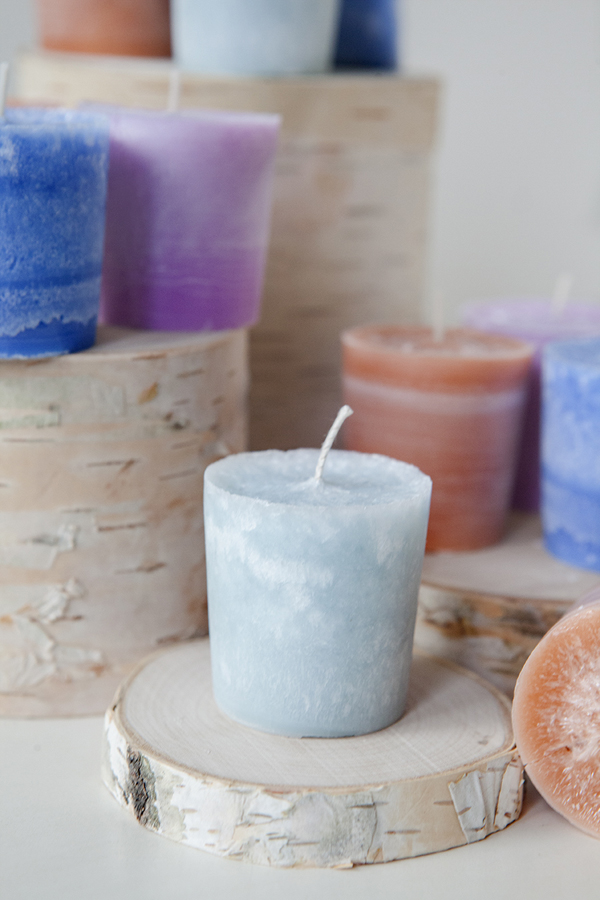
///// CRYSTAL PALM WAX /////
It’s beautiful and unique. It melts wonderfully and is very easy to work with. Each candle will have a different (crystal – feathered – marbled ) appearance that gives the votives a rustic look. The imperfections and unique lines give them charm. This is a clean burning wax with no soot. *Technically speaking this wax should be poured between 200 – 210 degrees, but we are keeping it simple in this tutorial and pouring it once melted. Varying pouring temperatures and molds will produce a variety of crystal shapes and sizes!
Start by melting your awesome ‘crystal palm wax’ on very low heat, stirring constantly. If you keep the heat as low as possible and melt the wax slowly, you can eliminate the need for using a thermometer – we like to keep things simple! Here we are only using about a half pound of wax. One pound makes 10 votives. Make sure to just keep stirring it ~ DO NOT let it burn or simmer!

///// FLUTTER DYES /////
To keep things simple we are using ‘flutter dyes’ to color our wax! Not only are they cute, but they are a very easy and hassle-free way to color your candles! Using 1 flutter dye per pound will give you a medium shade tint, using 2 will yield a darker color and using half will achieve a pastel look… the experiment is part of the fun!
Once your wax is almost fully melted you can add your flutter dye. The amount will be up to you… here we only added half a flutter dye to half a pound of wax (meaning the color produced would have been a full flutter to a full pound). Stir until the dye and remaining wax is completely melted as shown. Here we are using a ‘peach flutter dye’.

Remove from the heat and add your scent. You can use up to 1.5 oz of scent to 1 pound of wax. I normally use 1 oz to 1 pound – because I like to keep it simple. Stir to combine.

Ready your molds! Place the wick pins inside your votive molds on a surface where you can pour the wax. These wick pins are the place card holder for you wicks! Here we put down some parchment paper to protect the surface from rogue wax.

Now the fun part, pour your candle wax into each mold! You can do this right away… if you wait too long your wax will start to cool and it will harden in your pouring pot. If that happens, just re-melt it.

Where you stop your pour is completely up to you, some people fill them till they overflow!

This is what they look like completely cooled…

Instead of messing with ‘mold release’ chemicals… just pop your completely cooled votives in the freezer for 5 -10 minutes. The cold will perfectly release the candle wax from the mold.** This is also true for any candle holder… like if you have the remnants of a burned candle in a container – pop it in the freeze and the wax releases like magic!

Tug a little on the wick pin to remove your candle!

Then turn the candle upside down and tap the pin on your counter top a few times to release the wick pin. Carefully push down and then pull the pin out.

You can make your own wicks (details here) or purchase them. Simply slip them in the hole! Press the wick clip base firmly into the wax so that the wick stays put.

Trim the wick down as needed… and that’s all there is to it!

Aren’t they gorgeously rustic looking…

We just love the way all these turned out, aren’t you super excited to make them!!!
The flutter dyes we used were: peach, lavender, light blue and blue.
Supplies:
- cardstock
- paper punch
- twine
- 9″ tulle circles
- pen

If you are looking to turn these darling votives into little wedding favors, here is a cheap and easy way to package them.

Start by punching and then hole punching little tags…

Then write a sweet message to your guests… or design and print them from your computer.

Put each votive in the center of a tulle circle, wrap the tulle around the votive, clip with a clothespin and then tie it off with a piece of twine or ribbon…

Make sure to add your cute little tag!

So fun and so lovingly handmade. The perfect favor for the hardcore DIY bride.

As with all our DIY tutorials, if you create one of our projects please send us a picture or a trackback – We Love Seeing Your Creativity! If you use Instagram or Twitter please use the hashtag #SomethingTurquoiseDIY. Happy Crafting!
![]()
Photography: Studio 11 Weddings // DIY tutorial by: Jen | Something Turquoise // Crystal Palm Wax and flutter dyes: CandlesandSupplies.net // votive molds and wick pins: Candle Lynn Supplies via Etsy // pouring pot, scent, wicks, hole punch, hexagon punch, 9″ tulle circles, and cardstock: Michaels // nail polish: Essie – Mint Candy Apple

Comments