
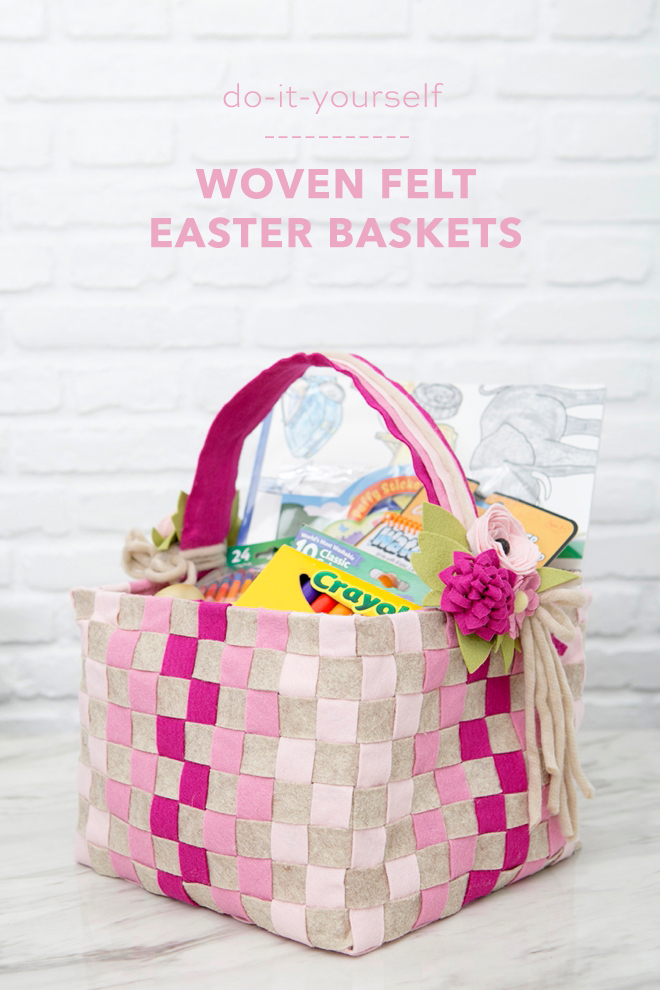
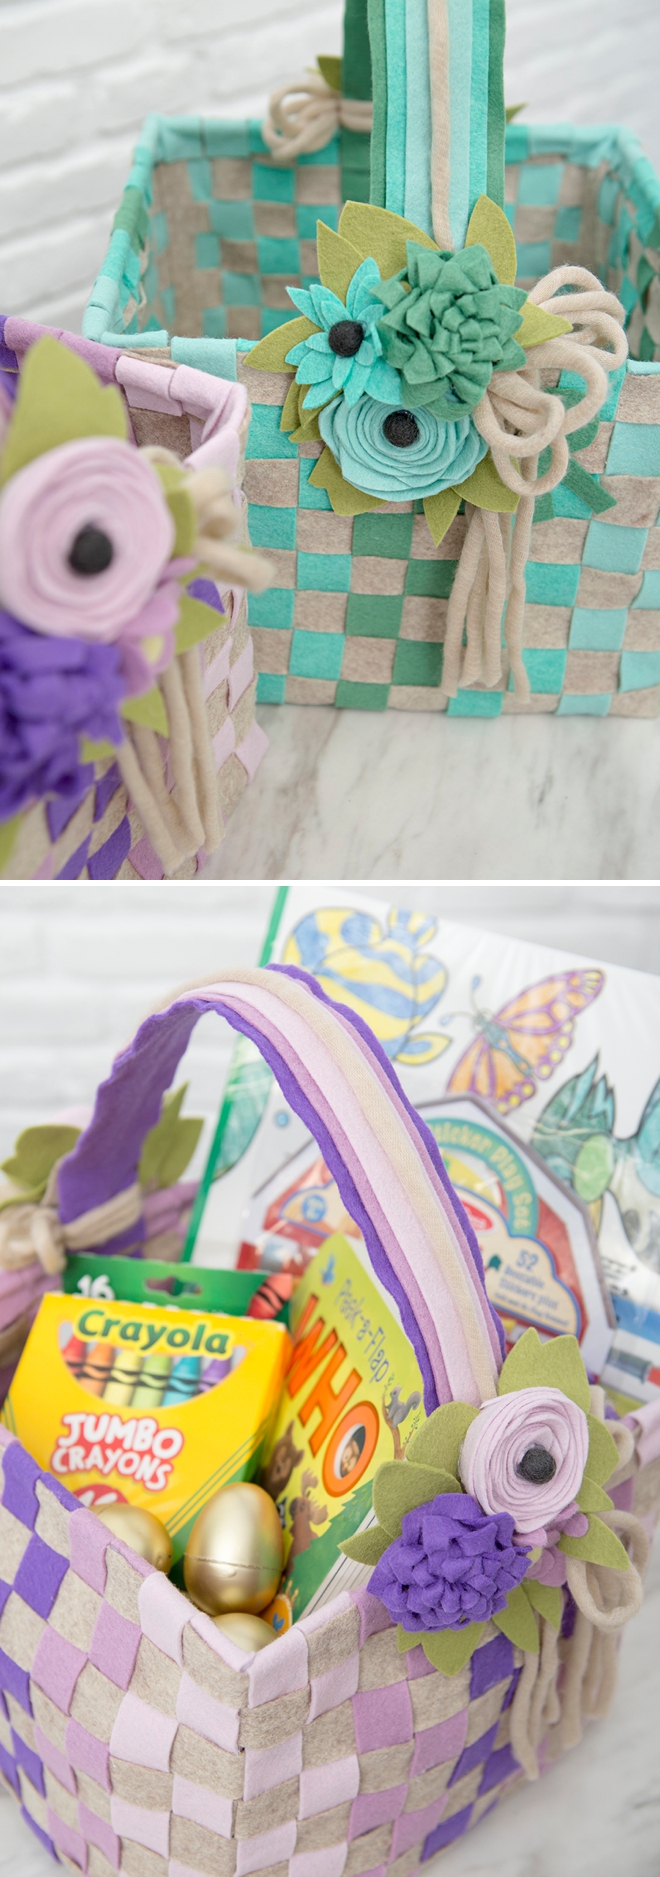
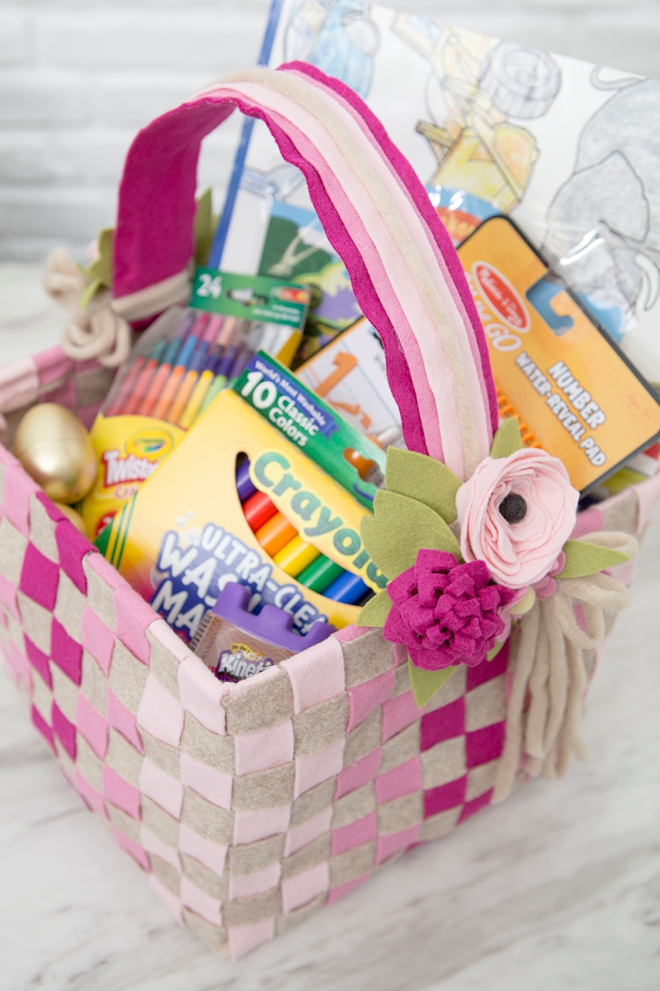
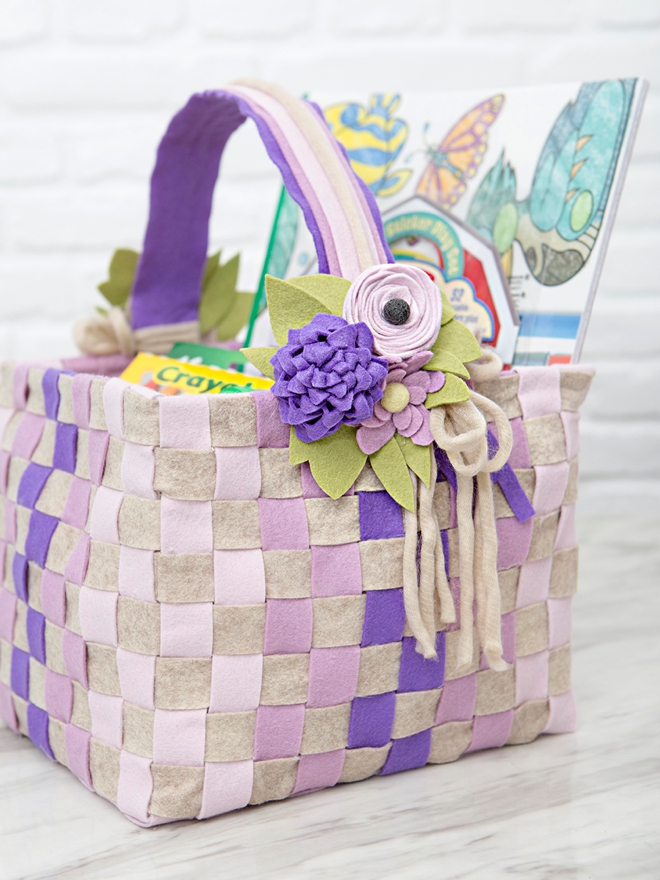
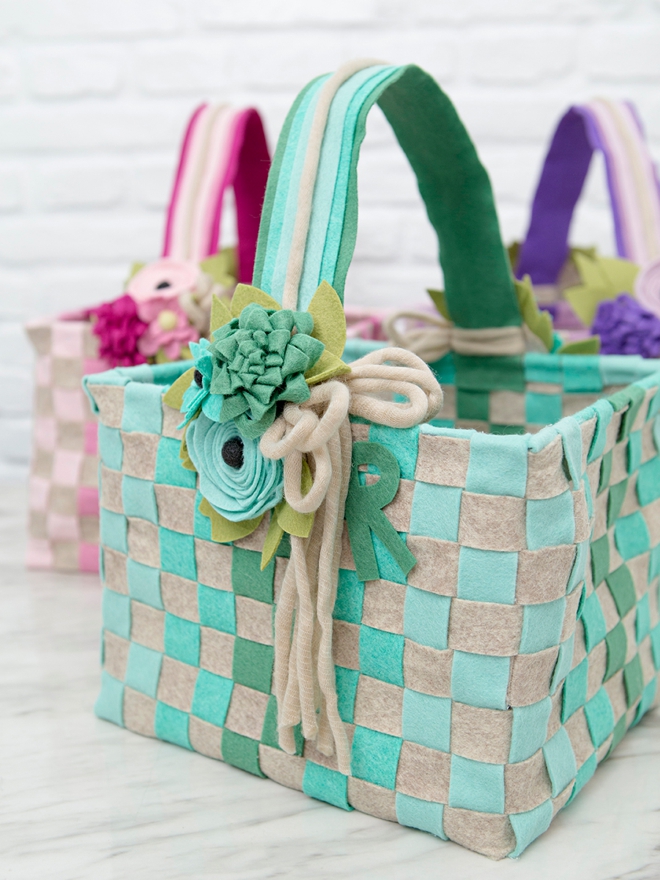
How To Make Woven Felt Baskets (Perfect For Easter!)
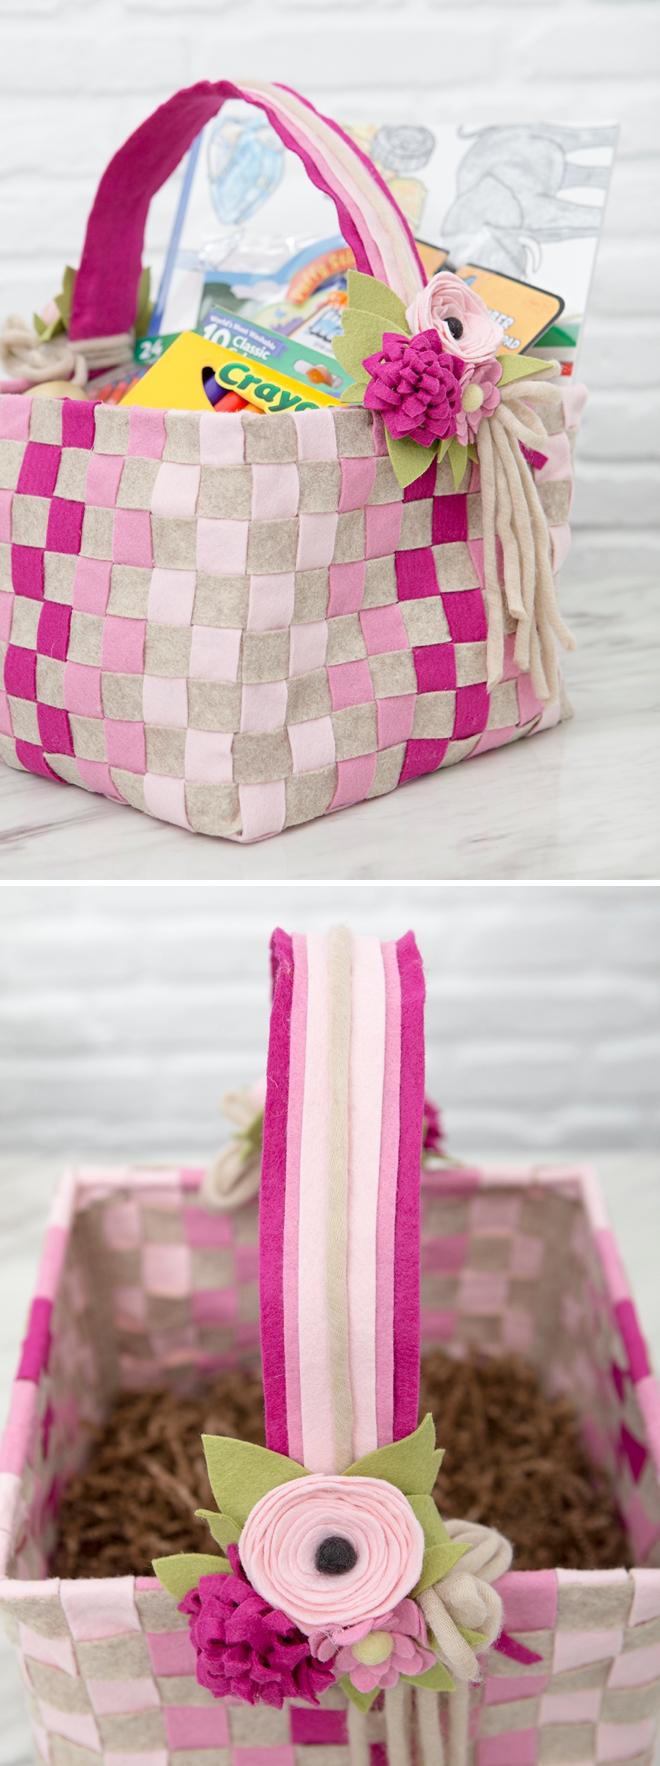
I love felt because it has SO many amazing uses! Wool felt from Benzie Design happens to be the only felt I use because it’s stunning and fabulously made. Up until today, my felt flowers have easily been my favorite felt project, but now it’s these woven Easter baskets! I made one for each of my littles and I’m looking forward to using them now year, after year. Also, if we add another babe to the family I know I can easily make another basket and not have to worry about finding something similar in the stores. This project is a labor of love but seeing as we’re all quarantined, you might have a little extra time on your hands!
Easter or Decor
Obviously these would make perfect Easter baskets but this pattern would also make terrific decor baskets. You could make one to fit magazines, kids toys, diapers for your changing table, hair accessories in the bathroom, etc. Instead of the big handle you could add small faux leather loops. With modern colors your friends will think you bought the basket from Pottery Barn!
10″ x 8″
I created this pattern using 1″ strips of felt to keep things super simple and easy. These baskets are 10″ wide by 8″ tall but you can make them ANY size you want! Use less base strips to make them smaller, and more side strips to make them taller, or vice versa!
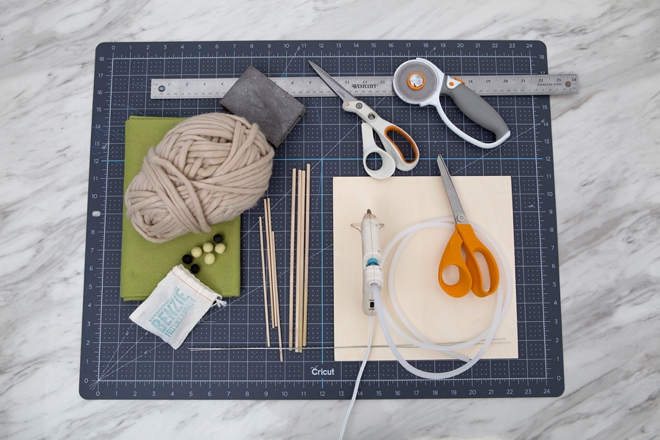
SUPPLIES:
- 1 Yard of Wool Felt (in total)
- Large Cutting Mat
- Rotary Trimmer and Ruler
- Hot Glue Gun and Glue
- 1/4” Wooden Dowels (68″ total)
- 10” x 10” x 1/8” Plywood
- 20 Gauge Floral Wire
- Ribbon or Yarn
- Felt Pom Balls
- Scissors
- Our FREE printable instruction sheet at the end of the post!
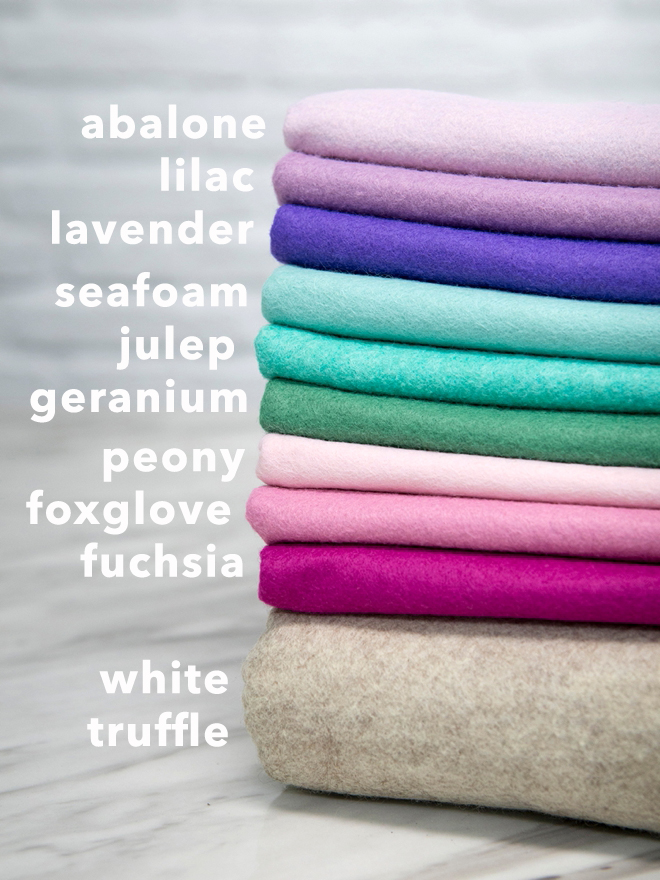
Choose Your Felt
You’ll need at least 1 yard of felt total per basket. I made three baskets; each with 3 different colors, so I ended up needing 1/2 yard of each color (9 – 1/2 yards), plus 2 yards of the light brown felt I used in all three baskets.
Benzie Design Wool Felt is simply the best. They have the most robust color options and the quality is exceptional.
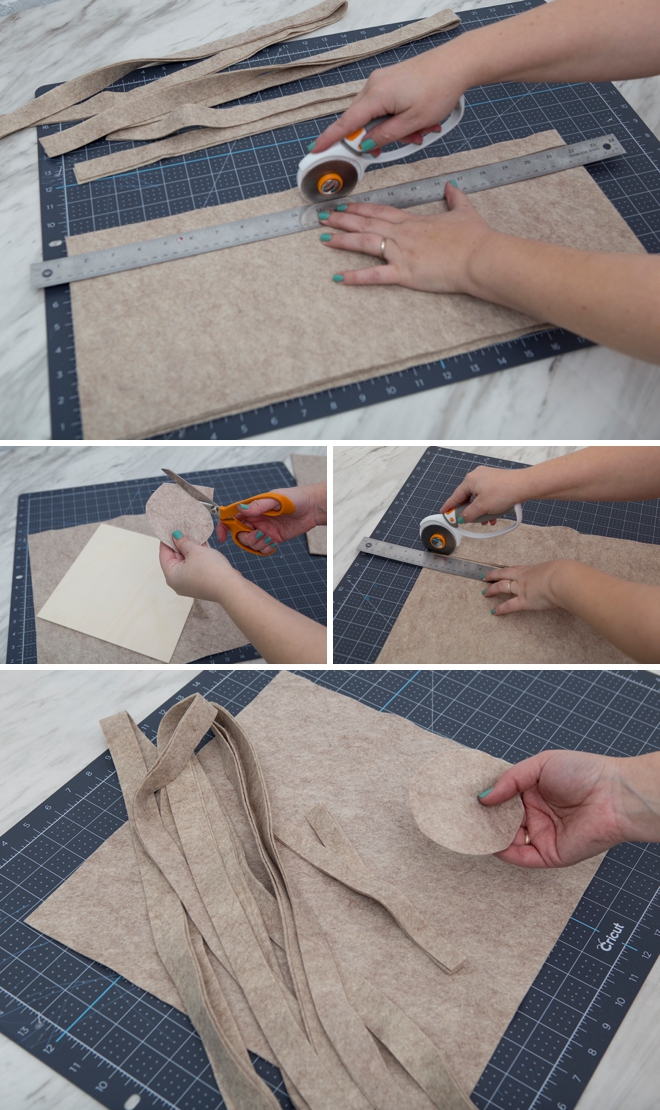
The Light Brown Felt
I’ve created a color-coded felt basket guide that you can download and print for free at the end of the post. That will definitely help when it comes time to cut everything.
First, I started with cutting all the light brown felt. I chose light brown to give the feel of a wicker basket and a cohesive look across all three. Per basket you’ll need to cut:
- Basket Strips: 8 – 42″ x 1″ strips of light brown felt
- Base: 14″ square of light brown felt
- Wood Dowel Pieces: 4 – 8″ x 3/4″ strips of light brown felt
- Base For Flowers: 2 – 2″ circles of light brown felt
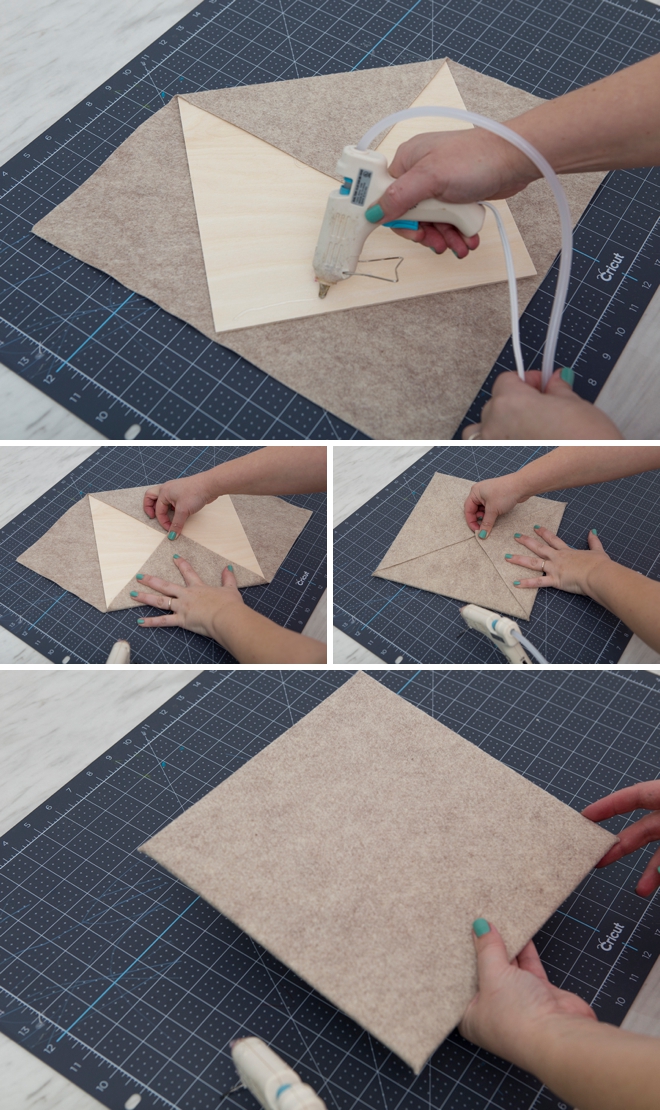
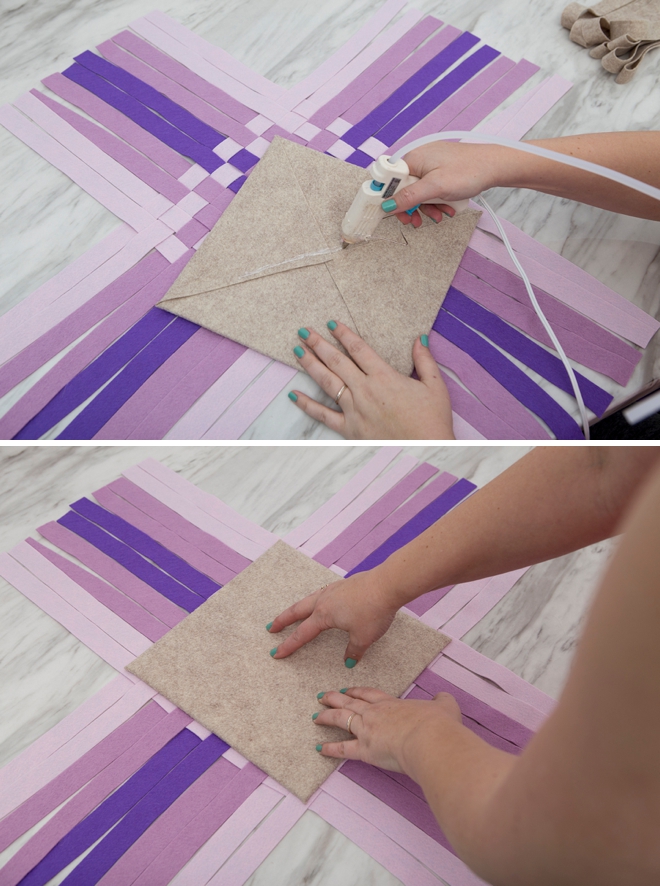
Cover The Plywood
Wrap the 10″ square piece of plywood with the 14″ felt square and secure with hot glue. Set aside.
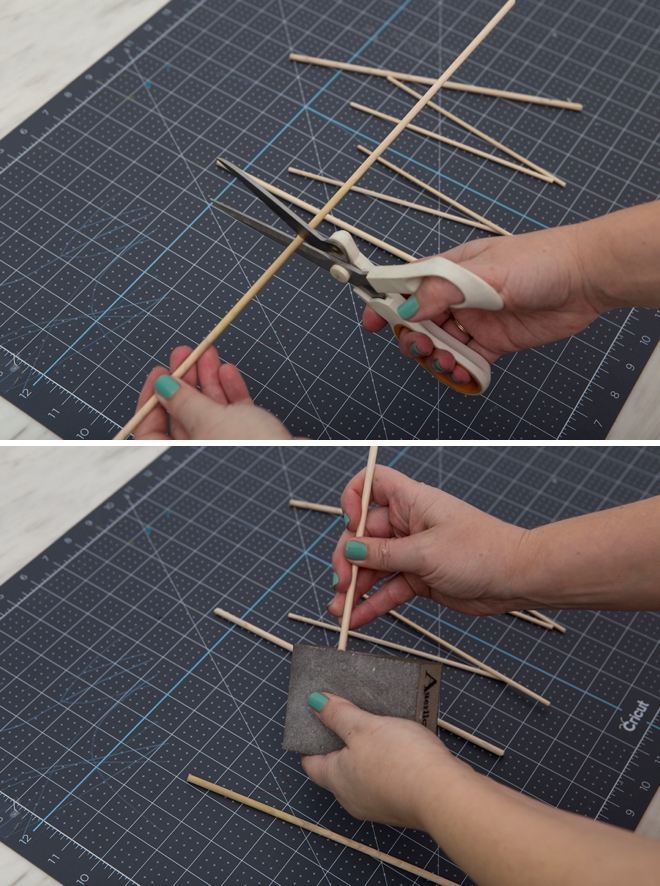
Dowels
Cut the the 1/4″ dowels down to 9 7/8″ and 7″, you’ll need 4 of each size. Then sand the edges.
Originally I used 1/8″ for the sides of my baskets and 1/4″ for the top, but then my 1.5 year old laid on her basket and snapped one of the side dowels in half.
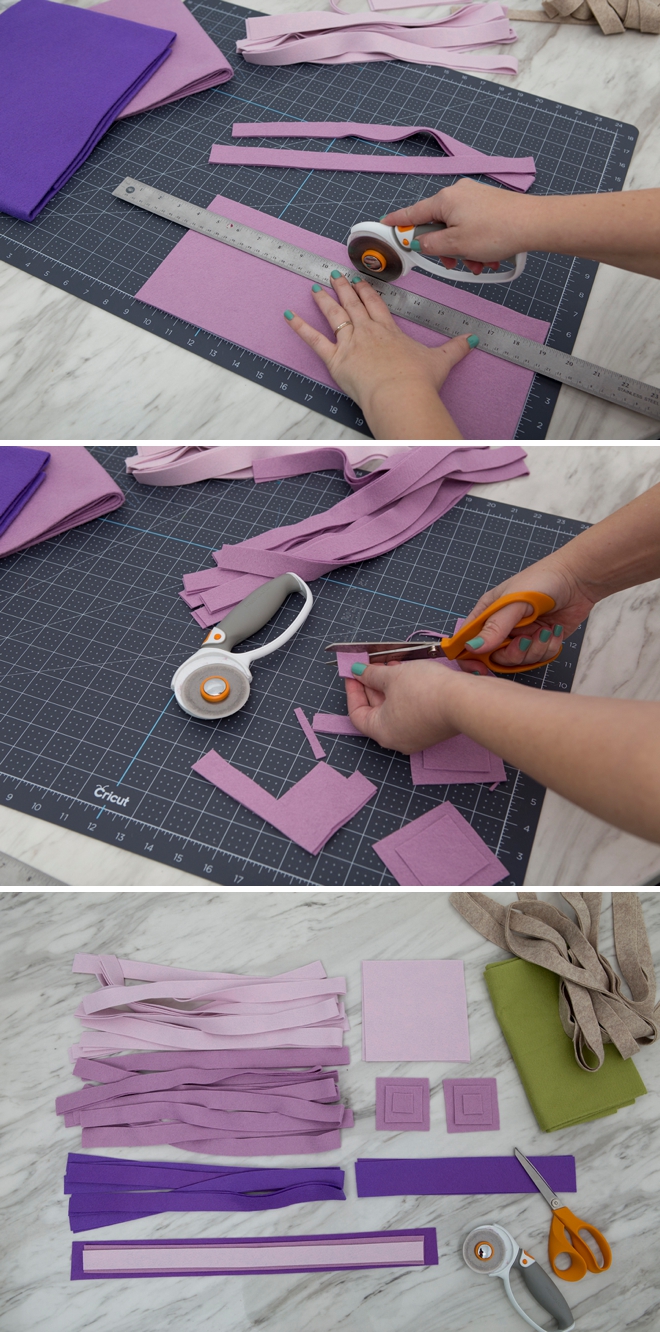
The Colored Felt
Now it’s time to cut all the colored pieces of felt! On the printable guide, I made it easy to follow along and everything is color coded. Per basket you’ll need to cut:
Handle:
– 1 – 2″ x 19.5″ piece of felt
– 1 – 1.5″ x 18″ piece of felt
– 1 – 1″ x 18″ piece of felt
Basket:
– 20 – 1″ x 30″ strips of felt
Flowers:
– 2 – 12″ x 2″ rectangles of felt
– 2 sets of 1″, 2″, 3″ felt squares
– 2 – 6″ felt circles
– 24 different shaped leaves
A rotary cutter on a large cutting mat with a metal ruler is definitely the way to go.
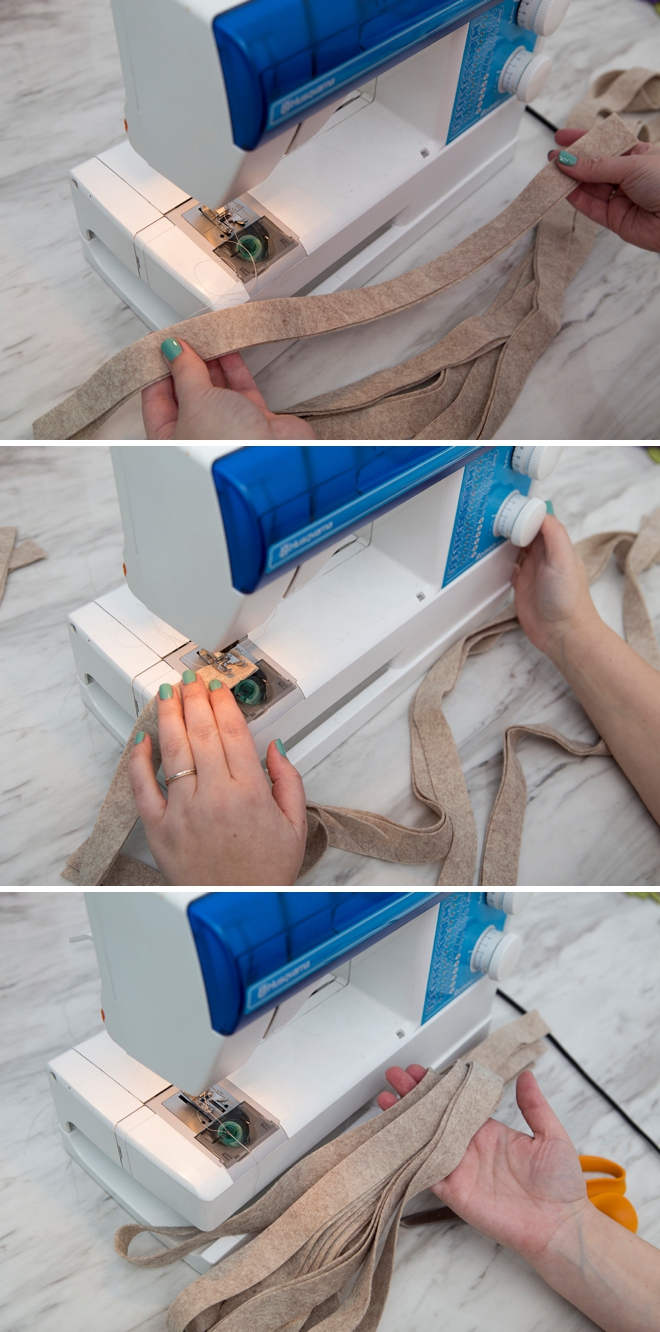
Assembly Begins
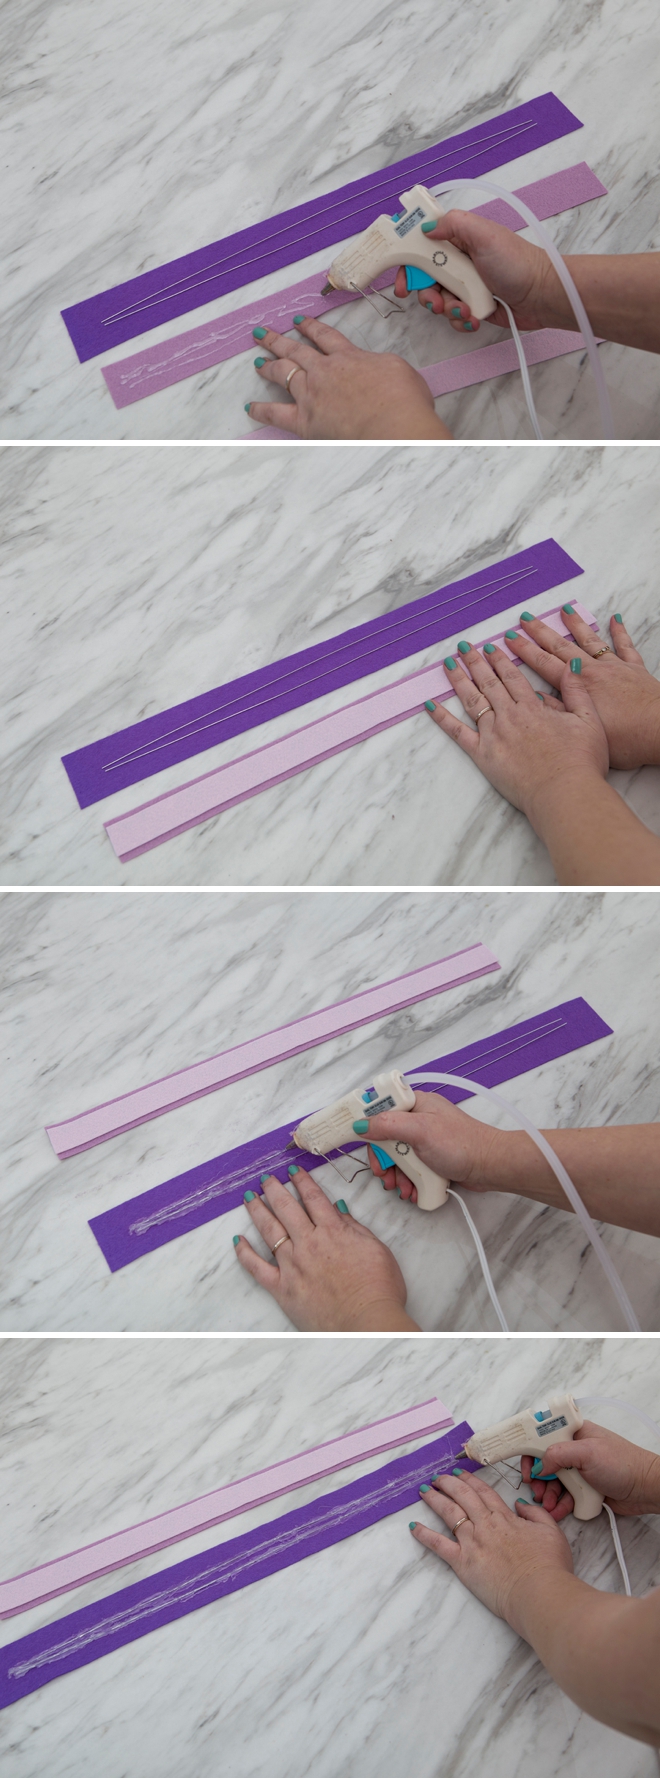
First up, we need to sew the longest pieces of felt together; this is the 1″ x 42″ pieces of light brown felt. Fold them in half to line up the edges and sew using a 1/2″ seam allowance to create a 41″ loop of light brown (or your color of choice) felt. Do this to all 8 pieces, then set aside.
Dowel Prep
Hot glue 4, 7″ dowels to the 8″ x 3/4″ light brown strips of felt. Then set aside.
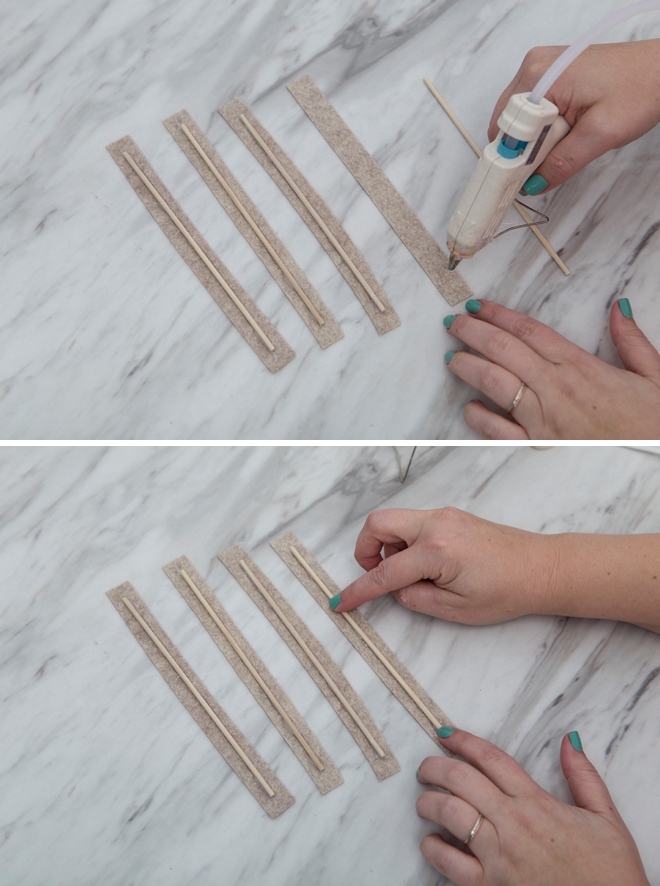
Handle Prep
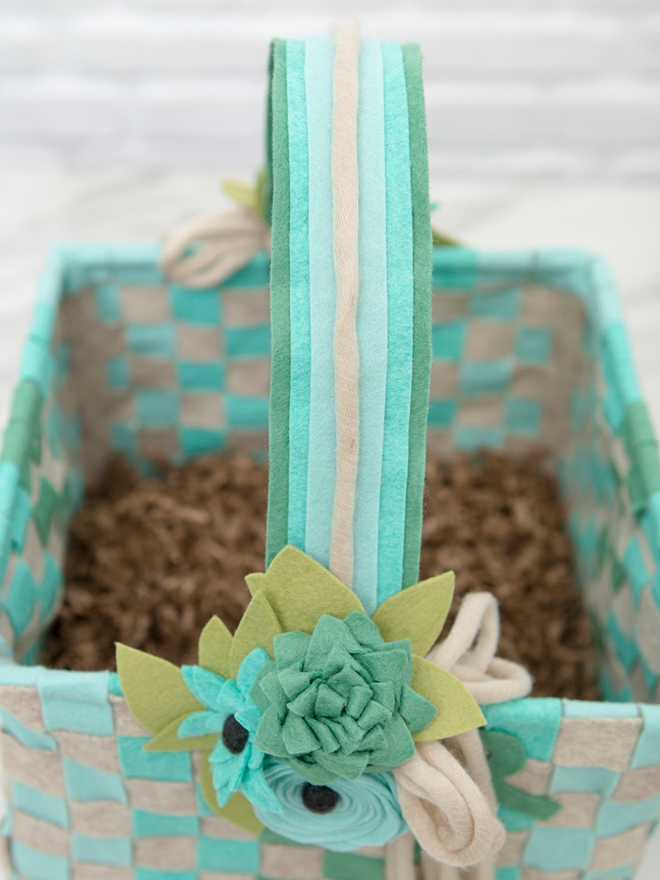
First, hot glue the 1″ x 18″ strip of felt on top of the 1.5″ x 18″ strip, then set aside. Next, hot glue two pieces of 20 gauge floral wire (cut to 17″ long) onto the middle of the widest handle strip, the 2″ x 19.5″ piece, then set aside.
Now, aside from embellishing the baskets with flowers, you’re fully ready to get to the fun part of assembly!
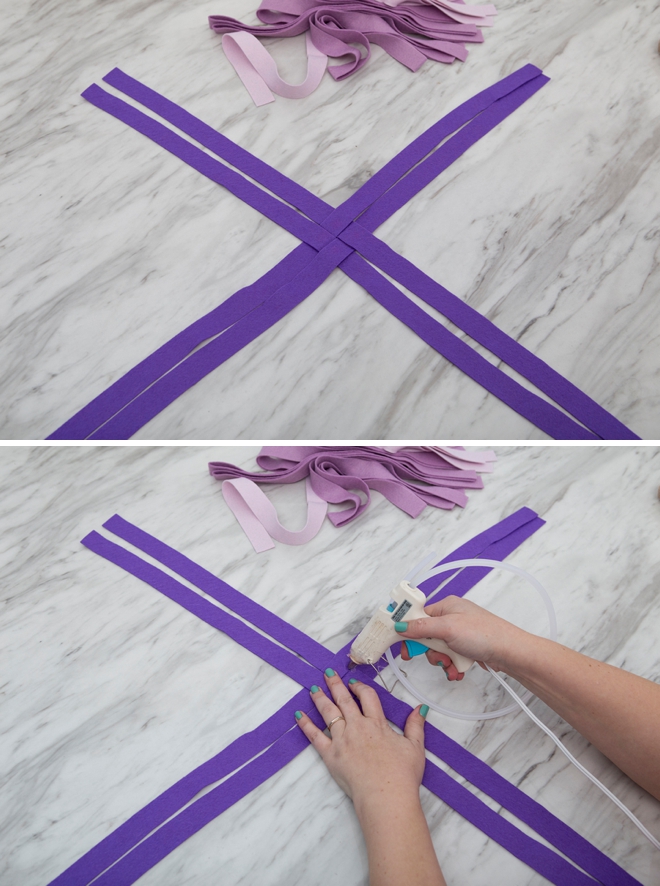
Begin To Weave
Start your felt basket weave by intertwining the four darkest colored 1″ x 30″ strips of felt. Hot glue the weave together tightly.
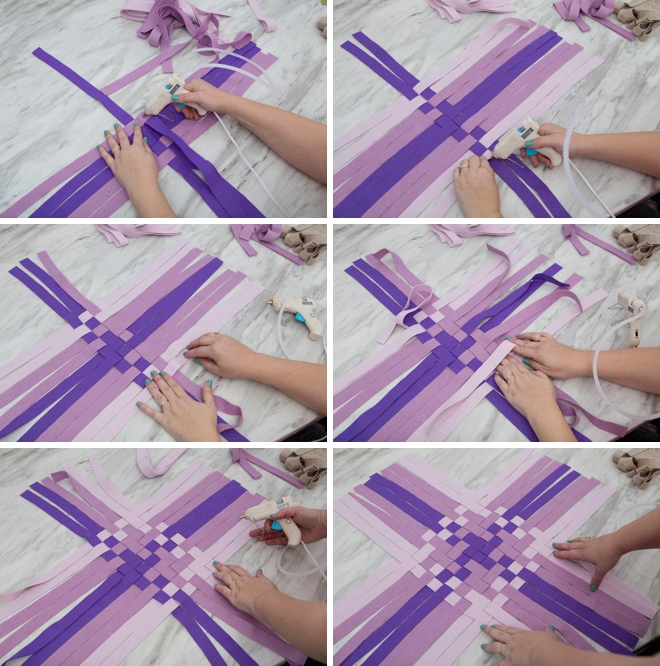
Continue The Weave
Continue adding the felt strips one at a time and adding bits of hot glue as you go to secure it. No need to use clips the hot glue is the key. You’ll get into a groove after you add a few. Your base is complete once you’ve added all 20 strips of felt.
Add The Base
Now take the felt covered plywood and hot glue it in the center of the basket weave.
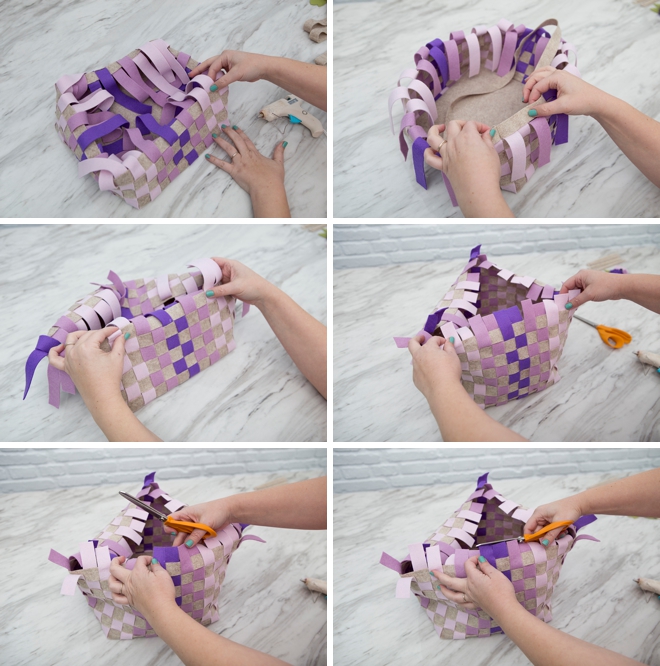
3D Basket
This step makes your basket come to life! This really is the fun part… using the same weaving technique, we’re going up! I found it easiest to take every other strip and fold it into the center. Then starting in the corner with the seam of the loop facing in, add the first long light brown loop by weaving it in with the rest. Hot glue every other square as you go. Once your first row is complete move onto the next row using the same steps. Again, after doing a few you’ll get into a nice groove…

Keep adding the next light brown loop strip until you’ve added all 8! Then trim the remaining edges to all be the same length, preserving as much as you can.
Add Felt Dowels
Next up, in each of the four corners we’re going to add the dowels that have the felt glued onto them. Simply add a ton of hot glue to the dowel side and press firmly into each corner – giving your basket much needed stability.
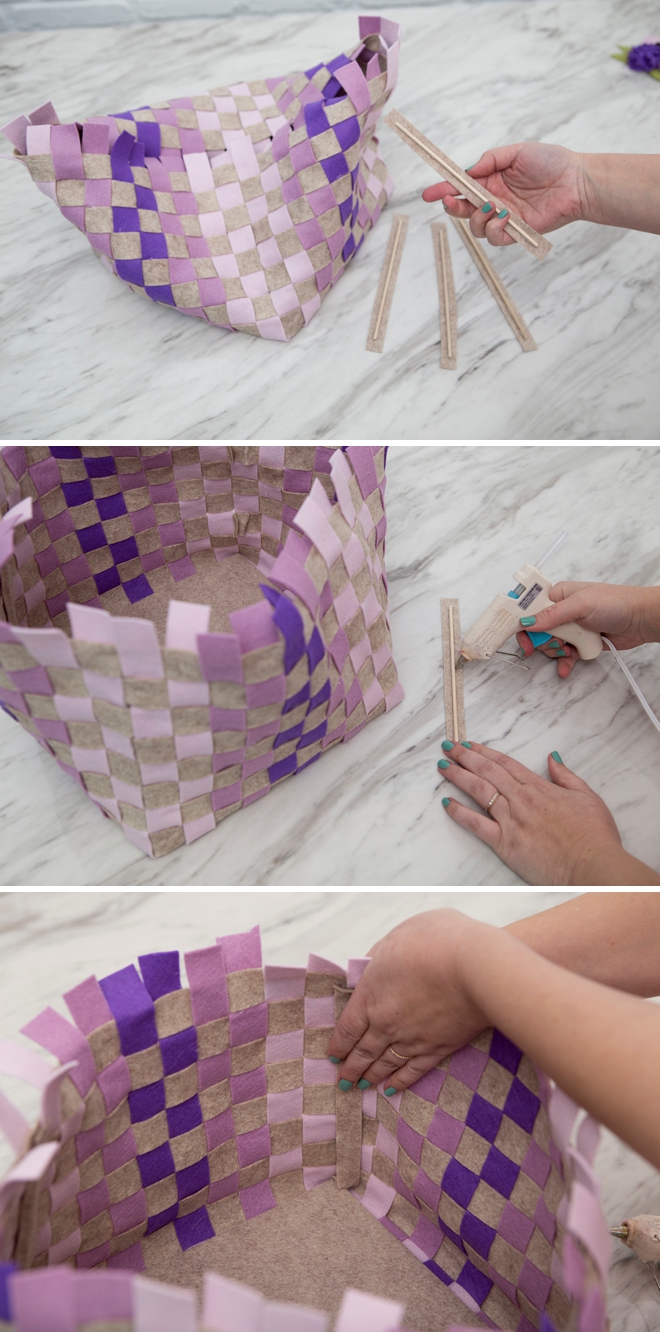
Add Top Dowels
Now we’re going to hot glue the 9 7/8″ dowels to the top of the basket sides. Place the dowel inside the basket, right at the edge. Then hot glue the free felt strip ends over the dowel to secure. Do this on all four sides. On opposing sides, leave out the two felt strips in the middle, these will be glued onto the handle!
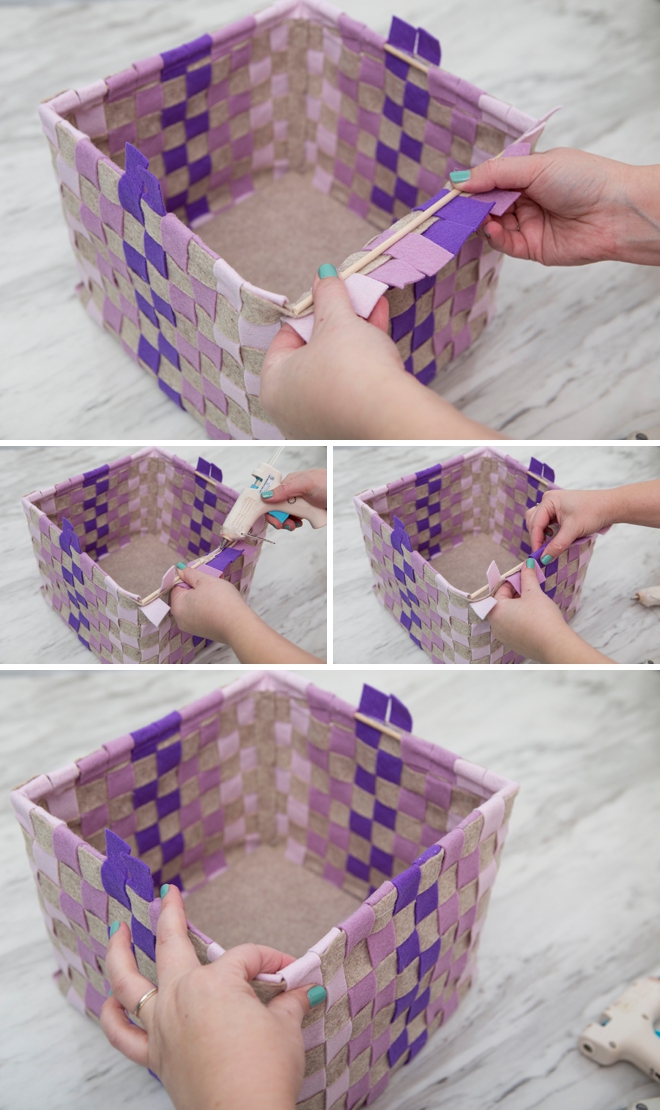
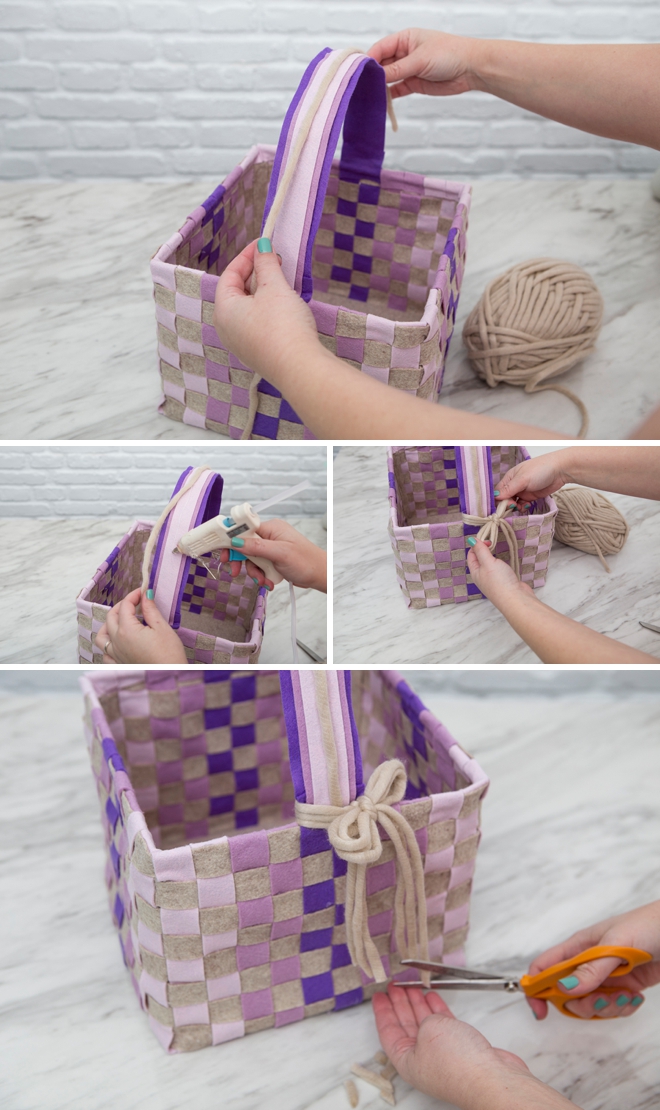
Handle Time
Take the largest handle piece, the one with the wire glued onto it and hot glue it to the free flaps on the basket sides. The flaps should be hot glued on top of the handle.
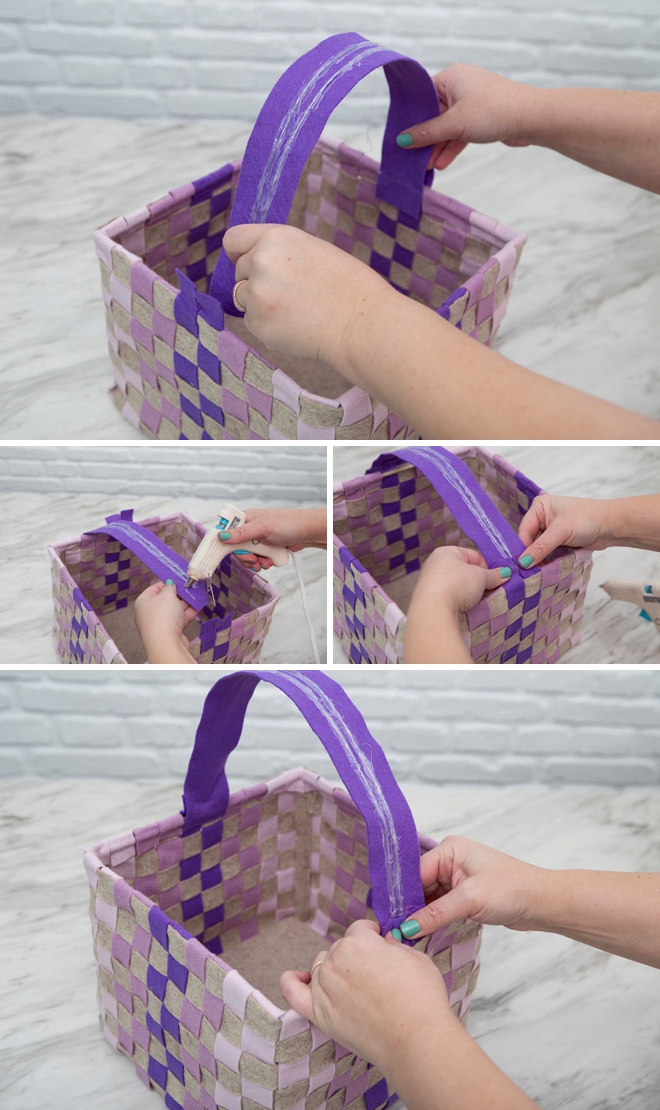
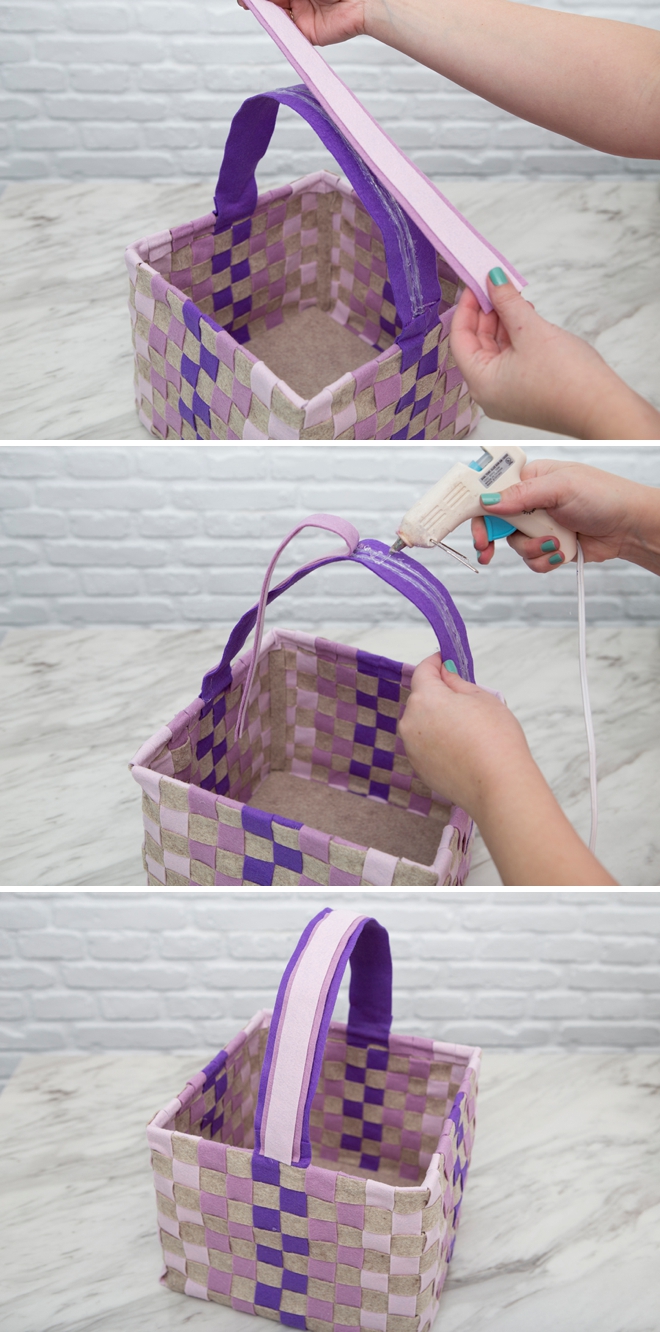
To finish the handle, add the two layer piece on top of the wired felt with hot glue.
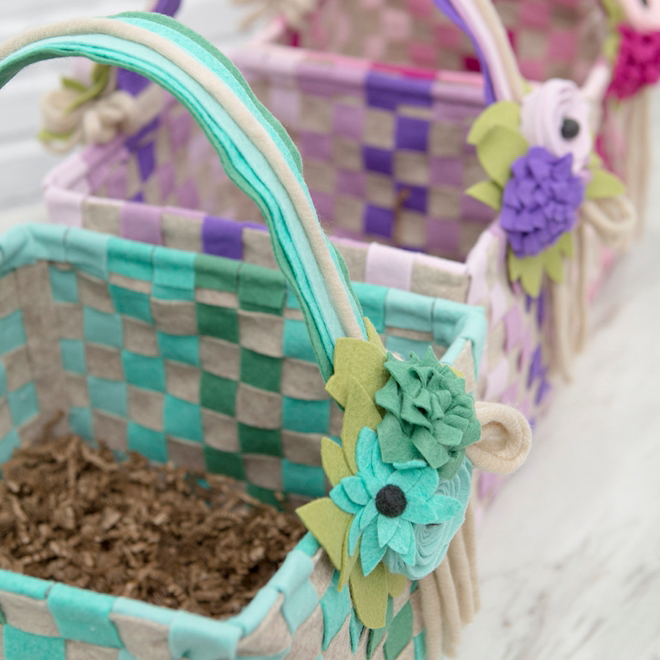
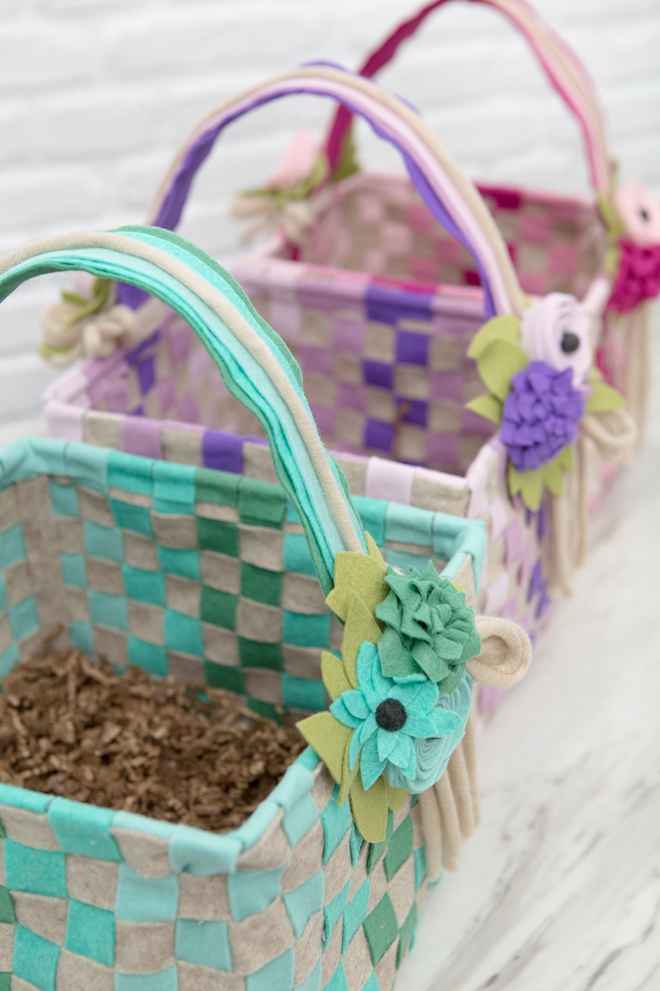
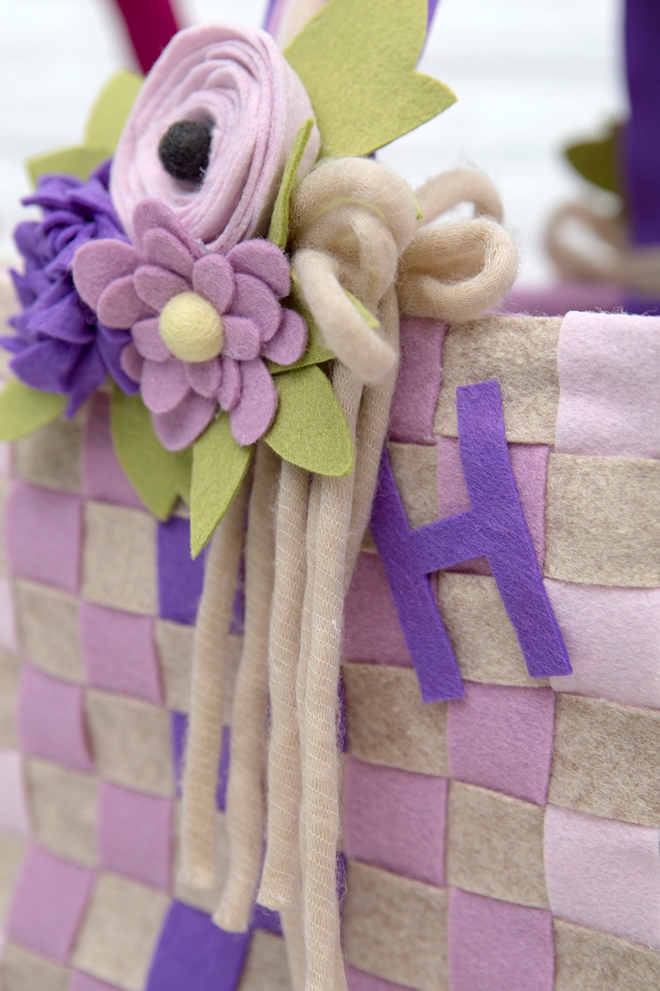
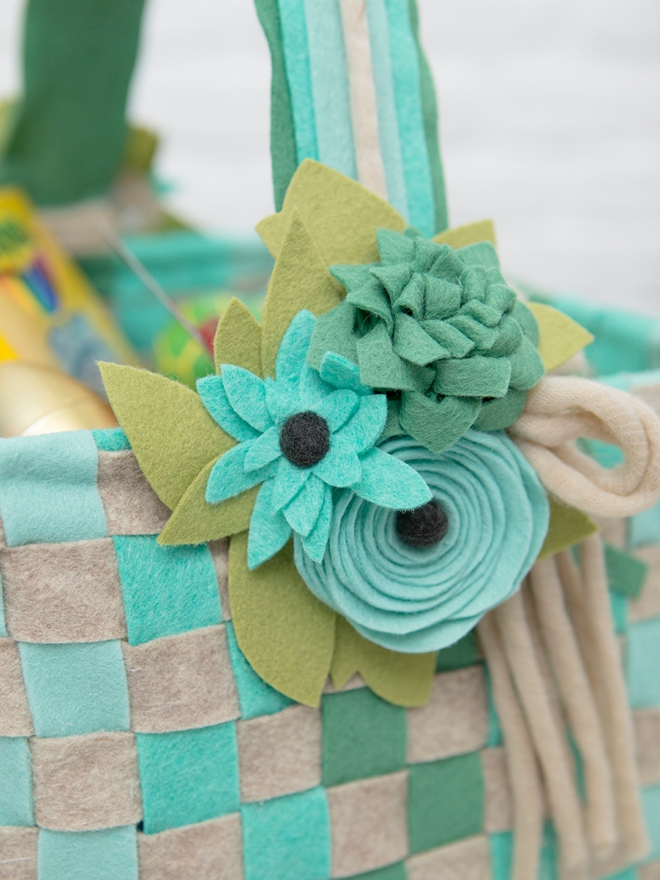
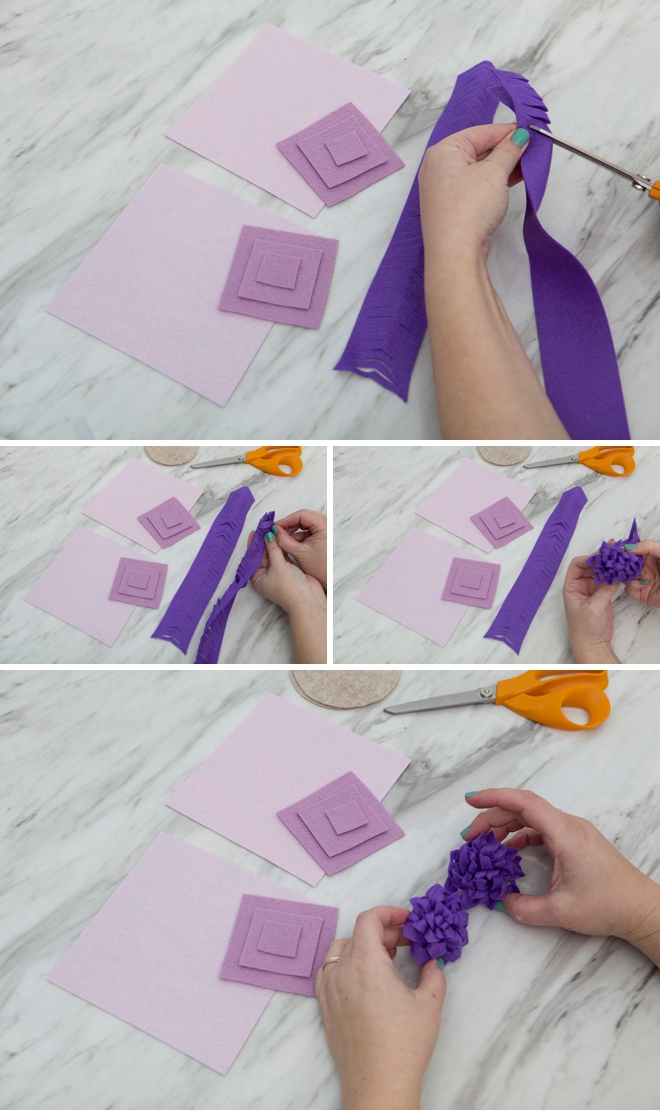
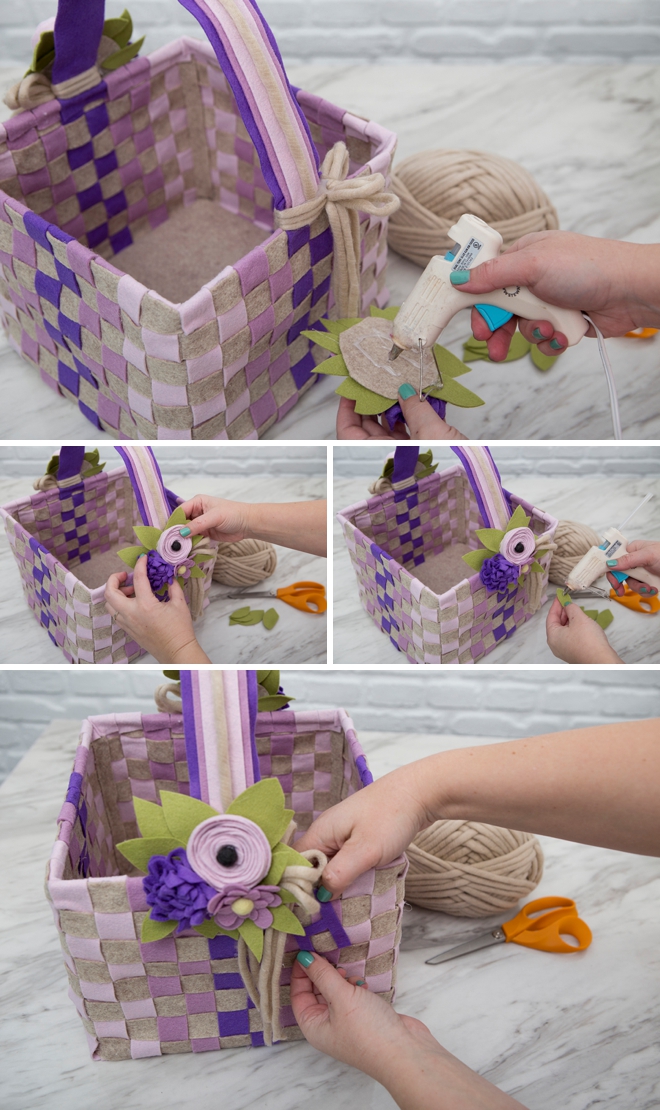
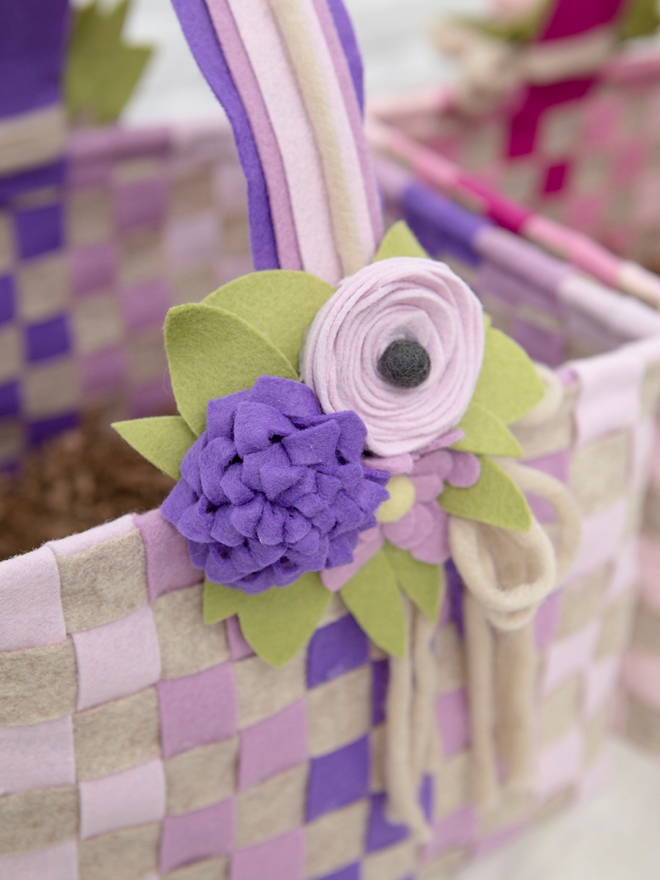
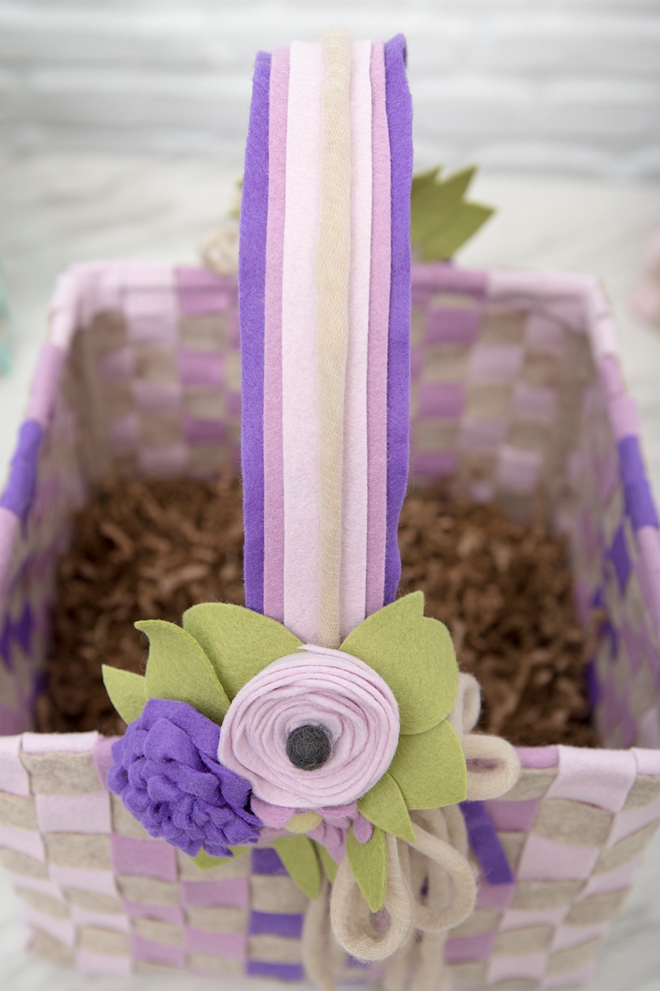
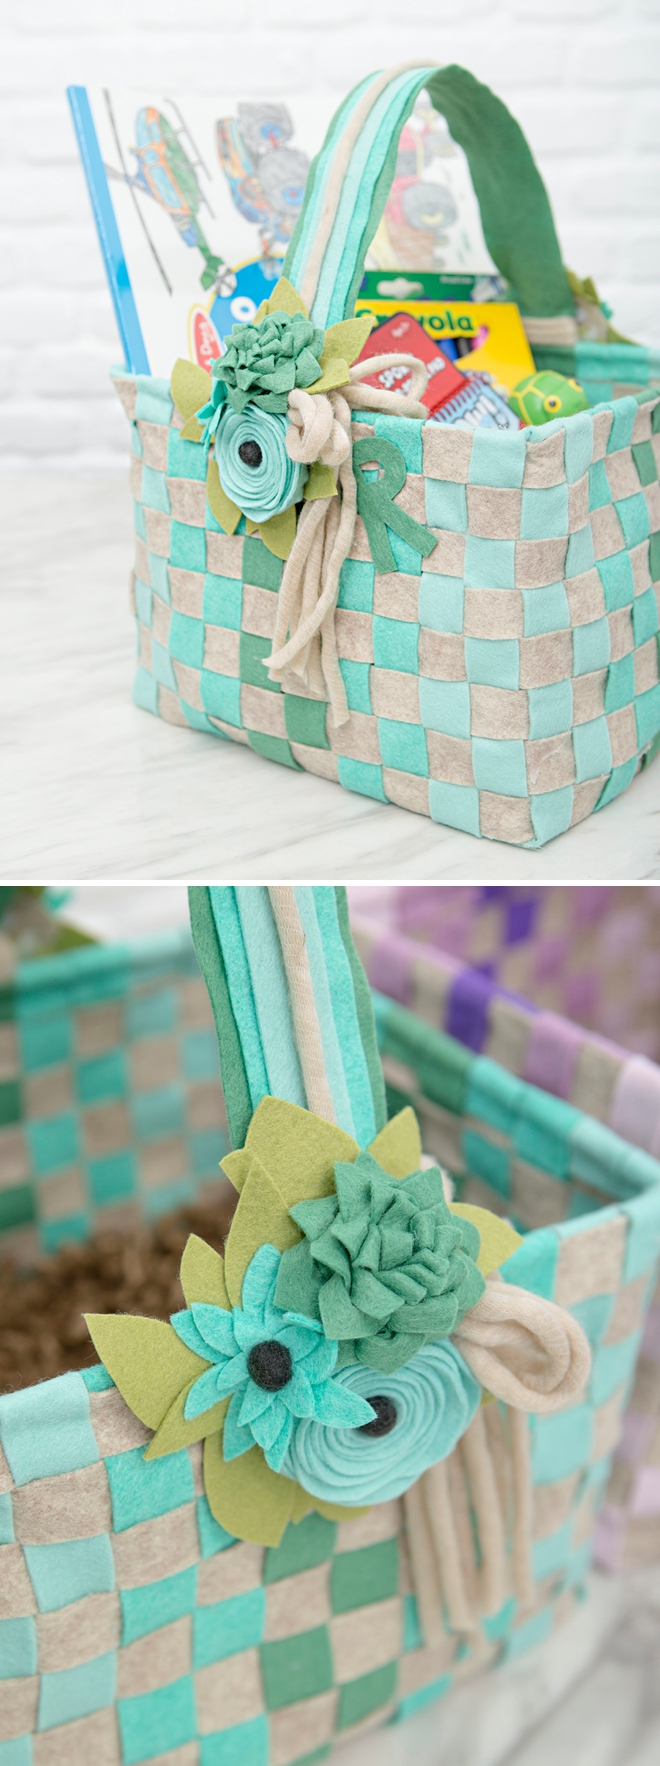
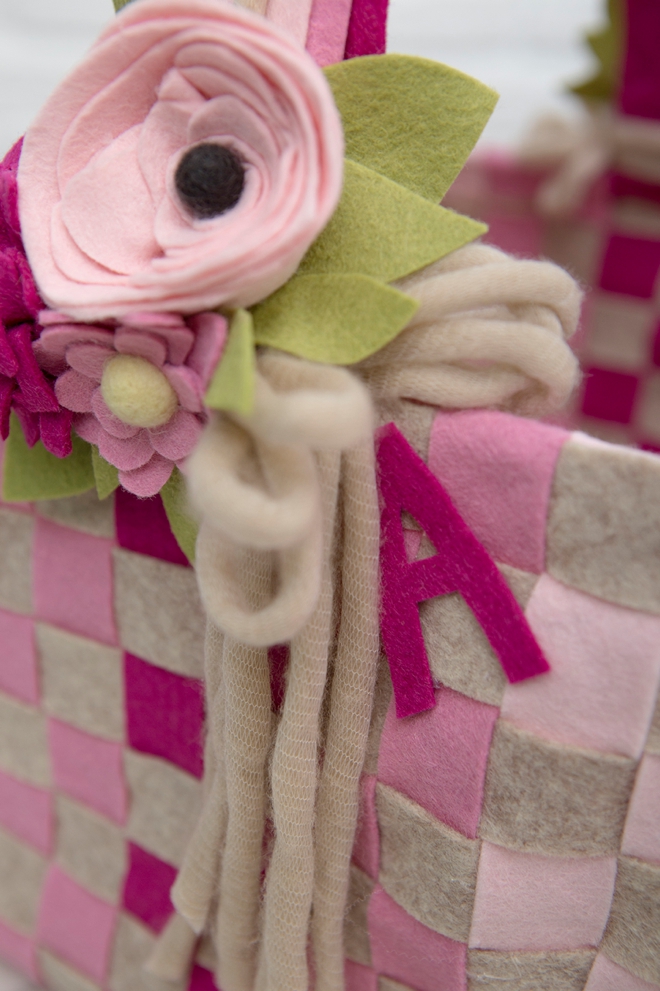
Felt Flowers
If you decide to adorn your baskets with felt flowers, you can make these 3 super easy versions or any of these! I made two sets of three flowers for each basket.
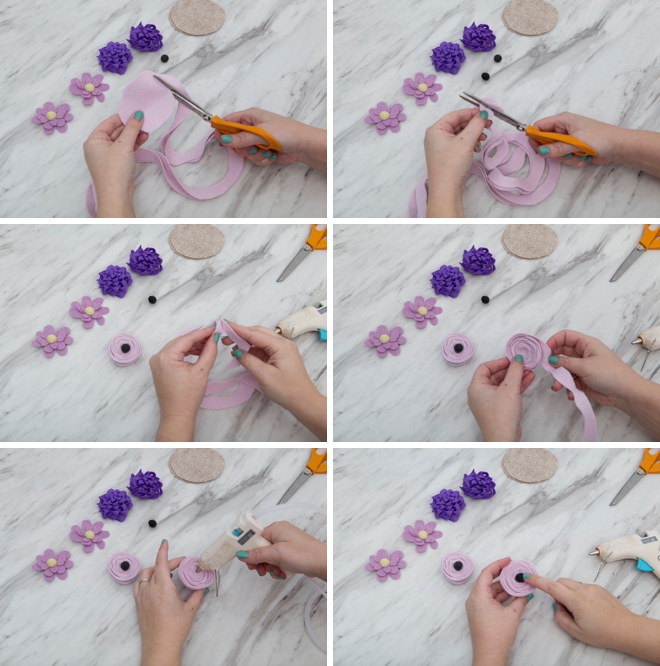
First one is the rolled rectangle. Start by folding a rectangle in half, then cut little notches in it, all the way down. Then wrap and roll it from one end, glueing as you go to secure.
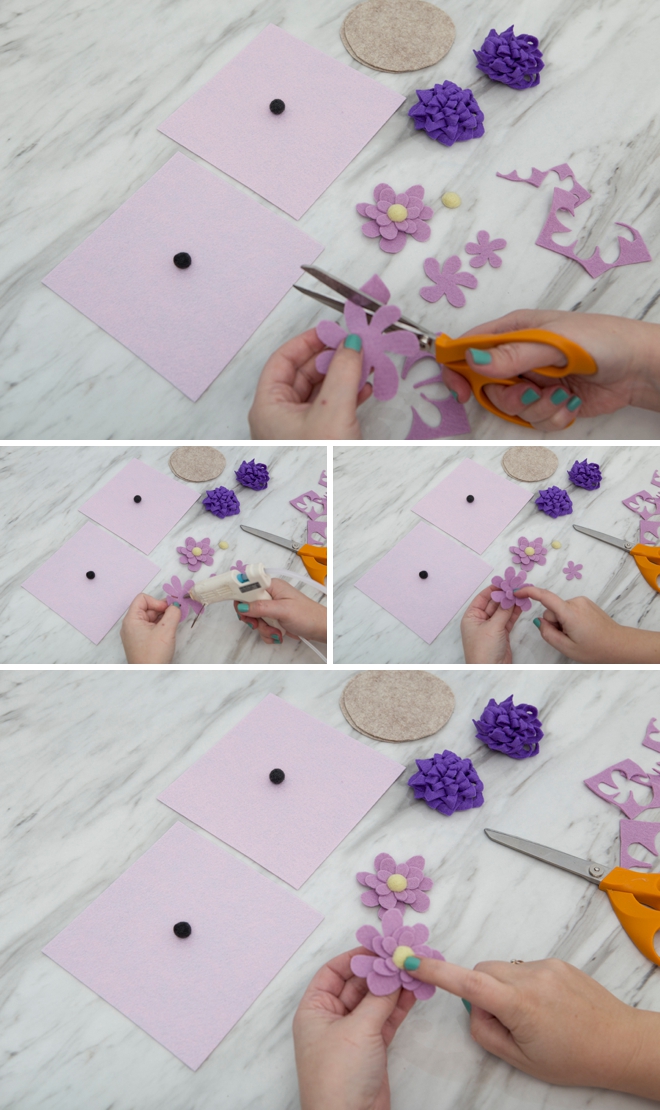
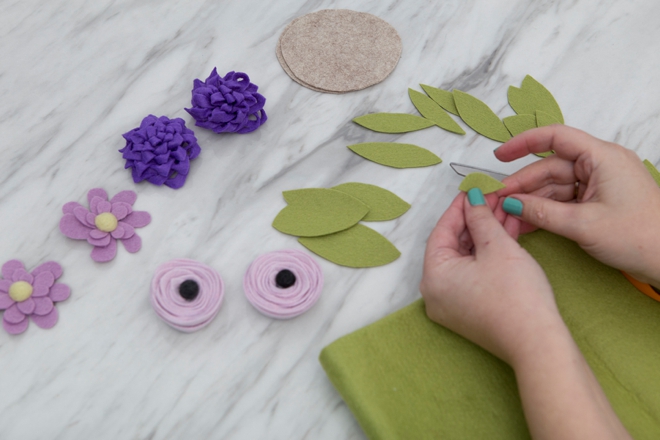
Hand Cut Flower
Next up is the hippy, hand-cut flower with three petals. Start with the 1″, 2″ , 3″ felt squares and cut a flower like the kind you would draw in elementary school. Glue 3 of them together and add a felt pom center!
Rolled Circle
Similar to the rolled rectangle, start with a 6″ felt circle and cut a wavy spiral into it. Then starting at the center point, wrap and hot glue it into a flower shape. Finish with a felt pom center!
Cut Some Leaves
You’ll need about 24 leaves total, 12 for each side. I made three different shapes.
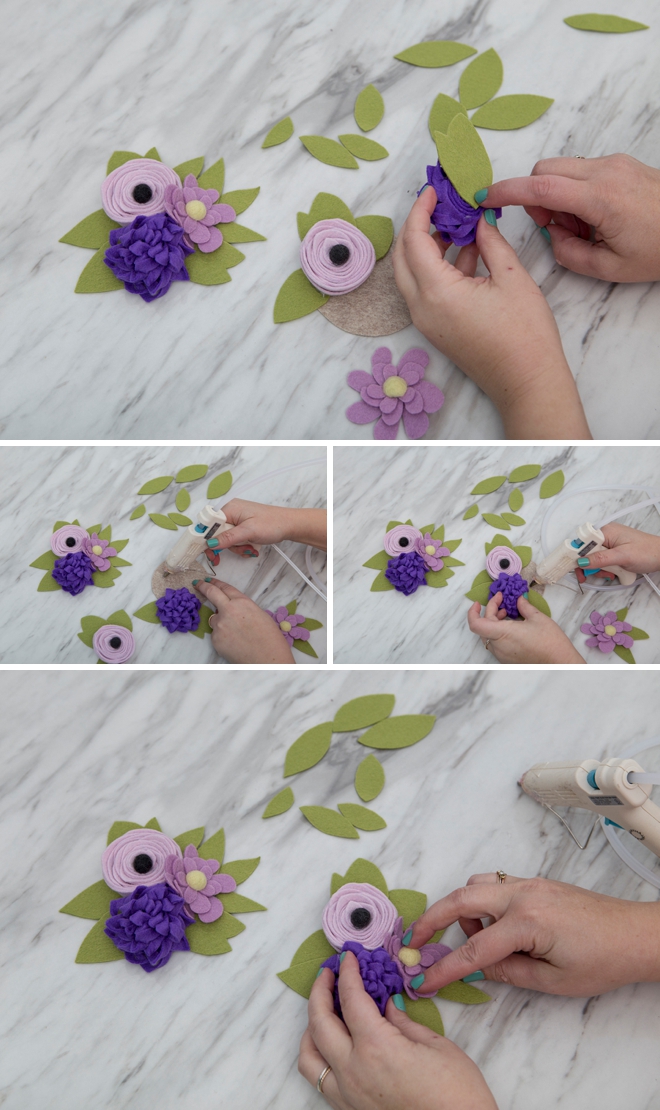
Flower Arrangement
Add leaves to your flowers and then assemble all three flowers together and glue onto the 2″ round light brown felt base. This makes the ideal surface to glue onto the basket.
Add Yarn
I found this beautiful yarn in my stash that perfectly matched the light brown felt so I added a strip down the center of the handle and tied bows on the side. Hot glue to secure.
Last Step…
The last step for this labor of love is to glue the little felt flower arrangements onto the sides of the handles! Ugghhh, I’m so in love!!! You can also add a little felt initial for your babes name if you please.
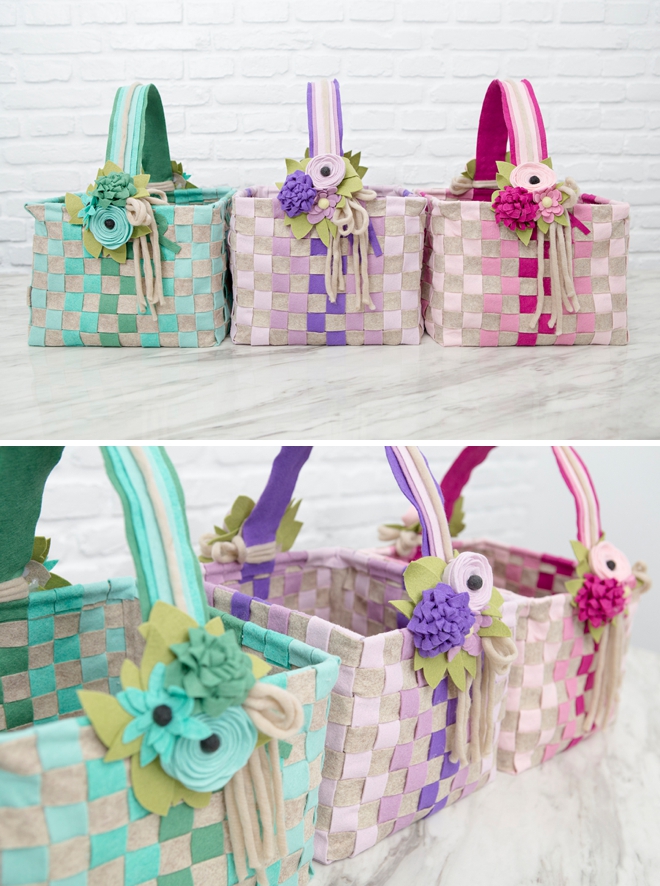
Keepsake Baskets
My mom handmade our Easter Baskets and we used them year after year, even into our late teens. They were so special that she still has them! I hope that these baskets will stand the test of time like the ones that she made.

If you create one of our projects, please share a picture with us on Instagram or Twitter using the hashtag #somethingturquoisediy, we regularly reshare our favorites! Your profile will need to be public for us to see it otherwise, you can always DM us!
DIY Tutorial Credits
Photography + DIY Tutorial: Jen Causey of Something Turquoise // Wool Felt: courtesy of Benzie Design // Wood Squares: Amazon // Hot Glue Roll: Amazon // 1/4″ Wood Dowels: Lowes // Yarn: JoAnn // Rotary Cutter: Fiskars // Fabric Shears: Fiskars // 20g Floral Wire: Michaels
Shop The Supplies:
Find the supplies you’ll need for this project from our affiliate links below:


Comments