
DIY | easy reception chair signs
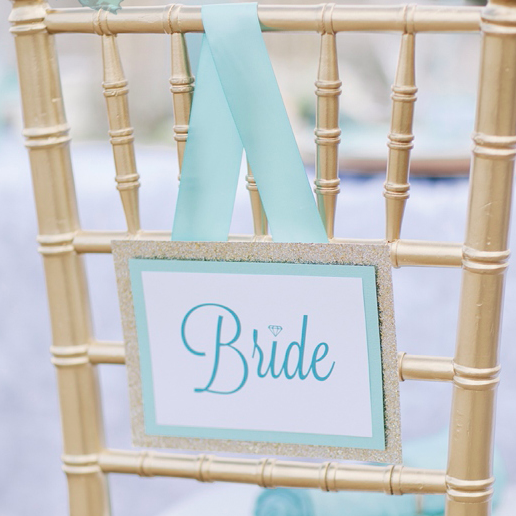
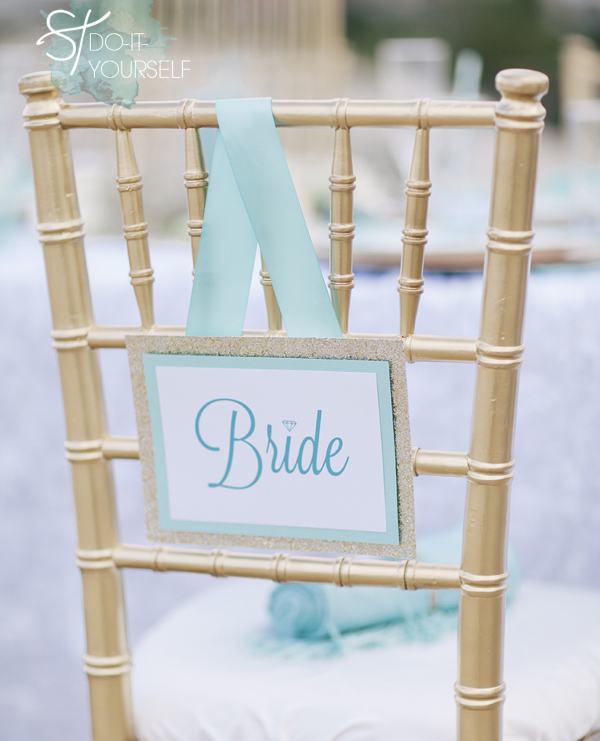
I absolutely adore the new tradition of ‘reception chair signs’… there are so many amazing ways to embellish your wedding chairs and they are all just darling! But, my personal pet-peeve of this new trend is when super cute signs just hang off one corner of the chair… you all know what I’m talking about! So when the photographer takes a picture of the bride and groom sitting in the chairs you can’t read the ‘Mr & Mrs’ – one sign has to be shot from one direction and the same thing with the other, no good. So here is a very simple way to make a reception chair sign that will work with absolutely any chair – and of course hang right where it should! …this is our last DIY project from our special Seaside Bridal Shower…
SUPPLIES:
- Two different colors of 12″ x 12″ scrapbooking cardstock
- One piece of 8.5″ x 11″ cardstock
- Paper trimmer
- Glue Dots
- Foam Adhesive Circles
- 2″ ribbon
- brads and eyelets… along with hole punch and eyelet setter
- large needle (or paper piercer like below)
- stapler
- pencil

Start by designing your own signs on the computer or downloading ours below; they are available in the turquoise shown or gray! The font we used is called Lavanderia from LostType.com (sorry the diamond on the bride sign is not from the font – it was us!).
Print them onto your 8.5″ x 11″ cardstock of choice.
BRIDE: turquoise or gray ///// GROOM: turquoise or gray
MAID OF HONOR: turquoise or gray ///// BRIDESMAID: turquoise or gray

The trim and border size of each sign is completely up to you! Cut out the wording first, then place it onto your colored cardstock and mark where you want to cut, then cut out the colored layer of cardstock.

Using Glue Dots, apply your ‘word’ layer to the colored cardstock.

Do the same for the next sheet of colored cardstock, in this case ours was gold glitter paper! But don’t attach your ‘word’ card just yet!

Here’s where we get super crafty! Cut at least 18″ of your ribbon. Using a hole punch, punch two holes at one end of the ribbon. CRAFTERS TIP // Even this super strong Crop-a-Dile hole punch couldn’t completely punch through the ribbon – and that’s a good thing! We want ribbon fragments for the eyelet to hold onto! I know it looks weird but it works!

Next, set an eyelet in each hole using your choice of eyelet setter – I prefer the Crop-a-Dile.

We are making a removable ribbon end to our chair sign! So that when at the venue – you can easily wrap the ribbon around the chair back and secure it onto your sign!

Once the two eyelets are set, you can trim a fresh edge on the ribbon and proceed. Lay the ribbon onto the back of your largest piece of cardstock, in this design it’s the gold glitter paper. Lay it out imagining it hanging from the back of the chair… so at a slight angle..

Draw two little dots inside the eyelet holes, this is where we will add brads to the cardstock.

Pierce your paper with a large needle or paper piercer, on top of a soft surface that will accept the needle – I just used a nail buffer.

Place two brads through your freshly pierced holes – making sure the movable ends are on the backside of your sign. Don’t worry the brad heads will be covered up later!

We just created a simple, removable ribbon end for our chair sign! Now it’s time to make the permanent end. Lay the opposite end of the ribbon onto the card, 2″ – 3″ away from the eyelet end and fold it under…

..then staple it a few times! This will be the permanent end.

Now you have a permanent end and a removable end to your ribbon! To attach the eyelet end of the ribbon to the sign, simply thread the brad ends through each eyelet and then open the brad ends! This sign will stay secure on your chair all night long!

The backside of your sign is now complete!

For a little depth, apply foam adhesive circles to the backside of your ‘word’ card and adhere the card to the glitter backside of your sign!

Ta-da!!! Beautiful, simple reception chair signs that can be easily added to any chair!

Once at the event, simply wrap the ribbon around the top of the chair and secure it to the backside of your sign using the eyelets and brads… it’s that simple!

Most of the time we see these signs used for wedding receptions and only for the Mr & Mrs… but why not do this for your bridal shower as a fun treat for your besties! Anytime there is a chair with your name on it – you feel special!

As with all our DIY tutorials, if you create one of our projects please send us a picture or a trackback – We Love Seeing Your Creativity! If you use Instagram or Twitter please use the hashtag #SomethingTurquoiseDIY. Happy Crafting!
beautiful photography: Studio 11 Weddings // DIY tutorial + FREE design downloads: Jen | Something Turquoise // gold chivari chair rentals: BeDazzle My Events // All cardstock, ribbon, Glue Dots, foam adhesive circles, Crop-a-Dile, brads and eyelets: Michaels // font Lavanderia: LostType.com // nail polish: OPI liquid sand in Get Your Number
Click here to see the entire ‘Seaside Bridal Shower with Martha Celebrations‘

Comments