
DIY | escort cards + menu options
So you have decided to give your guests menu options, and you are asking for their decision upfront – on the RSVP card. What happens when the guest writes; one fish and one chicken… how do you know who ordered what? This mini- envelope escort card makes it extremely easy for the guest to show the wait staff what they ordered and you don’t have to think twice about it – plus they are ridiculously adorable!

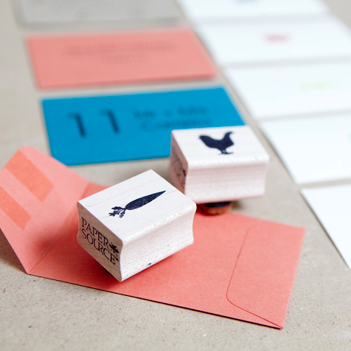
Supplies: Mini-envelopes, Business Cards, and Menu Rubber Stamps from Paper-Source {envelopes below shown in khaki, peacock, and persimmon; business cards in superfine soft white}, stamp pad colors according to your taste… and either a printer or a nice pen or pencil.

Start by reviewing your guest list and adding up how many of each entree has been ordered. Your menu might not offer all the options below… but the stamps are just so darn cute – I am sure you will come up with a reason to use them again {newlywed dinner party maybe?}. Once you know how many of each entree you need, count out that many business cards and ready for some rubber stamping!

Using each stamp and it’s chosen color, make a card for each entree that has been ordered. I chose vibrant colors for each type of entree because it will be a clear sign for the wait staff to see the guests entree of choice.

My stamp colors are: Poultry: Ochre by Color Box // Beef: Brown by Color Box // Pork: Stucco by Color Box // Veggie: Green by Studio G // Seafood: Robin’s Egg by Color Box.

Aren’t these little cards adorable!

Ok… now here’s the tough part. If you are computer savvy like me, you can design and print your mini-envelopes straight from your computer… here is what mine looked like laid out in my Print Shop Program. Also, most printers now have adjustable printing guides that hold your paper. These mini-envelopes are the smallest paper my printer can hold, 3.5″ x 2.25″.

Once your guests names and table numbers have been printed or written on each mini-envelope…

…then fill with an appropriate menu card for each guest and seal… display at your reception.

So darn cute and the color possibilities are absolutely endless!


So easy!

If you aren’t computer savvy, you can always hand write your guests names and table numbers… or maybe even have someone calligraphy them…

Love.

As with all our DIY tutorials, if you create one of our projects please send us a picture or a trackback – We Love Seeing Your Creativity! If you use Instagram or Twitter please use the hashtag #SomethingTurquoiseDIY. Happy Crafting!
![]()
Photography: Studio 11 // Diy: Jen | Something Turquoise // mini-envelopes, business cards, and menu stamps: Paper-Source // stamp pads: Michaels // great print shop program by Borderbund // nail polish: same

Comments