I am in love with today’s DIY. It’s a very special way to ask your besties to be a part of your special day! Don’t just blurt it out… “Will you be my bridesmaid!!??” Take time to plan something nice for your friends… they are going to have to put up with your every demand for the future months. Treat them to something nice like this special box below…
SUPPLIES:
- bridesmaid tank top
- personalized champagne glass (find our DIY tutorial for it here)
- a split of champagne
- fun gift items
- cute diamond paper weight
- paper maché 7.5″ square box
- two colors of 5.5″ tulle ribbon
- tube from some old wrapping paper
Start by marking lines on the top of your box to create guides for stamping.
Since our stamping is aligned at the right, I started stamping from the right side; or backwards.
If your box top is like mine, it might sag a little towards the middle… make sure you apply even pressure with your stamp.
I always like to test out each stamp along the way… check twice and stamp once.
Keep stamping until it reads, “Will you be my…”. I’m not the best speller and sometimes I forget what letter is next, especially when working backwards, so write out on your scratch paper what exactly you are stamping.
Since the box had a slight texture to it, I had to fill in some little spots with a fine black marker.
When your ink is finally dry, carefully erase your guide lines.
Now we are going to start wrapping! Begin with one of your ribbon choices and measure a piece long enough to span through your box and be able to tie a bow over your present. Tape your ribbon to the bottom of the box so it won’t slip on you.
Now, prepare your tissue paper. Measure the width of your box so that the fold of your tissue paper will be the exact length you need.
Next we will roll the bridesmaid tank over your wrapping paper tube so it will stand up when placed in the box. I used an old tube of wrapping paper and cut it with a serrated knife to the width of my box. Fold the edges of the tank inward, so that when rolled up, the tube will perfectly read ‘bridesmaid’.
I folded the top of my tank underneath the tube and kind of tucked the edges inside the empty tube. The beauty of rolling the tank around the tube is that it will stand up for your friend to read the word ‘bridesmaid’.
Then carefully place the tube into your present box and add all your other fun gifts.
Next, fold in your tissue paper and tie your ribbon bow.
So cute!!!
Now we will tie the outer bow. Measure both your ribbon choices and start your bow from the underneath of the box.
Carefully tie a bow and fluff it out.
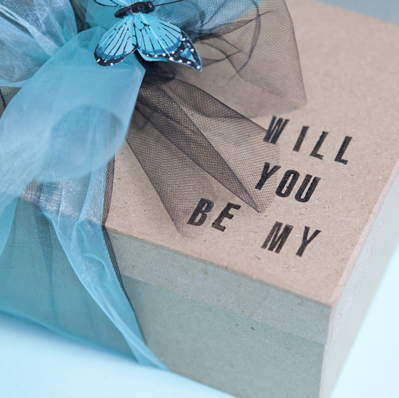
For the finishing touch we are adding a cute little butterfly (also from Michaels). Using Glue Dots (my fav!) apply one to the backside of your butterfly and stick it to an area on your ribbon. Glue Dots are extremely strong and your butterfly will definitely stay stuck wherever you put it.
Thats it! Isn’t it adorable!!!
As with all our DIY tutorials, if you create one of our projects please send us a picture – We Love Seeing Your Creativity! If you use Instagram or Twitter please use the hashtag #SomethingTurquoiseDIY and it will show up on our Get Social page. Happy Crafting!
DIY Tutorial Credits
Photography + DIY Tutorial: Jen Carreiro of Something Turquoise // // paper mache box, bridesmaid tank top, turquoise diamond paper weight, turquoise butterfly, ribbon and stamps: Michael’s // DIY glitter champagne glasses: Something Turquoise // champagne spits: Ralphs // wine bottle bar tools key chain: WeddingStar, ages ago
Comments
Vivienne @ The V Spot
October 14, 2011
Adorable!
John | Shutter Nonsense
October 14, 2011
Looks great , are you going to do one for the Best Man ? Great pictures
theladygives
October 16, 2011
I love it! :D
Susan Gage
October 16, 2011
Love it! Looks Familiar! - Susan
Hayrelyn
October 30, 2011
Love this! I am working on this box and am having trouble finding the champagne flutes that fit in the box. I purchased what I thought was the same box above from Michaels- its 7.5 X 7.5. The champagne flutes from Micheals are about an inch too long and all the champagne flutes at ikea are longer than 8 inches. Can you please let me know where exactly you purchased yours and possibly the brand/name?
Thanks!! HD
Jen | SomethingTurquoise
October 30, 2011
Hi Hayrelyn, sorry your having trouble - both my box and my champagne glasses are from Michaels. My box is actually 9" x 7" and my champagne glass is 7 3/4". I found the box over by the woodworking section in Michaels, not the gift wrapping section - and the glass was from the candle/mason jar area. Hope this helps! Let me know if you have any more questions.
Heather
November 11, 2011
Cute ideA love it!
Deanna
November 16, 2011
This is amazing!! I may use this idea for Christmas gifts for my girlfriends.
Megan
February 5, 2012
I adore your blog! I made a similar box to this for my bridesmaids, and they all were so impressed. Thanks for all your inspiration. I hope I will eventually get around to sending you a photo of the finished product!
Katie
February 9, 2012
I LOVE this! Could you send me the link for the instructions on how to personalize the champange glasses? Thanks so much!
Jen | SomethingTurquoise
February 9, 2012
Hi Katie! http://somethingturquoise.com/2011/10/21/diy-glam-champagne-glasses/
Hannah
May 6, 2012
I Love Love Love this!!! I was looking for a creative way to let all my girls know up front how much they mean to me when I ask them to be my bridesmaids (especially since some of them are out of town and by Phone/Txt just seems so.....lazy) And this is perfect! I adapted the idea a bit, but my boxes and it's booty is really looking adorable! Thank you so much for sharing such a wonderful and thoughtful idea!
Hannah
June 21, 2012
Hello again Jen!
Now that I have given my boxes to each of my friends, I wanted to share with you my final boxes inspired by your blog! I mentioned and link to your blog (I hope that is ok) Thank you again for the WONDERFUL idea! It really made it a very special and memorable moment for each of my friends, and it was nice to have the excuse to focus on others during all the wedding planning!
http://happilyeverhannah.blogspot.com/2012/06/will-you-please-be-my-bridesmaid-boxes.html
Have a wonderful day! ~Hannah
Jen | Something Turquoise
June 21, 2012
Hannah! You did such an amazing job! I LOVE THEM!!! Terrific step by step... and great shopping/$$$ saving ideas! Cheers!
Clara
May 8, 2012
Must do
Affordable Wedding Invitations
May 8, 2012
That is adorable, I love it!
Jen | SomethingTurquoise
May 9, 2012
I {LOVE} your invitations!!!!
jenn hall
May 12, 2012
LOVE LOVE Where did you get the split from?
Jen | SomethingTurquoise
May 13, 2012
Ralphs!
Wedding And Gems
May 23, 2012
Not only do I love the box but the way you've presented the bridesmaid gifts inside will makes a really professional impression. I've shared it on google+ as I was really impressed with the idea.
Caroline
June 12, 2012
Oh my gosh! This is EXACTLY what I was looking for to give to my girls! Thank you so much! I think they're going to absolutely LOVE it! It's beautiful!
Missy M
June 24, 2012
Cute - I saw www.bridebikini.com (also an etsy shop) has some super cute bridesmaid tank tops, as well as bride tanks with rhinestones. Much cheaper than the listing you shown! Only $19.99 :)
Kristen
June 29, 2012
I LOVE this!! I have been looking for something unique to do for my bridesmaids I love it! I am even going to make one for my photographer and mother of the bride and mother of the groom!!! Super cute ! Thank you for the idea.. I will post some pictures of mine soon! :)
Danielle
July 9, 2012
This idea is amazing and exactly what I am looking for! Cannot wait to make these to ask my girls to be a part of my big day!
Thank you!!
Carrie Schlegel
July 23, 2012
LOVE THESE! What size are the paperweights in the box? I have seen so many different sizes, and not sure which one to get. Thanks SO much!
Jen | Something Turquoise
July 23, 2012
Hi Carrie! They were about 3" in diameter I think... any cute paper weights will do though :)
Carrie Schlegel
July 24, 2012
Thank you!!!!!!
Gabby
July 26, 2012
I just love this post. I ended up doing a variation of it for my own bridal party. I even posted my results and linked your site in my blog.
Jen | Something Turquoise
July 26, 2012
Terrific! Thanks Gabby!
Lily
August 8, 2012
awesome! I will definitely do this !
Occasions In Print
September 11, 2012
What a wonderful idea! If they are good friends, they will be giving so much to you during the wedding planning. How nice to create something special like this for them.
Jennifer
September 30, 2012
I was looking for the champagne splits and can't find them! Could you post a link to the website you used? Thank you for the great idea!
Jen | Something Turquoise
October 3, 2012
Hi Jennifer! The champagne splits I purchased are from Martini & Rossi. I purchased them at Ralphs (not online) and I know that Target, Vons, Costco, BevMo and many other places carries these exact splits... but any cute splits will do!
Sarah
October 5, 2012
I did a variation of this with a couple of other things/notes.
The girls loved it!!!
Thank you!
Laurie
October 17, 2012
I wish I would have done this for my own wedding! The shirt is adorable!
Ashley
December 1, 2012
Love this, thank you so much for the inspiration. So perfect & sweet! Could you please tell me where you got the key chain?
Jen | Something Turquoise
December 2, 2012
Hi Ashley! Thanks! The link to purchase the key chains is within the post :)
Samantha Kay Smith
December 4, 2012
I'm just starting this project but instead of the plain cardboard boxes I'm using picture memory boxes sold at Micheals. That way they already have designs on them! They are only 2.46 right now!
Ashley
December 4, 2012
Thank you! To add onto Samantha's post-I am doing the same exact thing (damask boxes) and they are $1.49 at my Micheals in KY right now.
Niah
January 25, 2013
I just got engaged on NYE and my fiancé and I just picked our wedding party. I'm so excited to make these next weekend and present them in a couple weeks. Thanks for this AMAZING idea!!! :)
Hollie J. Smith
February 4, 2013
I'd like to know where you got the glasses from with the initials on them, I like that idea.
Jen | Something Turquoise
February 7, 2013
Hi Hollie, the glittered champagne glasses are one of our most popular DIY tutorials you can find it here: http://somethingturquoise.com/2011/10/21/diy-glam-champagne-glasses/
Ambie Gerber
February 10, 2013
Love this. Definitely going to do this!
Amber Harner
February 16, 2013
where did you get your sticker letters from I cant find any in this size or smaller I want to do my bridesmaid whole name.
Kristen
February 16, 2013
What a sweet project!
Amy
February 27, 2013
Hi there. This is so cute! I plan to work on these this week for my bridal party. I've never painted glass however, and I see you have to let these air cure for 21 days. This may be a silly question, but does that mean they cannot be touched at all until that time, or can I put them in their box and give them out before then? Does it just mean not to drink out of them or wash them for 21 days? Sigh. I'm just so impatient and ready to give these cute boxes out! ;)
Jen | Something Turquoise
February 27, 2013
Hi Amy! You are right! You can't drink or wash them for 21 days, but before you wrap them I would let them dry for at least 48 hours - just to make sure they don't 'stick' to any of your wrapping :)
Amy
March 15, 2013
I finally finished mine! ;) I couldn't find any pretty purple paperweights, so I used small purple candle holders instead. The girls loved their boxes! Thanks for such a cute idea!
Jen | Something Turquoise
March 15, 2013
Fabulous Amy!!!!!
Fiona
March 29, 2013
I just loved this. I did my own variation and gave them to my girls last night they loved them. I've put your link on my pin. Thank you http://pinterest.com/pin/531284087261602971/