
DIY | poured glitter tin candles
Are you in the mood for some glitter? I sure am! Here is a super fun way to pour your own candles into cute tins and simply embellish them with gorgeous shades of glitter…

These will make perfect bridal shower favors or great additions to your ‘Will you be my Bridesmaid‘ gift boxes!

SUPPLIES:
- 6oz metal tins in silver or gold ($.086 each from SpecialtyBottle.com)
- 1lb soy wax flakes (makes 4 candles)
- Martha Stewart Glitter in your choice of colors
- wicks
- Glue Dots or wick sticky tabs
- sticks for holding your wicks
- pouring pot
- old spoon (that is only used for crafting!)
- 2.5″ round labels from Paper-Source
- scent oil is optional
- **the heat embossing gun is only for mistakes

Start by adhering your wicks to the base of the metal tins. If you have never done this before, to start with your wicks need to be taller than your tin. You need to stick the wick to the bottom of the tin using an adhesive like Glue Dots or wick sticky tabs available in the candle crafting area of your local craft store. If you are having trouble with your wick sticking to the tin, make sure the tin is clean and free of any oil.

Shimmer, sparkle, shine, thank you for being so fine! Download these cute, free label designs for your tins or create your own! These are designed specifically to print onto Paper Source 2.5″ round labels. I have created a range of colors for you to download, including the labels shown. Click on each color to download and print it’s label:
Fall Colored Labels (as shown)
Red // Pink // Orange // Gold // Green // Turquoise // Blue // Navy Blue // Purple // Grey // Brown // Black

After your super cute labels have been printed, place them on each lid. The labels hang like a millimeter off the center part of the lid, so run your finger nail around that ridge to press the label down and around it.

Now the fun part! Melting the candle wax. I’m using a smaller pouring pot, so to keep things easy I started by melting half the pound of wax first. Melt your wax on the lowest heat that your stove will produce. The lower the heat the better – since we aren’t fussing with thermometers – make sure to heat your wax low and slow. If you heat and pour your wax too hot it will sag/shrink in the middle of the candle, and no one wants that!

After the half pound of wax has melted down a bit and created a little more room, add the remainder of the pound of wax and melt LOW & SLOW…

This will take less than 10 minutes per pound but while you are doing it, it can feel like forever!

Once your wax is completely liquified remove from the flame and add your choice of scent. The ratio is usually around 1oz of scent to 1lb of wax. Adding scent is completely optional.

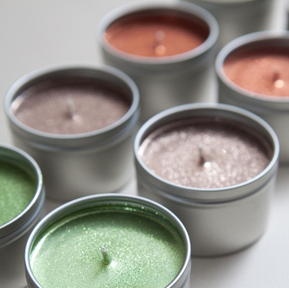
Yeah, it’s glitter time!!! I used Martha Stewarts wonderful glitter in Citrine (gold), Olivine (green), Orange Topaz, and Sunstone (brown). All of these are available in full size bottles, they aren’t exclusive to the kit above.

Carefully pour your warm wax into each tin. One pound of wax will make four, 6 ounce candle tins.

Right away, while the wax is still nice and warm pour tons of glitter into each tin. The glitter is lighter than the wax and sits right on top of it – but at the same time blends into the wax.

Keep shaking and adding glitter to the top of your candle until you are satisfied with the coverage. It gently spreads across the top of the wax to create a beautiful layer of glitter.

Once happy with the glitter coverage, use sticks or the like to set your wick in the center of the tin. After moving the wick you might need to go back and add more glitter.

Don’t worry – you cannot add too much glitter! If you feel like the glitter isn’t reaching the edges, give the warm candle tin a little shake/swirl and the glitter will perfectly work it’s way to the edges – don’t slosh – just a little swirl.

Let the candles cool for about a half day before you trim the wicks and let them set at least 24 hours before burning.

They really are as gorgeous in person as they are here. When the wax cools, covered in glitter it is so smooth and shiny – your friends will wonder how you did it!

DAMAGE CONTROL // Just like scratching any candle, if you scratch the top of these some of the glitter will come off. So here’s the fix – using a heat embossing tool re-heat the top layer of wax and simply shake on a little more glitter! This works great for bubbles and any other imperfections that can happen to the top of your candle as well. Do not try this with your blow dryer – they produce way too much wind and not enough heat.

What will they look like after they have been burned you ask?

As with all our DIY tutorials, if you create one of our projects please send us a picture or a trackback – We Love Seeing Your Creativity! If you use Instagram or Twitter please use the hashtag #SomethingTurquoiseDIY. Happy Crafting!
![]()
Photography: Studio 11 // DIY tutorial + free downloads by: Jen | Something Turquoise // 6oz silver tins: Specialty Bottle, they also come in gold! // Martha Stewart Glitter Set, ArtMinds 1lb containers of soy wax flakes, ArtMinds liquid candle scent in cinnamon, ArtMinds wicks, embossing gun and Glue Dots: Michaels // 2.5″ Round Labels in Paper Bag: Paper Source // candle pouring pot: Ebay // free label downloads in multiple colors are available above // nail polish: OPI Ski Teal We Drop + Fly

Comments