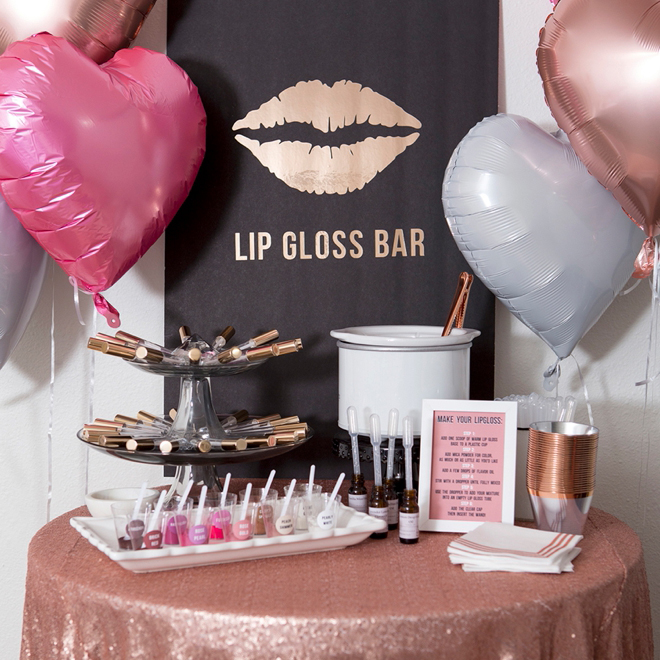

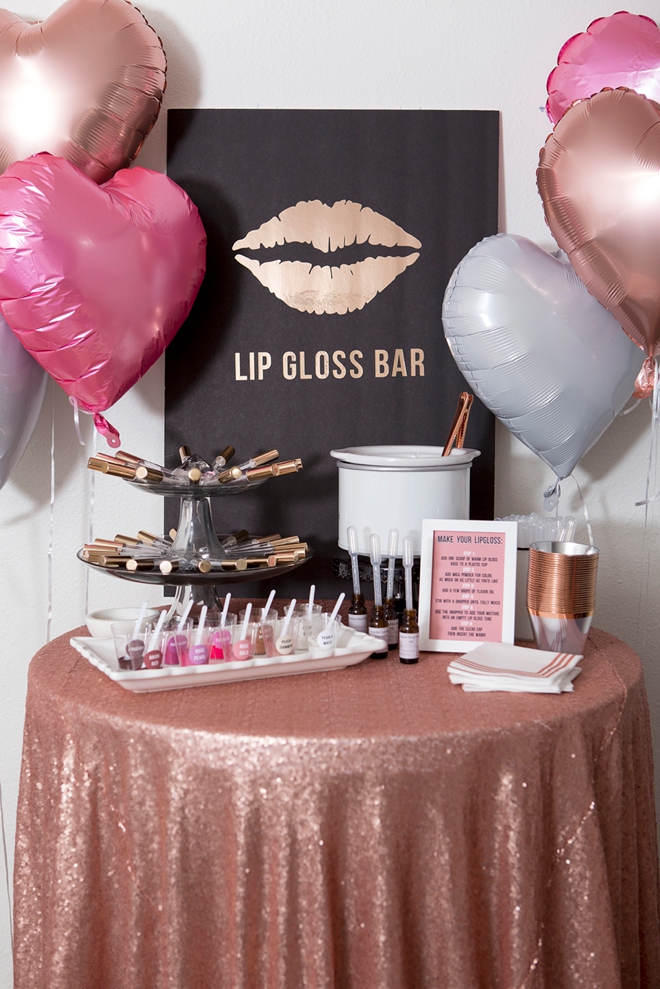
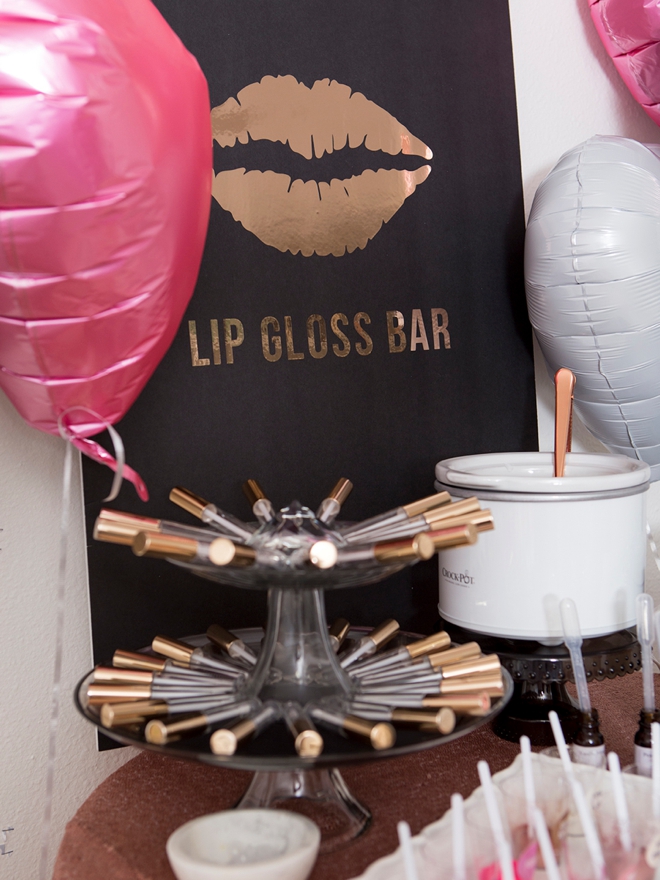
How To Create A DIY Lip Gloss Favor Bar
I’m a HUGE fan of having “interactive” style favor bars at any event, especially one like this. They make for adorable decor, they can be terrific ice breakers, and they not only give your guests something to talk about but it gives them something to do… and take away. Below I’m sharing how to assemble your own Lip Gloss Favor Bar, but also how to make your own nourishing lip gloss, just in case you only want to make the gloss and not the bar. Either way, your lips will look fabulous in the end!
Bridal Shower or Bachelorette
This glossy bar would be an adorable addition to your Bridal Shower or Bachelorette Party. You could even make all your bridesmaids matching lip gloss for your wedding day!
BAR SUPPLIES:
- Cocktail Table
- Cute Table Cloth
- Black Poster Board
- Balloons
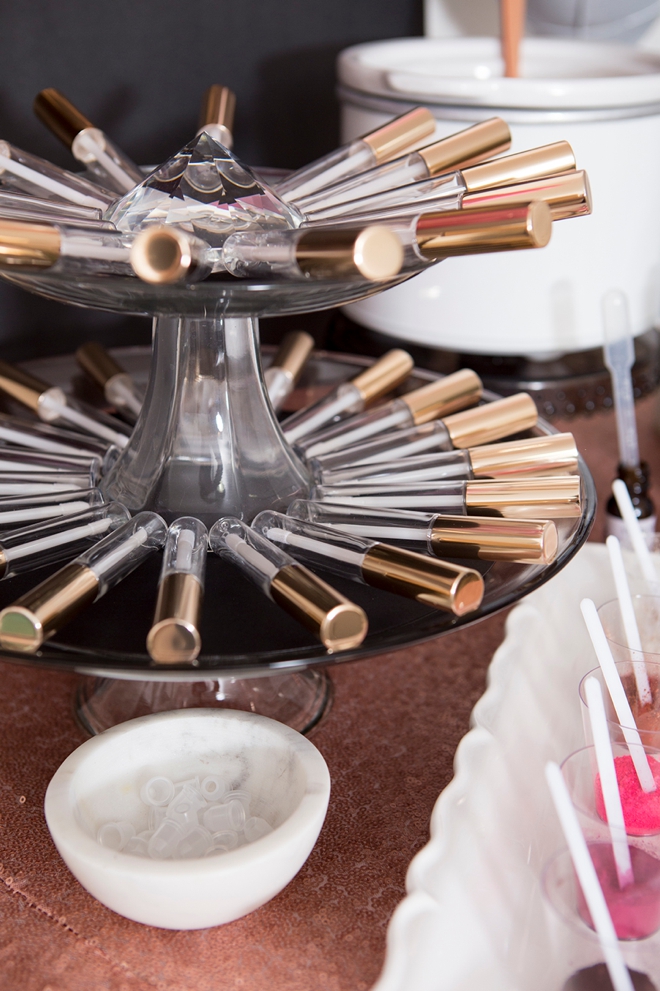
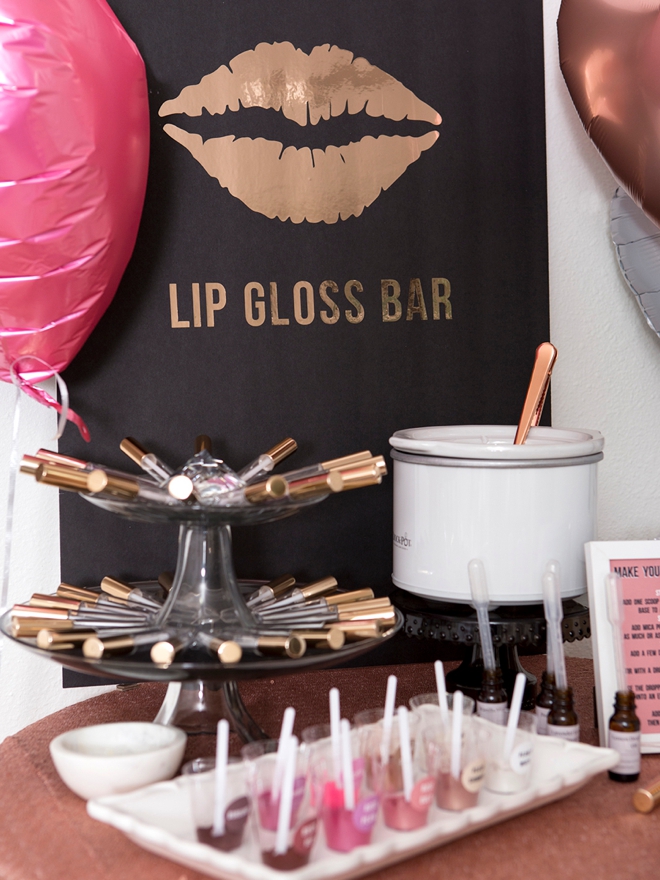
- Stacking Glass Cake Stands
- Metal Coffee Scoop
- Mini Crock Pot
- 4×6 Frame
- Plastic Cocktail Cups
- Napkins
- Tray for Mica
- Cricut Rose Gold Vinyl
- Sticker Paper
- Cardstock
- Our FREE printables at the end of the post!
LIP GLOSS SUPPLIES:
- 30 Rose Gold Lip Gloss Tubes
- 32oz Natural Lip Gloss Base
- 10 Lip Safe Shades of Mica
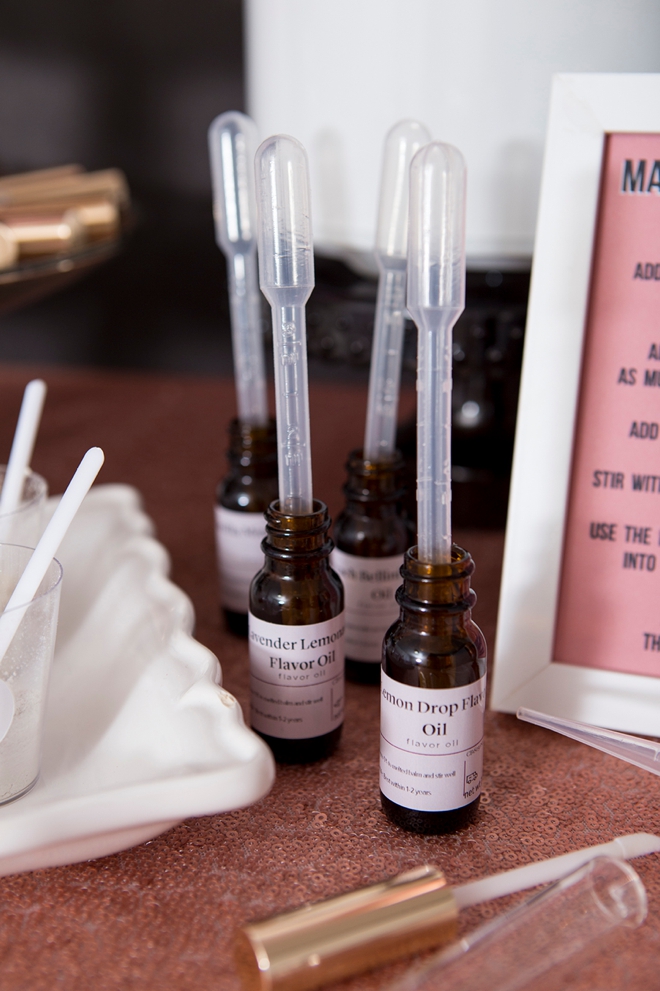
- 4 Flavor Oils
- 40 Pipettes (for stirring and for the flavor oil)
- 10 Scoops
Free Printables
At the end of the post there is a turquoise graphic you can click on to download this 4×6 sign and the labels for the Mica shades I used. Print the labels on 8.5″ x 11″ sticker paper and print the sign on cardstock or photo paper, and trim.
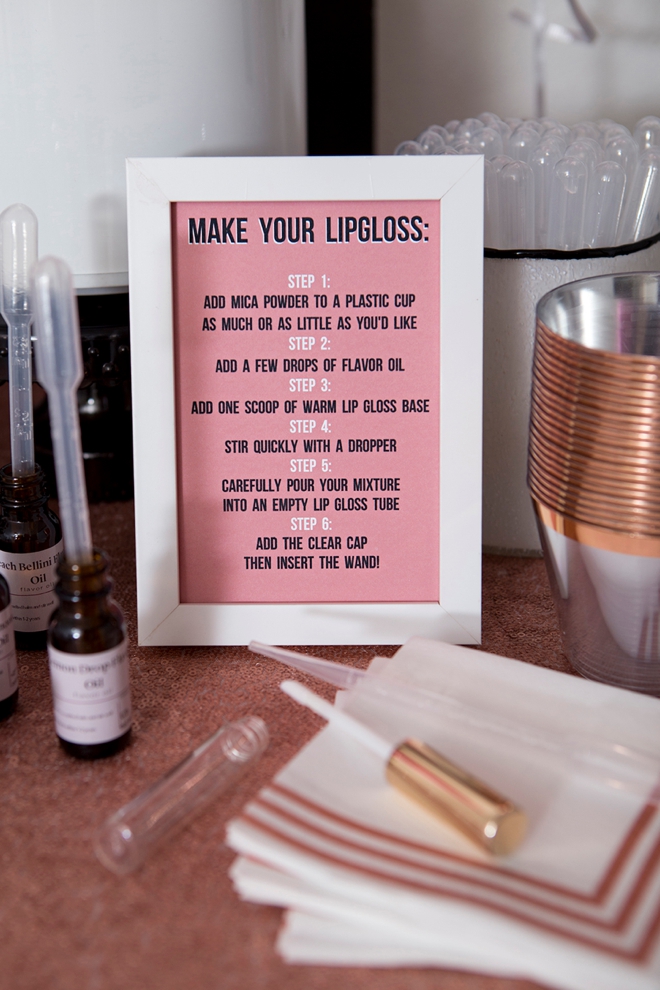
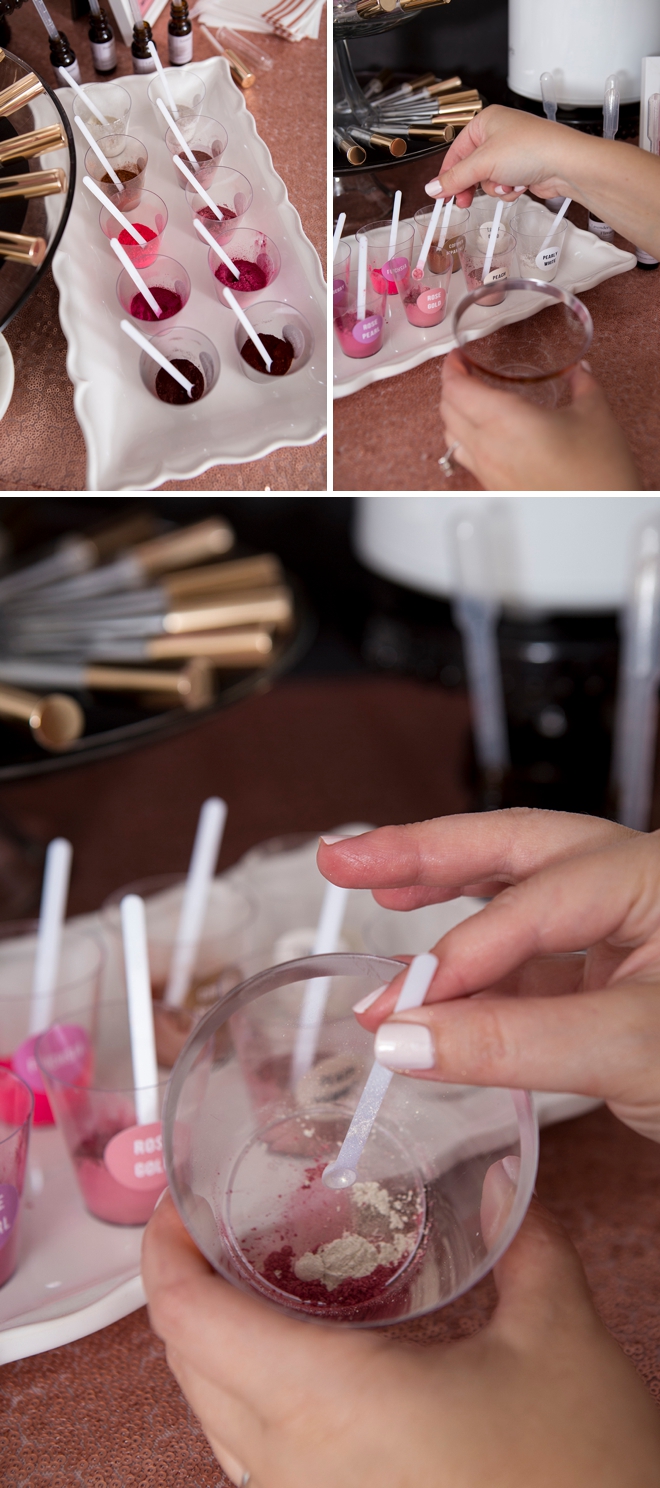
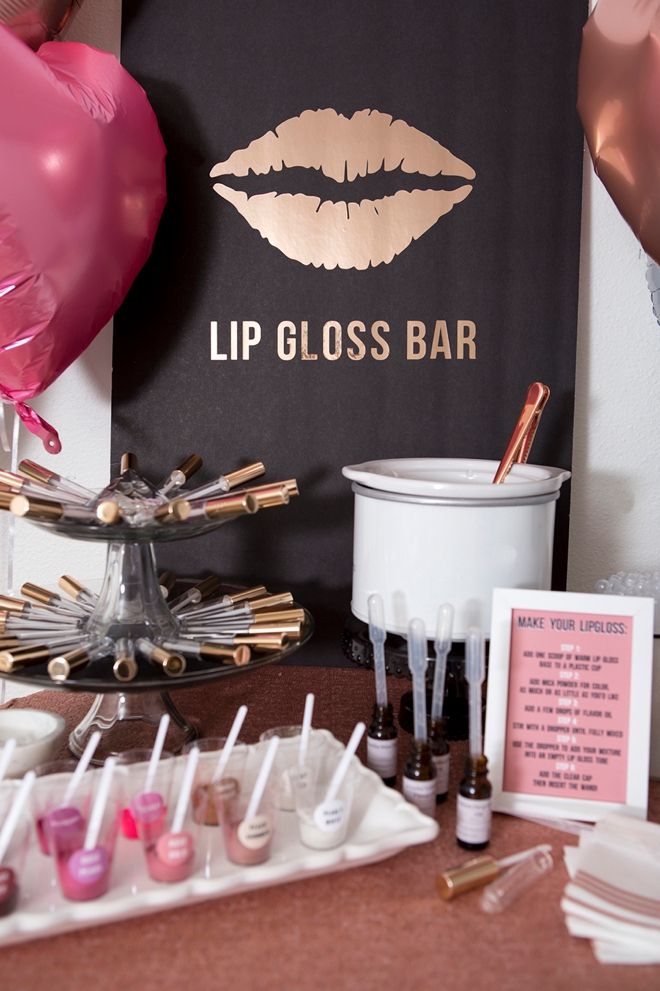
Step 1: Mica
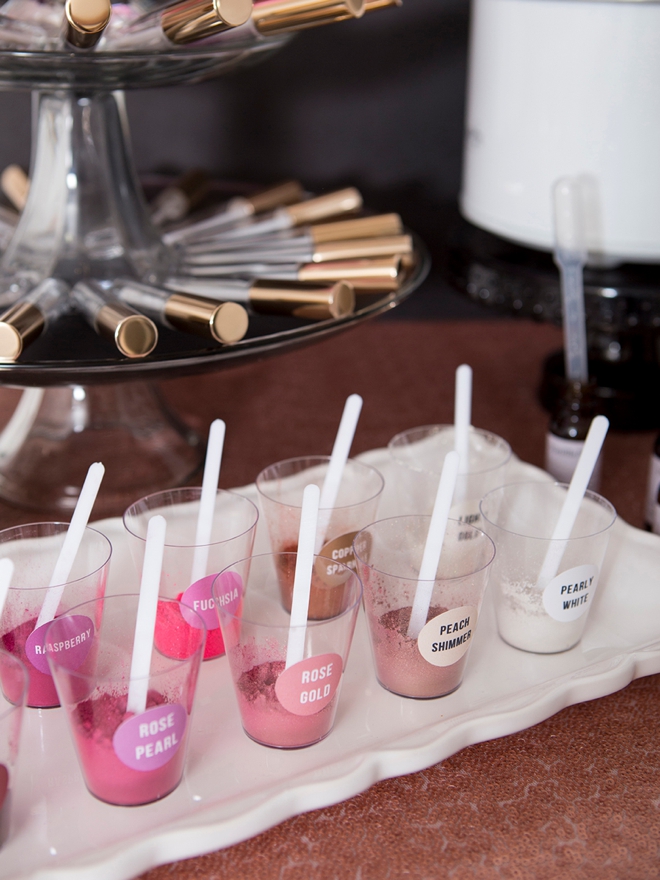
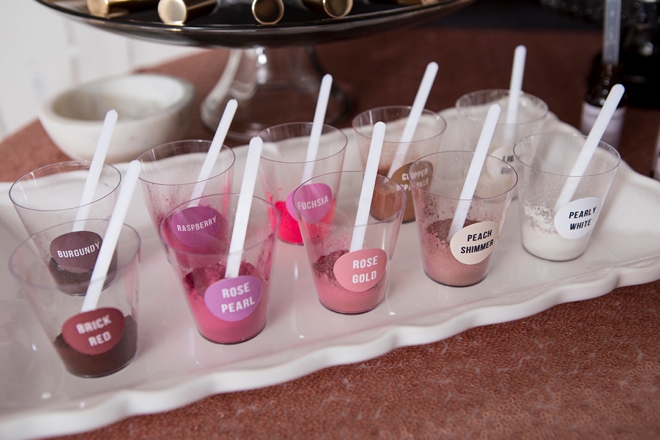
I added 1 Tablespoon of each Mica color to a simple clear plastic shot glass accompanied by a small scoop and it’s corresponding label. Displayed on a ceramic tray. Just so you know, this will get SUPER messy!
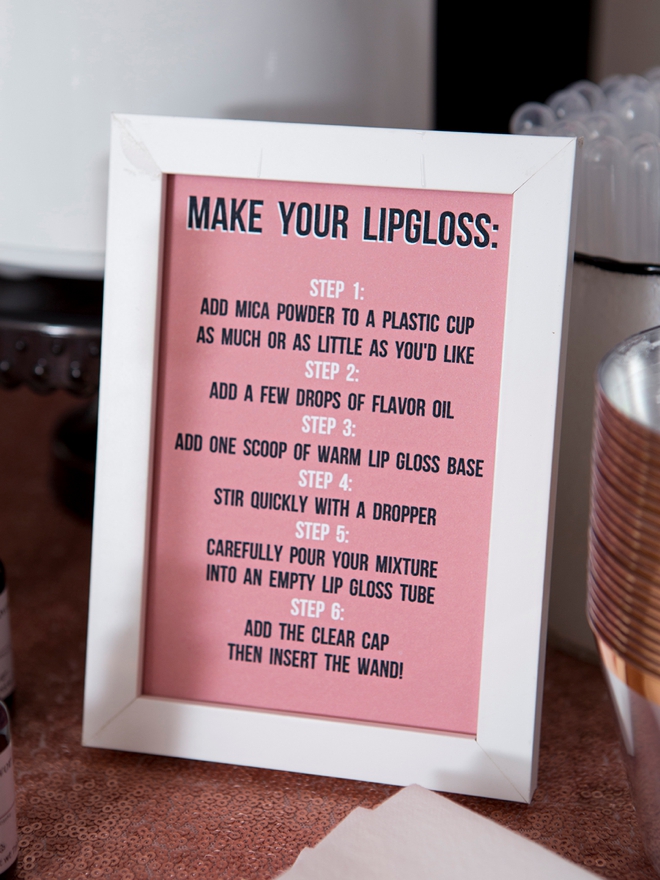
Add Mica powder to a plastic cup, as much or as little as you’d like. The more Mica you add, the more pigmented your gloss will be.
Mica Colors
- Burgundy
- Brick Red Oxide
- Raspberry
- Rose Pearl
- Rose Gold
- Fired Up Fuchsia
- Copper Sparkle
- Peach Shimmer
- Light Gold
- Super Pearly White
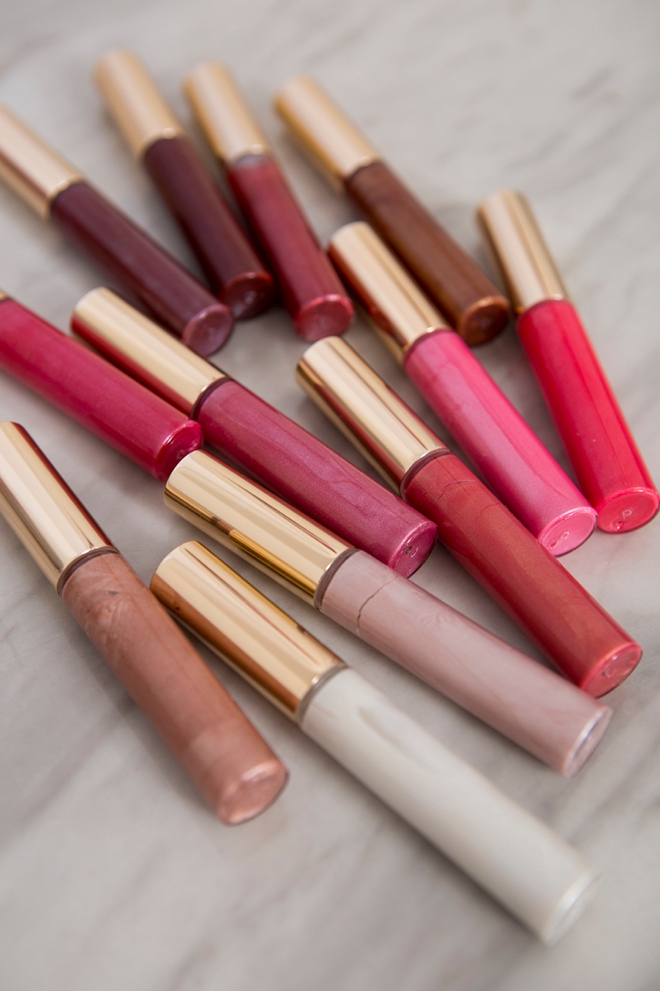
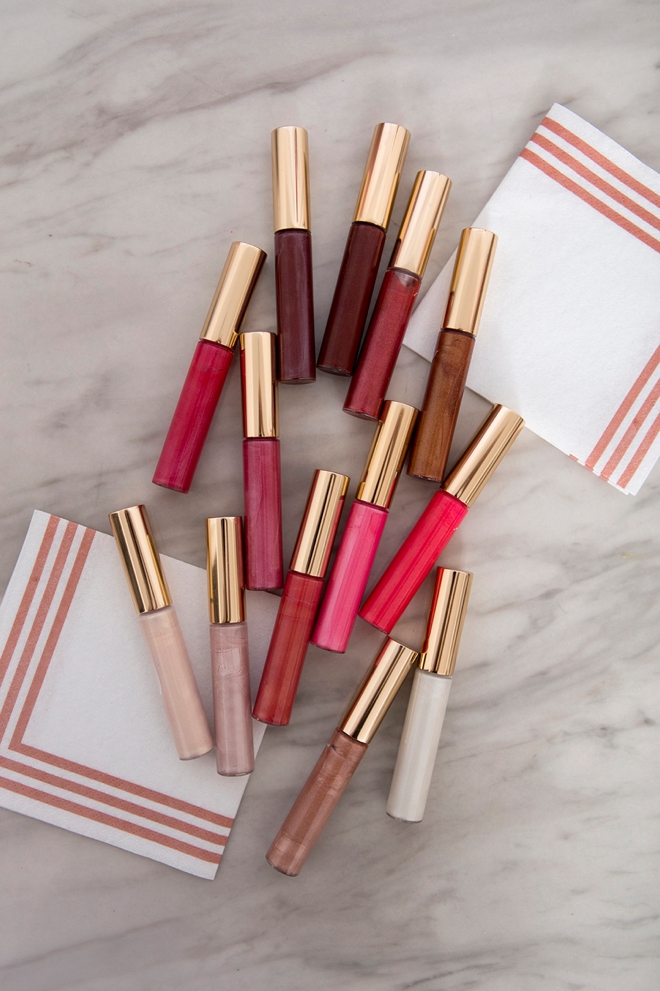
These 10 shades created all the lip gloss colors you see here. Combinations almost can’t go wrong. 2 scoops for very shear, 4 scoops for more coverage, and 6+ for an intense color. Here are some of my favorite combos:
- 3 Pearly White + 2 Light Gold + 2 Peach Shimmer = Summer Blush!
- 3 Copper Sparkle + 1 Raspberry = Nighttime Glimmer!
- 2 Rose Pearl + 2 Rose Gold + 2 Raspberry = Perfectly Pink!
- 2 Burgundy + 1 Brick Red + 2 Fuchsia = Bachelorette Red!
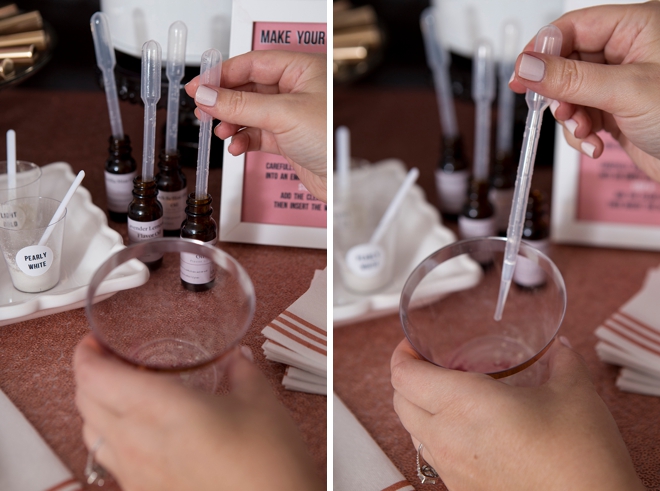
Step 2: Flavor Oil
Totally optional, but a lovely addition. I chose to offer 4 flavors; Peach Bellini, Vanilla Mint, Lavender Lemonade, and Lemon Drop. Totally your call, pick what sounds yummy! Each oil needs a Pipette.
Add a few drops of flavor oil to the Mica in your plastic cup.
Step 3+4: Lip Balm Base
The Natural Lip Balm base comes in microwave safe bags which is awesome. Pop in the microwave to warm it up, I did two rounds at 30 seconds each. Then pour into a mini crock pot to keep liquid during your event. The perfect spoon is a metal coffee scoop. I found the one pictured here with a clip on the handle which kept it out of the heat.
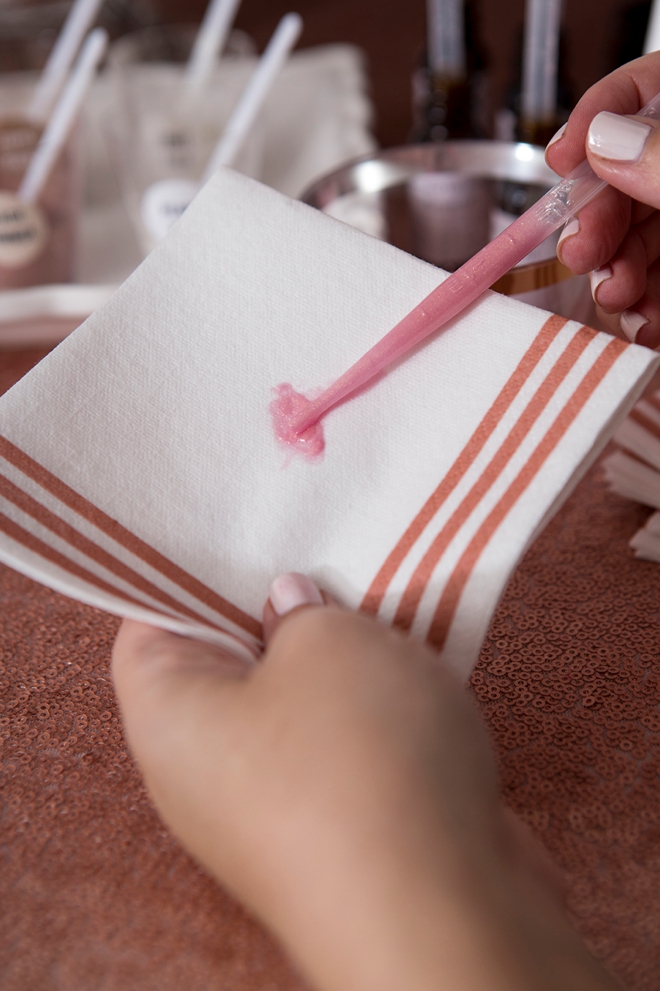
Add 1 Tablespoon (one coffee scoop) of liquid Lip Balm Base to your plastic cup and stir completely using a fresh pipette. For this step you need to work fast. Once the lip balm starts to cool it will be harder to add to the tubes. If you aren’t happy with the color, quickly add more mica or more lip balm base to dilute.

Quick Check: Wipe a bit of your lip balm mixture on a white napkin to check the color before you pour it in your tube forever, LOL.
Step 5: Pour Into Tubes
I used two of the three clear glass stacking cake stands to display the rose gold lip balm tubes. I cut circles of black cardstock out as doilies then carefully placed the tubes on the stands.
Very carefully squeeze your plastic cup and pour your lip gloss mixture into an empty tube. Fill with at least 1/4″ empty space at the top.
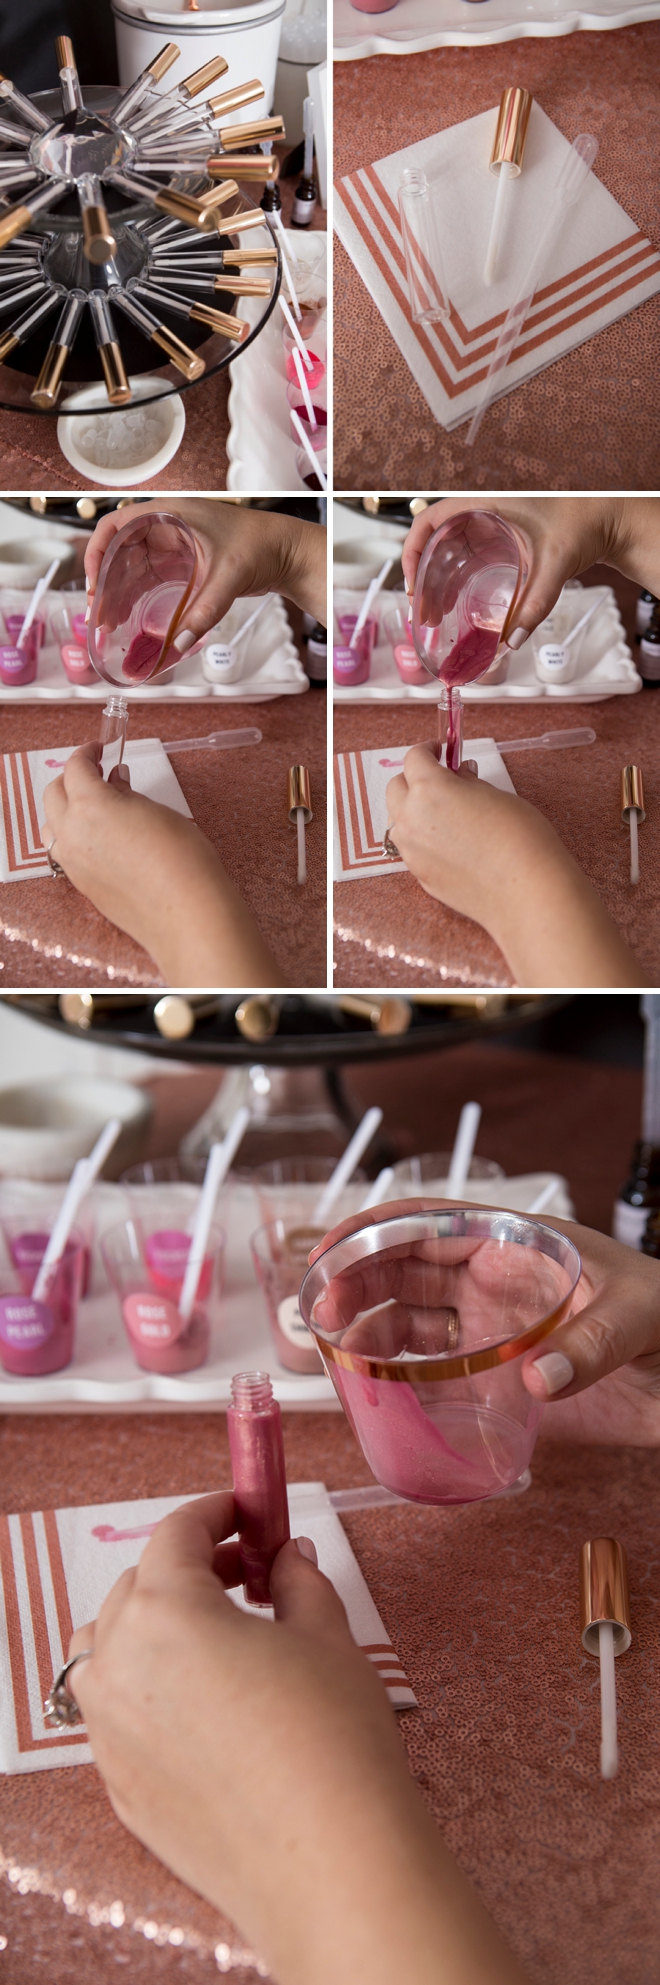
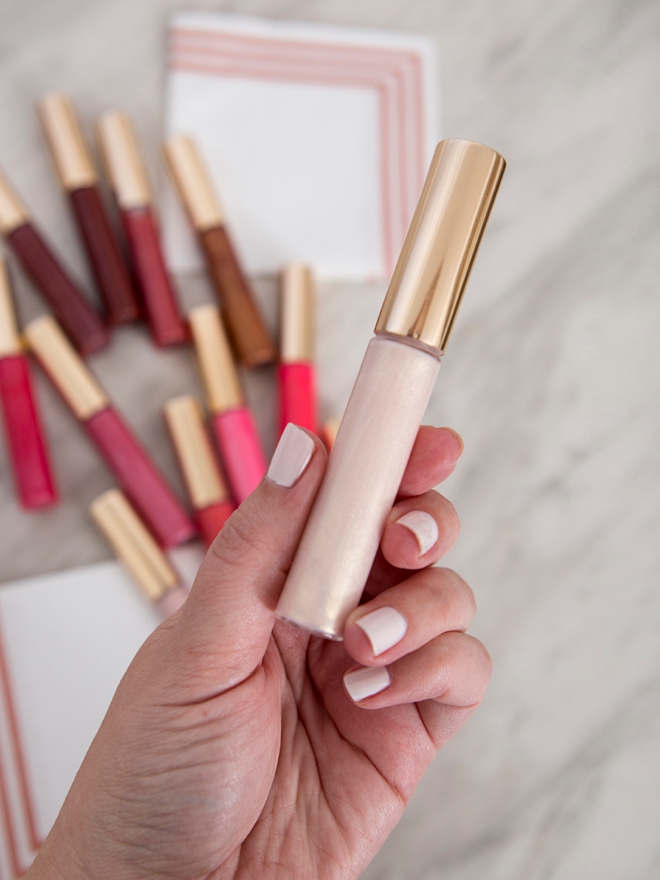
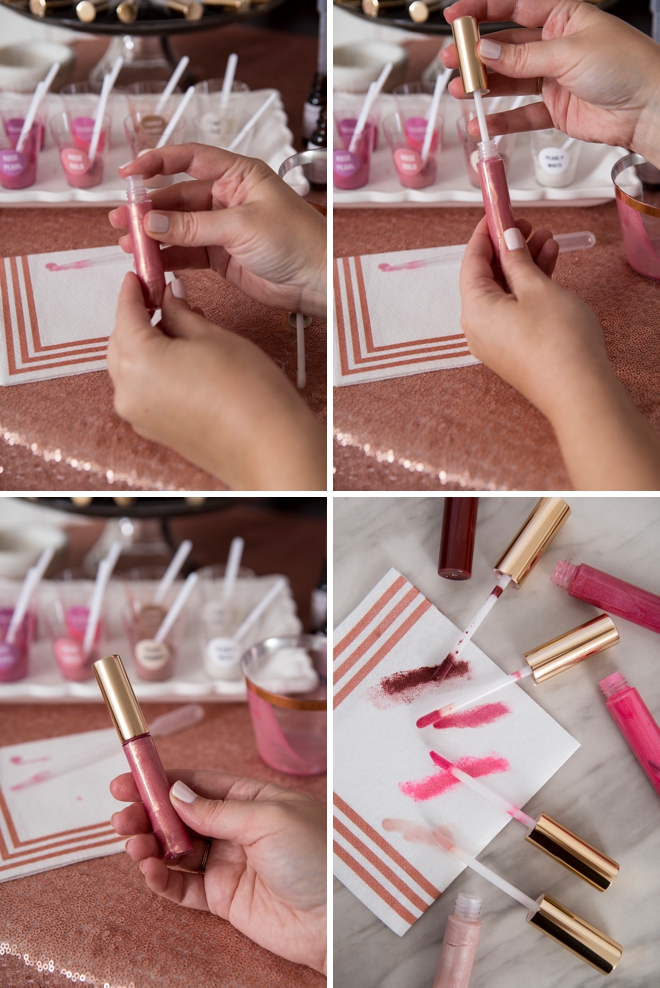
Step 6: Cap + Wand
The lip gloss tubes come disassembled, so you’ll need to add a wand to each tube for the display, and place the clear plastic caps (the part that wipes off extra gloss as you remove the wand) in a dish nearby.
Insert a clear cap into the lip gloss tube until you hear it click and then add your wand. Voila! Custom lip gloss completed! Super easy right!?
The Sign
Using my Cricut Explore I cut this giant lipstick mark and lettering out of rose gold vinyl and applied it to the black poster board using transfer tape. Font: Bebas Neue. Making a very quick, simple, and custom sign in no time!
Which Shade Is Your Favorite?

As with all our DIY tutorials, if you create one of our projects please send us a picture – We Love Seeing Your Creativity! If you use Instagram or Twitter please use the hashtag #SomethingTurquoiseDIY and it will show up on our Get Social page. Happy Crafting!
DIY Tutorial Credits
Photography + DIY Tutorial: Jen Causey of Something Turquoise // All Lip Gloss Supplies: courtesy of BrambleBerry.com // Mini Crock Pot: Amazon // Rose Gold Sequin Tablecloth: Amazon // Stacking Glass Cake Stands: Amazon // Plastic Cups: Amazon // Napkins: Party City // Balloons: Amazon // Shot Glasses: Amazon // Nail Polish: OPI – Withstands the Test of Thyme
Shop The Supplies:
Find the supplies you’ll need for this project from our affiliate links below:

Comments