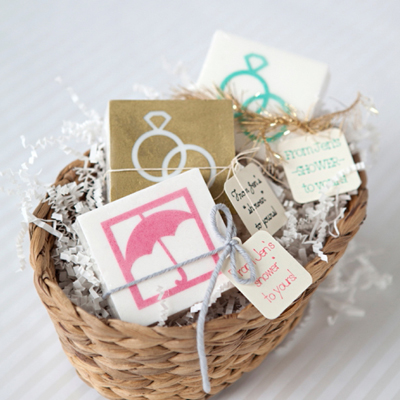

DIY | Stenciled Wedding Soap Favors
Exactly one year ago I made my very first bar of soap and I’ve been hooked ever since. Why it has taken me a year to share an actual soap tutorial with you, I don’t know but today’s project is worth the wait! Here I am sharing how to make and stencil soap favors for your bridal shower or wedding. I’m not talking Fight Club style soap from scratch, just simple melt & pour soap with fun mica dusted designs. The color options for this project are as endless as the stencil designs you could use. Through personal trial and error, the steps that I share below will ensure that your soaps come out perfect from the start. Please take time to read all my detailed tips, you’ll be glad you did!
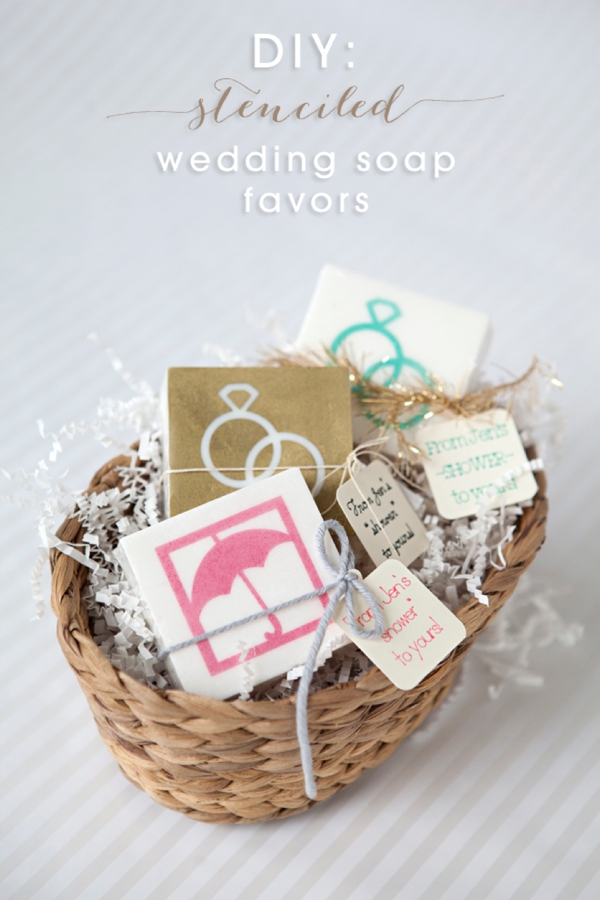
Today’s techniques are a little more intense than most of our tutorials but hey – I need to challenge you right?? Just because there are a lot of steps to this project doesn’t mean it should be intimidating. I’ve taken my time and created a very detailed step by step tutorial for you, so that even if you’ve never made soap before – you will feel confident attempting it. It’s not scary – it’s awesome.
SUPPLIES:
- Martha Stewart Crafts Stencil Paper
- Bramble Berry Square Soap Mold
- Bramble Berry Shea Melt & Pour Soap Base (the 1lb. bar pictured makes 4 soaps)
- Bramble Berry non-bleeding micas (ours are: Aqua Pearl, Heavy Metal Gold, Rose Pearl)
- Bramble Berry Soap Fragrance Oil (ours is Warm Vanilla Sugar) or essential oil
- Pipettes
- Aerosol hair spray
- Heat safe glass bowl for melting your soap
- Soap cutter
- Soft bristle paint brush
- Small spray bottle with rubbing alcohol
- Craft knife or Cricut
Find all the soap making supplies you’ll need from BrambleBerry.com.

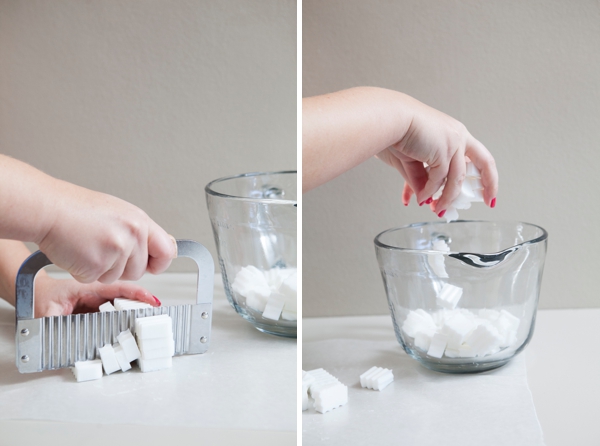
We need to start by melting our “melt and pour” soap base. Unlike making soap from scratch by mixing lye and other ingredients together yourself, all the hard work has been done for you in these melt and pour bases from Bramble Berry. Literally all you have to do is melt and pour. Using a soap cutter, cut your melt and pour base into little cubes and place into a heat proof container like this glass bowl.
I love the Shea melt and pour base from Bramble Berry that I’m using here, but you can use any white melt and pour base that you want to. You can even use a clear base, the end result will be different but that’s good. The color of this project is entirely up to you. See all of Bramble Berry’s melt and pour bases here.
Melt Your Soap
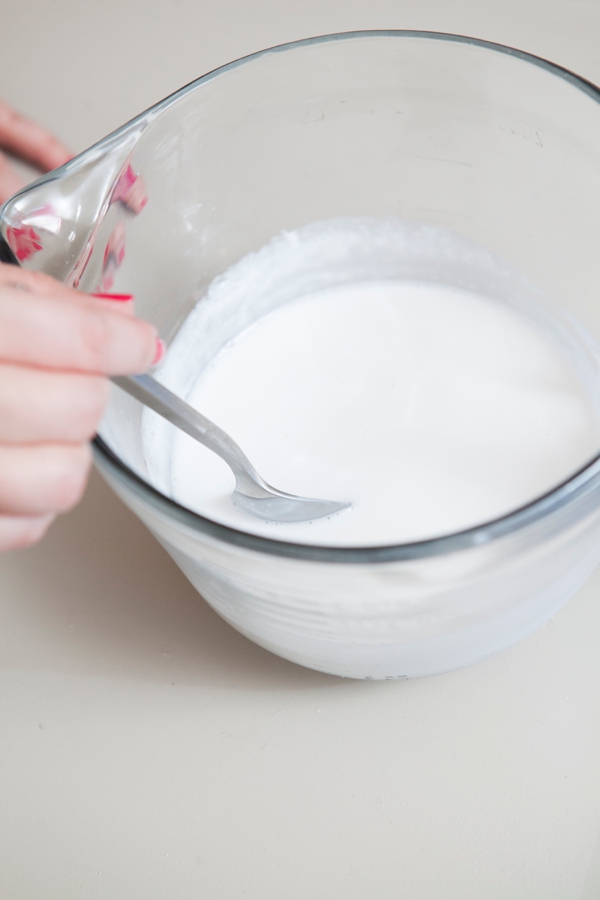
With the little cubes of melt and pour soap in a glass bowl, heat in the microwave on high in 15-30 second bursts. Giving the soap a good mixing in between. As the soap starts to melt you can use shorter bursts. Don’t burn your soap – it can discolor and smell bad!
Add your Scent
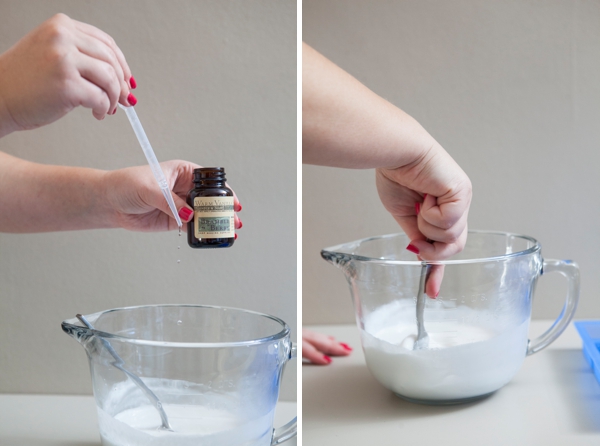
Once your soap is fully melted use your pipette to add your fragrance oil and mix. The rule of thumb is 1/4 ounce per 1 pound of soap. Fragrance is very personal so how much you use is really up to you. Some fragrances have usage notes that come with them. *You can also use essential oils to scent your soap. Some fragrance oils and essential oils can discolor your soap, so make sure to read notes on them before you choose one for this project.
This is also where you would add color to your soap base if you wanted to. For this project we aren’t because we want a white soap base, but you can definitely get creative. To learn more about coloring soap you can watch this video.
Pour + Spritz
Now you are ready to pour the soap into the mold. The 1 lb. soap bar makes 4 of these 4 ounce soaps. You can use any soap mold you want as long as it has a smooth top. As soon as you are done pouring you need to spritz the top of your soap with rubbing alcohol, this removes bubbles and gives your soap a smooth finish.
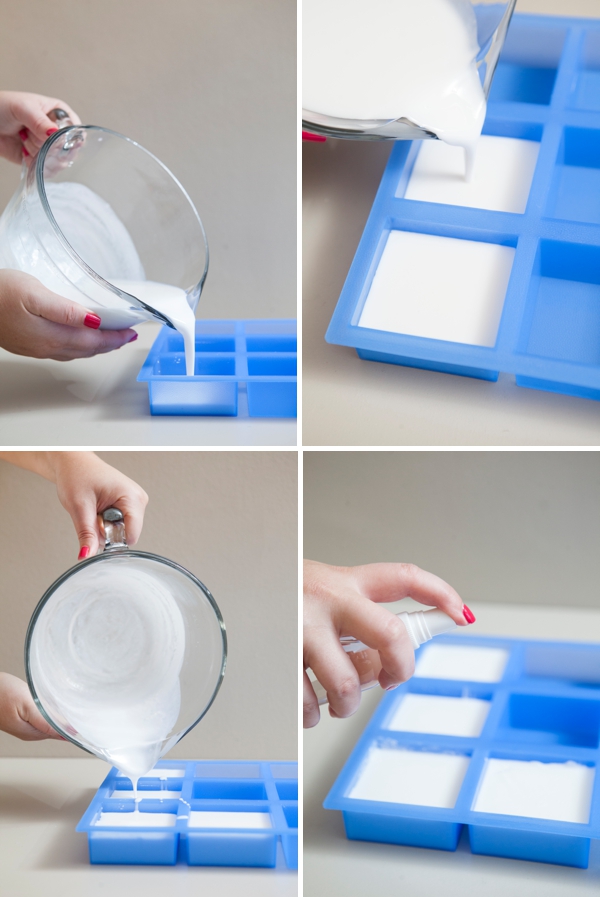
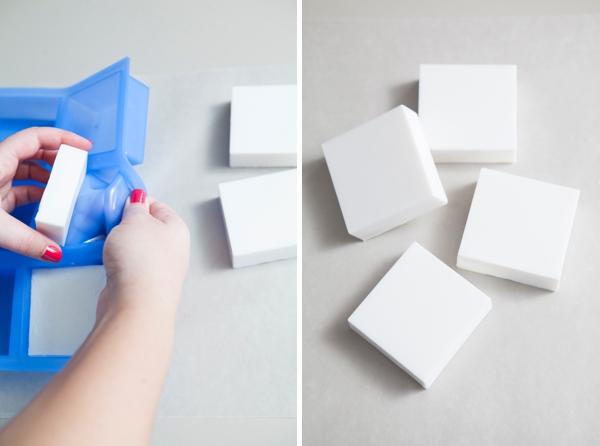
Once your soaps have fully hardened (usually takes a few hours) carefully remove them from the silicone mold.
Making Your Stencil
Now the fun part! I made the stencils in this project using the Martha Stewart Crafts stencil paper and my Cricut Explore. You can make this project using any stencil, sticker or design you want! You can also hand cut a stencil with a craft knife using the same MSC stencil paper.
Pick your design and import to your Design Center. Here I used #M3F487 for the wedding rings and #M472BD for the shower umbrella.
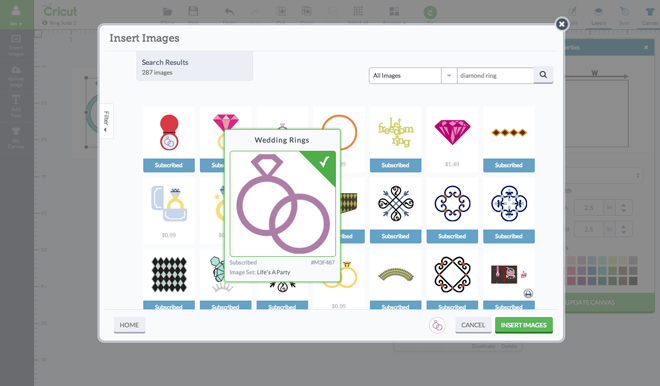
Create a canvas that is the size and shape of your soap mold. This mold is 2.5″ x 2.5″. Then size your design accordingly.
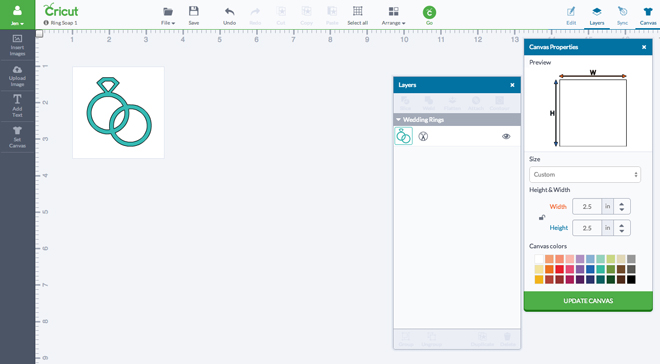
Cut as many stencils as you need to, dragging the designs an inch or so apart so you have room to use them. If you are considering making a large batch of these, using a cutting machine like the Cricut will save you so much time, compared to hand cutting each one with a craft knife.
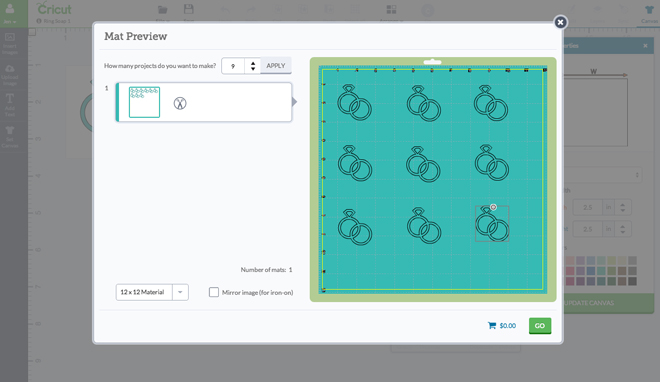
Using a “seasoned” cutting mat (one you’ve used quite a bit so the sticky isn’t super sticky) place the MSC stencil paper backing side down. Use the Paper setting to cut through the stencil layer and not the backing layer. This paper is thinner than the Cricut vinyl, that’s why the paper setting is a better choice.
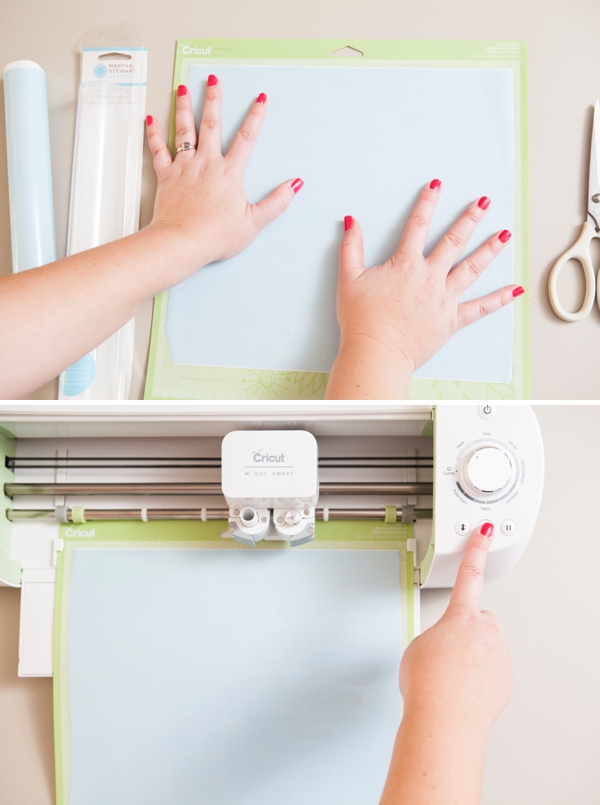
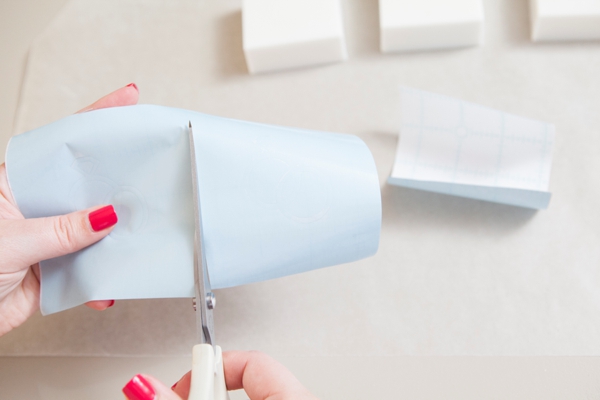
Once your stencils have been cut, split them up using a regular pair of scissors.
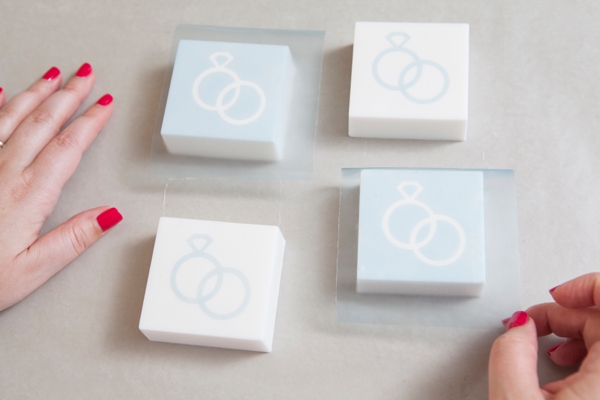
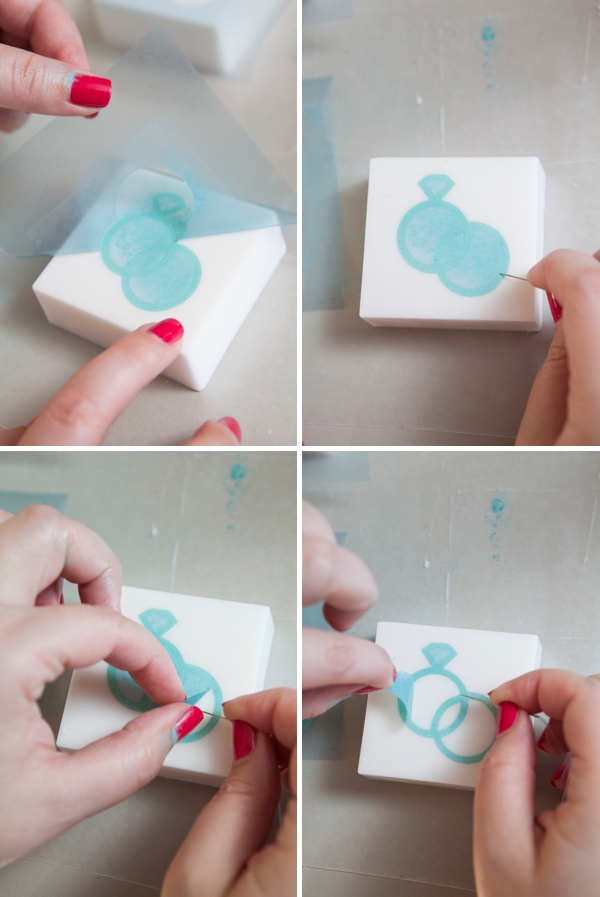
Apply Your Stencil
Carefully remove each part of your stencil and add it to the top of your bar of soap. The stencil paper is tacky like a sticker and will easily stick to the soap.
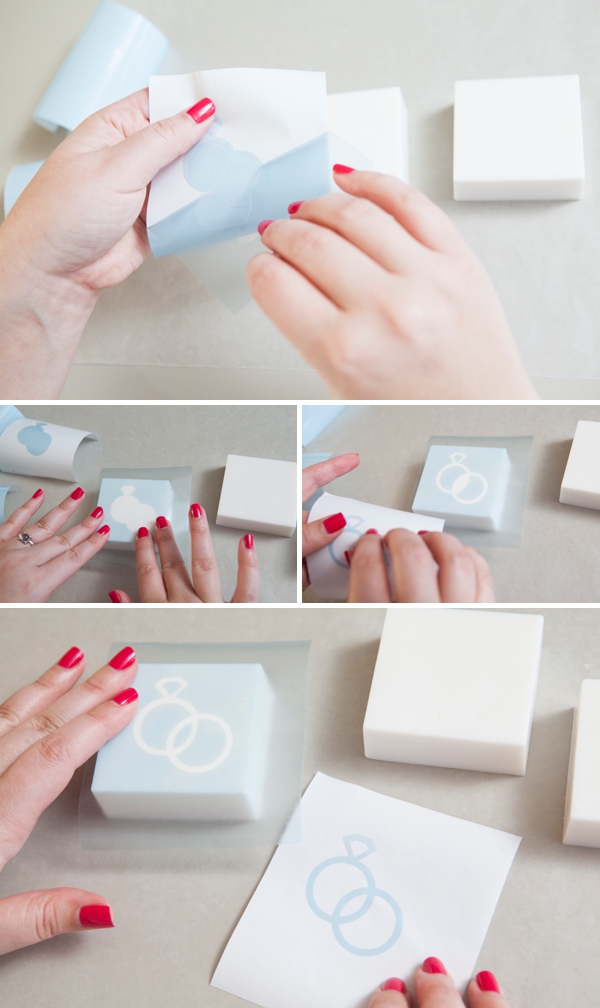
Using the positive and negative space from each design you actually get 2 stencils in one.
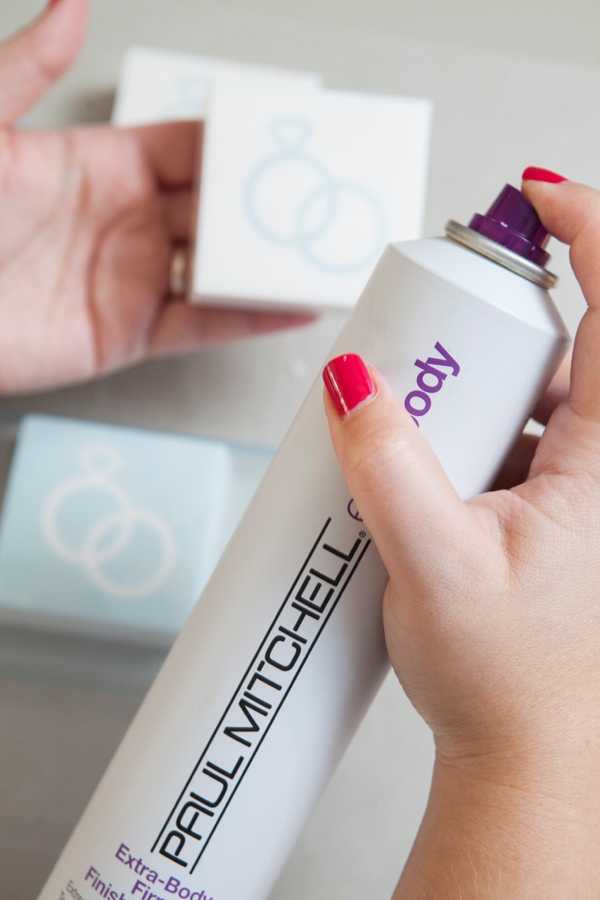
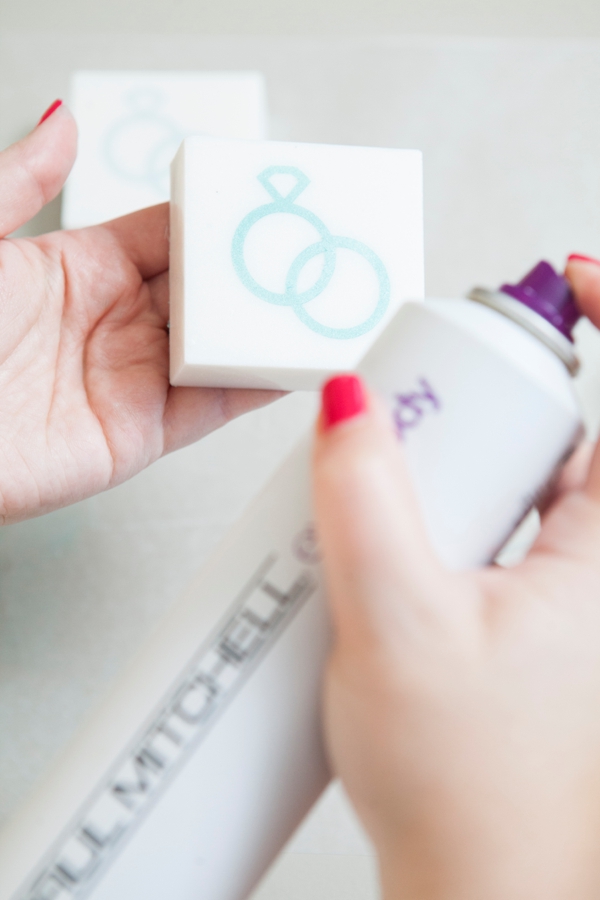
Hair Spray is the Trick
To make the mica both stick to your soap and set the mica to your soap you need hair spray – any type of aerosol will do. After your stencil is on your soap give it a quick and even spritz.
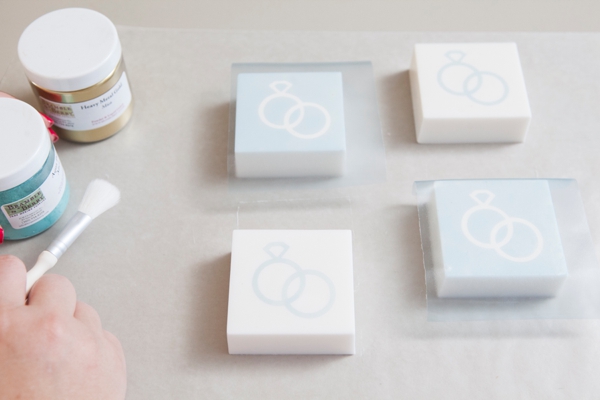
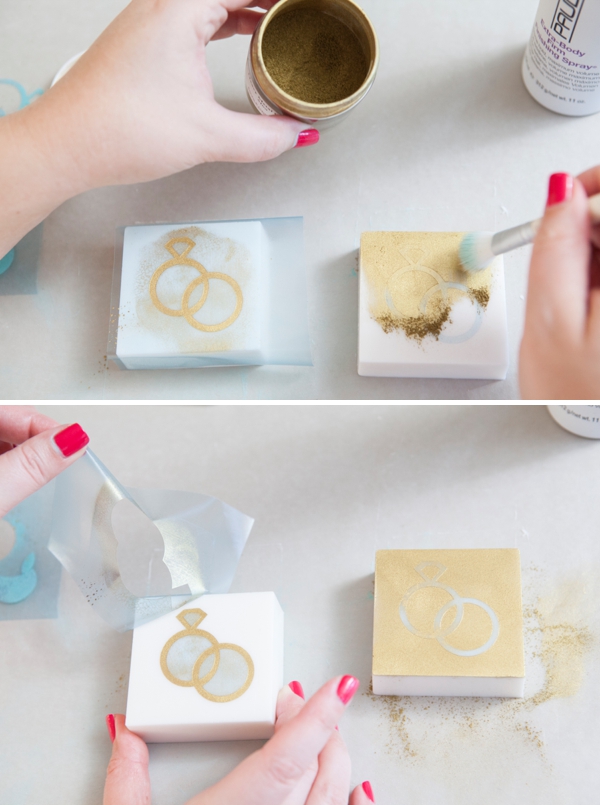
Painting With Mica
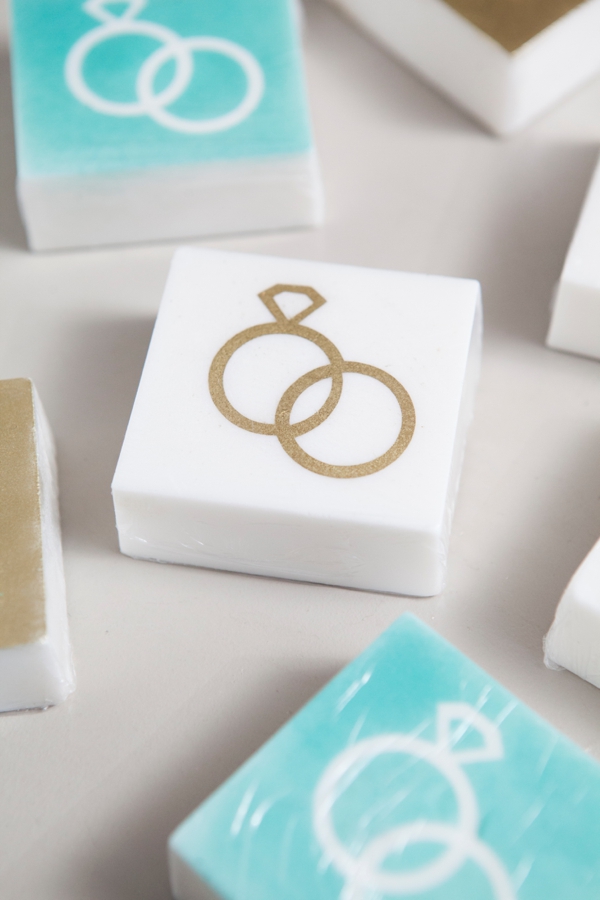
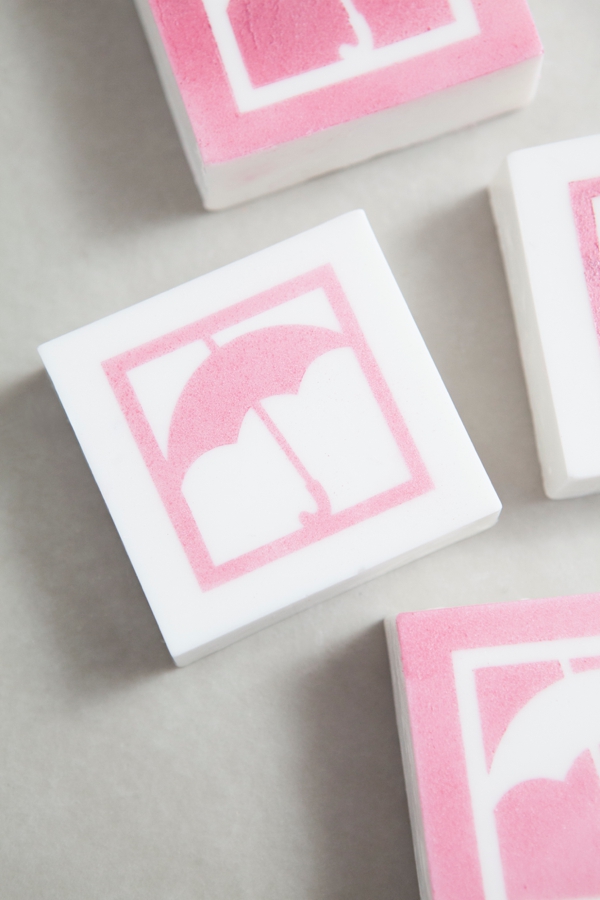
Mica is a natural pigment mined from the earth and it makes a wonderful “paint” for this stencil project. It is VERY IMPORTANT that you use a non-bleeding mica for this technique! If you don’t after a few days the color will seep and bleed into the soap and your design will disappear completely.
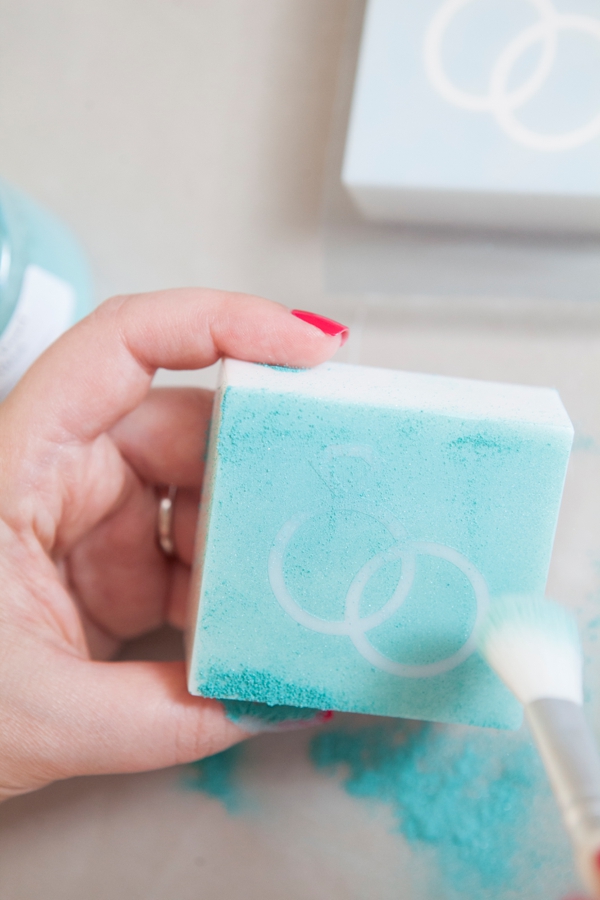
Gently dust or “paint” the mica powder over the top of your soap and tap to fill in all the areas of your stencil.

Carefully dust the mica pigment across your soap over waxed paper so that you can collect the excess and add it back to the container.
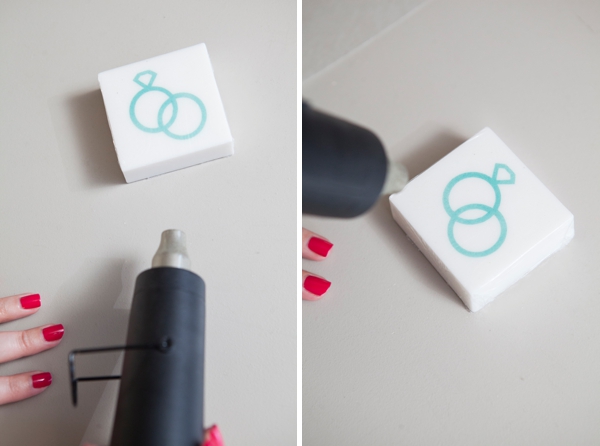
Remove Your Stencil
Using a needle or the like, carefully remove the stencil from your soap. If you touch the mica it can scratch off so be careful. This is the best part!!

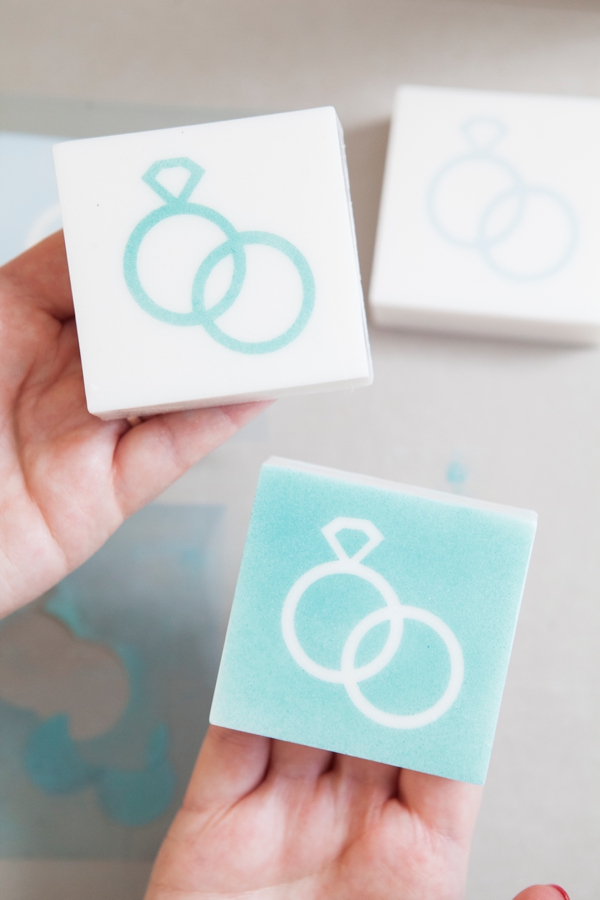
Aren’t these amazing!?! The stencil paper and the Cricut are a match made in heaven!
Remember, you can use this same technique using any stencil or sticker.
To set the mica so it doesn’t smudge, hit it with another coat of hair spray.
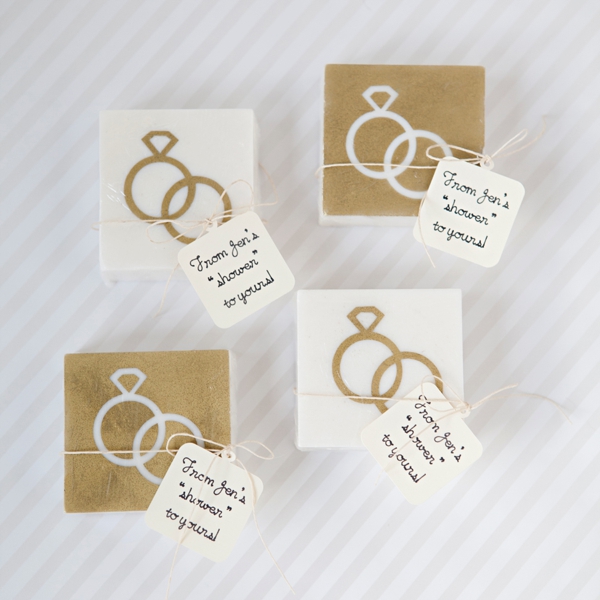
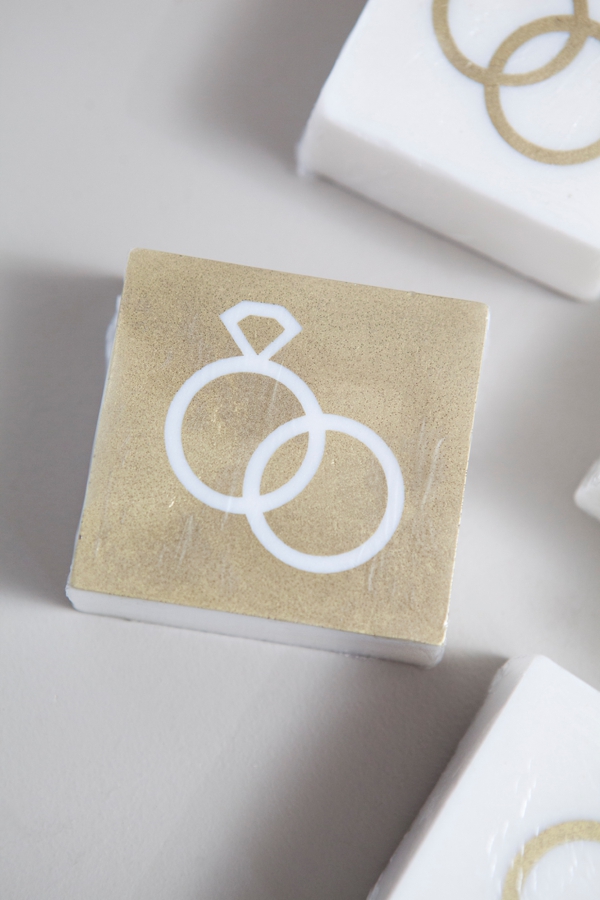
We Love Gold
OMG. This heavy metal gold mica is insanely gorgeous! The pictures don’t do it justice!

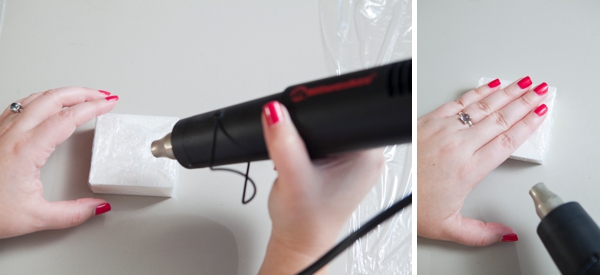
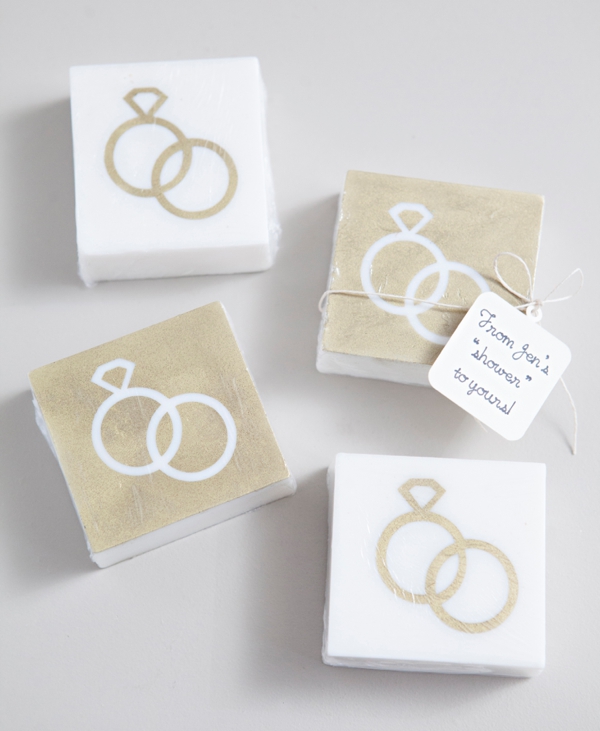
Packaging Your Soap
Packaging your soap is easy! All you need is a heat gun and saran wrap…. sorry blow dryers don’t work, they don’t get hot enough. Using saran wrap packaging is highly recommended for making and giving “mica painted” soaps because it not only protects your design but your soap. Store in a ziplock bag or plastic container to keep fresh.
Cut a piece of saran wrap and wrap your soap in it, cutting and removing excess and folding towards the back.
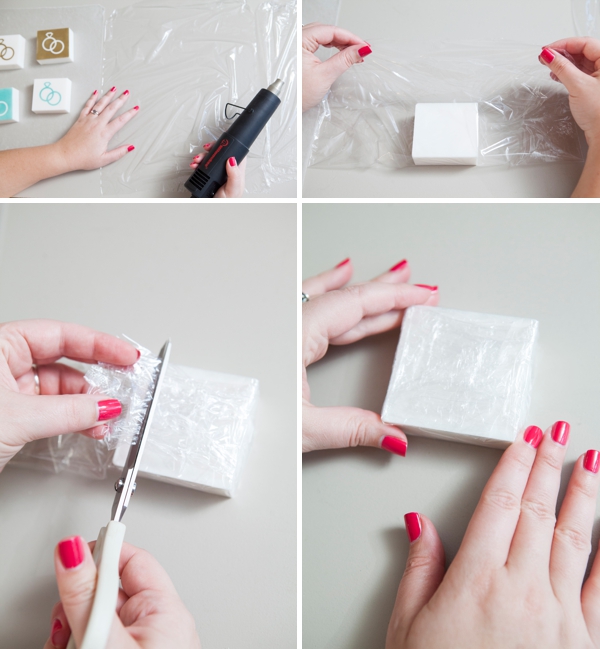
Hit the back with your embossing gun first. Hit with a little heat and tap the saran wrap into itself. It tends to warm up and lift up, so just pat it back down and it will stick to itself.
Then do the sides and finally the top. Working from the back, sides and top ensures an even seal with the saran wrap.
Soap Life Span
To ensure that your soaps look just as beautiful on the day you gift them as the day you made them; make within 1 month of giving. Otherwise they can start to shrink and get a tad rubbery feeling – even if you wrap them immediately. After they’ve been wrapped it’s best to store them in an air tight container in a cool place in your home.
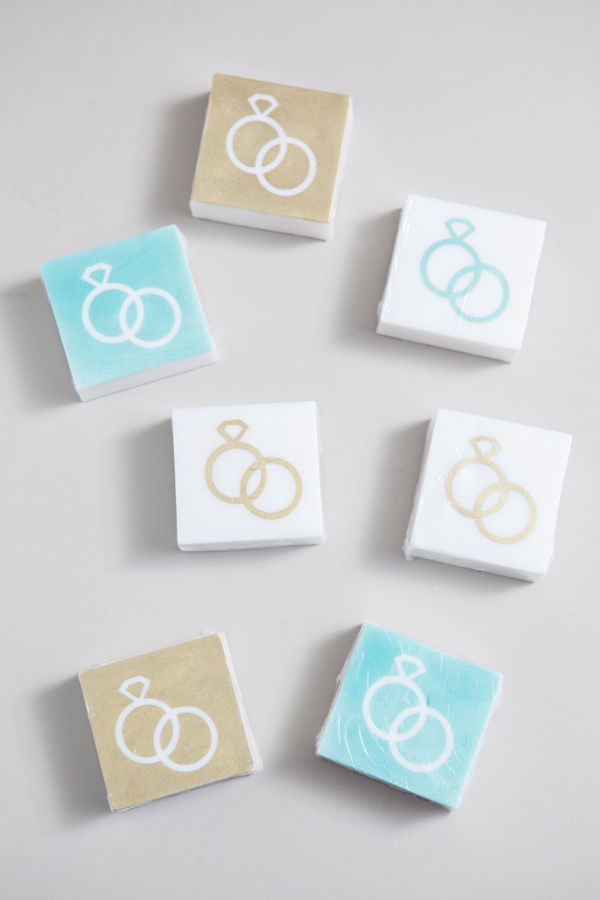
Aren’t they just adorable!?!
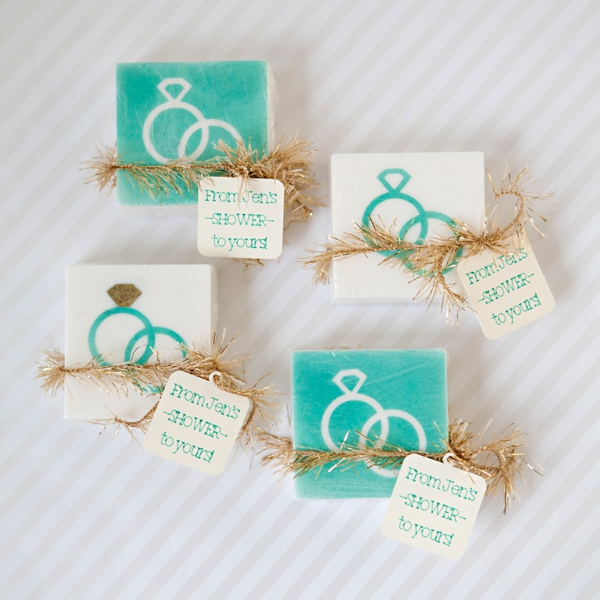
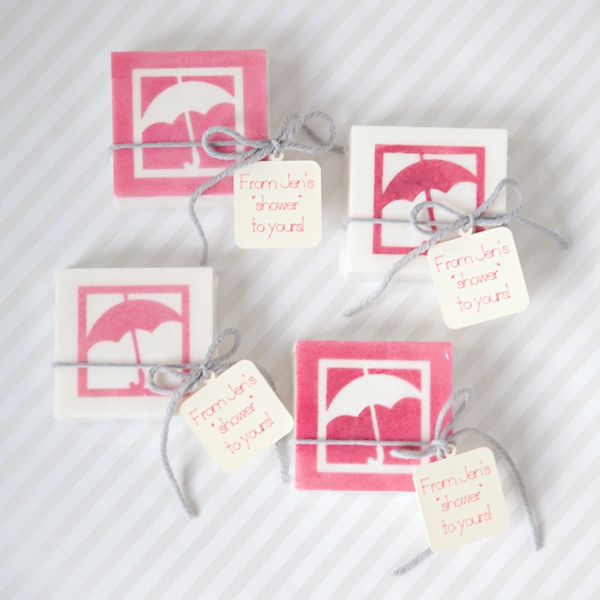
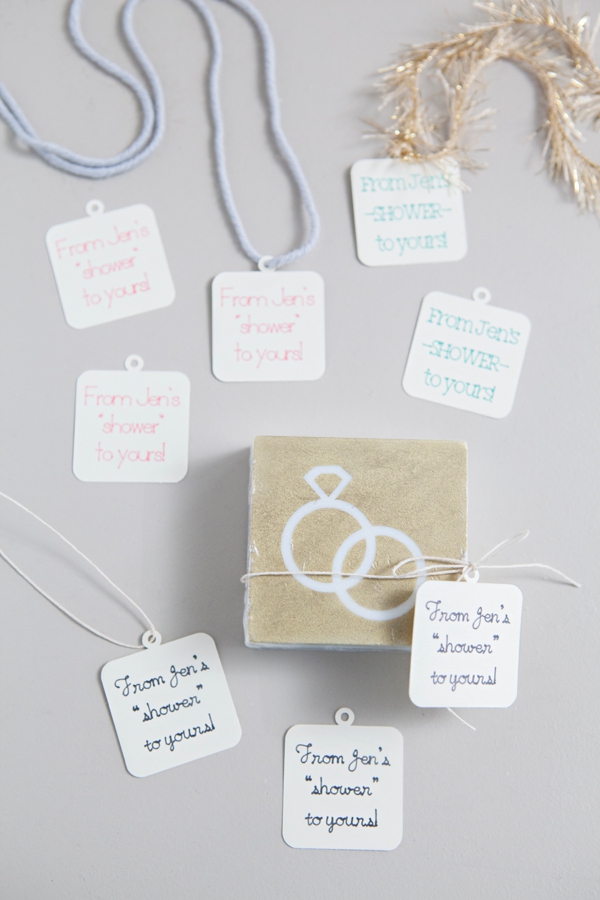
Make gift tags and add them to each soap. These are for a bridal shower and read; “From Jen’s shower to yours!” – appropriate right?
I’m seriously obsessing over this heavy metal gold mica.
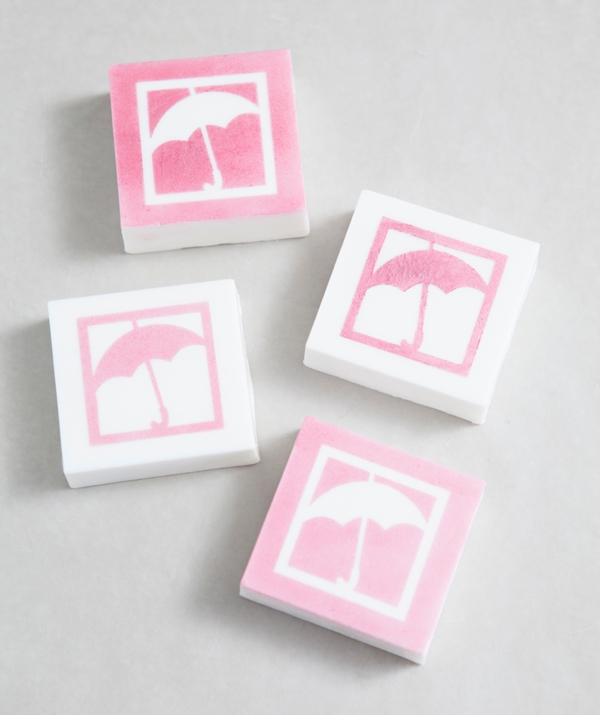
These umbrellas are the perfect design for a bridal shower! They are number #M472BD from Cricut Design Space.
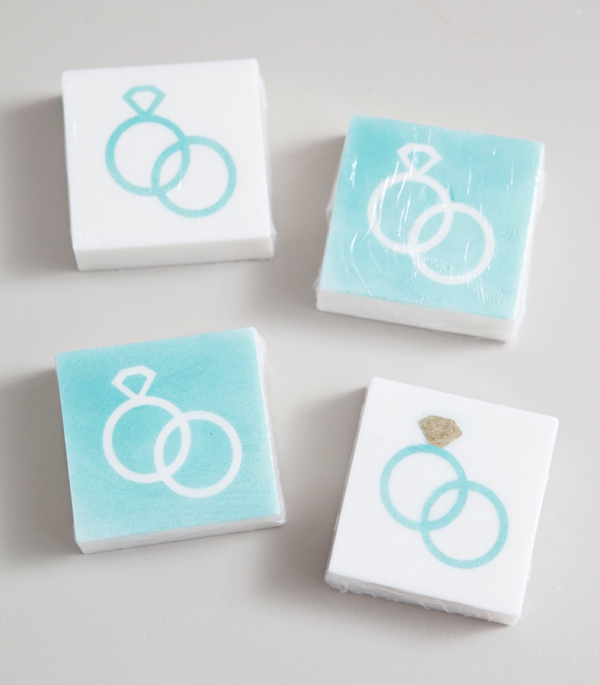
Get creative with your coloring – here I made the diamond out of the heavy metal gold mica! What colors would be perfect for your event?

As with all our DIY tutorials, if you create one of our projects please send us a picture – We Love Seeing Your Creativity! If you use Instagram or Twitter please use the hashtag #SomethingTurquoiseDIY and it will show up on our Get Social page. Happy Crafting!
DIY Tutorial Credits
Photography: Something Turquoise Photography for SomethingTurquoise.com // DIY tutorial: Jen | Something Turquoise // Martha Stewart Crafts Stencil Paper: courtesy of the Editors at Martha Stewart Living // Cricut Explore
: courtesy of Cricut // ALL soap supplies: courtesy of BrambleBerry.com // embossing gun: Amazon
// nail polish: OPI – Running With The In-finite Crowd

Comments