
DIY | gold leaf ring bearer dish
Happy 1st day of November! Today we are sharing how to create two different styles of gorgeously, gold leafed ring bearer dishes! The term we are using today is ‘gilding‘ ~ which covers a number of decorative techniques for applying fine gold leaf or powder to solid surfaces such as wood, stone, or metal to give a thin coating of gold. In this case, we are using Martha Stewart Crafts ‘silver’ gilding sheets… but of course you can use their gold, copper or even striped multi-colored sheets. This dish will add a beautiful touch to almost any style event and will make the perfect jewelry dish after the wedding!

Supplies:
- 6″ unfinished wooden bowl
- Martha Stewart Crafts Gilding Sheets in your choice of color (we are using silver)
- Martha Stewart Crafts Gilding Adhesive
- Martha Stewart Crafts Satin Enamel Finish spray paint (optional)
- Martha Stewart Crafts Gilding Gloves
- Martha Stewart Crafts paint brush and natural bristled brush
- drill with 1/8″ drill bit
- 2 feet of 1/8″ ribbon

The first step is to mark and drill holes into your unfinished wooden bowl. Make sure to keep your drill at an angle, almost parallel with the sides of the bowl. My drill bit is 1/8″ ~ you should use the same size drill bit as your choice of ribbon.

After drilling the holes will be rough; sand them smooth using sand paper or a nail buffer.

Now it’s time to GILD!
Using Martha Stewart Crafts Gilding Adhesive, paint the bowl where you will be applying the gilding sheets. Allow the adhesive to dry until it feels tacky, which may only take a few minutes. Make sure that the wood surface is clean, free of debris and dust before you paint.

Once the adhesive is tacky to the touch, you are ready to apply the gilding sheets. Press the gilding sheet onto the prepared surface with the wax backing sheet facing you. Smooth and press the sheet to the surface rubbing it gently and then carefully lift it away. Use Martha Stewart Crafts Gilding Gloves when working with delicate gilding sheets for ease of handling.

Smooth, press and carefully peel the gilding sheet away from the surface and repeat; keep repeating with multiple sheets if needed until the desired area is completely covered. Allow it to dry for 1 -2 hours. We used two sheets for this design.

Once the area is fully covered and dried, brush over the surface with a natural bristle brush in a circular motion to remove excess gilding.

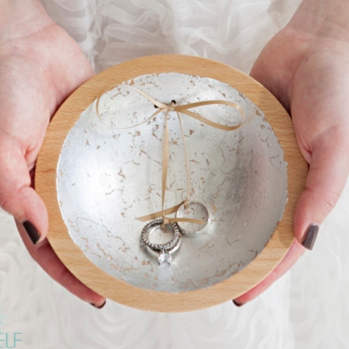
Your gorgeous ring bearer dish is almost complete…

Insert your choice of ribbon through the holes…

Tie a simple bow and then tie each ring onto the ends of the bow… so cute!

Only knot the rings once, this way they can be removed with an simple tug.
How perfectly romantic is this bowl!?

Now for our second design… only gilding the bowl edge…
Same steps apply… paint the gilding adhesive onto the edge of the bowl, allow it to dry until it becomes tacky to the touch.

Press and smooth the gilding sheet to the prepared surface.

Press, smooth, lift and repeat until you are happy with the coverage. If necessary you can go back and carefully hand place small pieces of gilding. For this design we only used one sheet of gilding.

Before you brush the gilded surface, let it dry for 1-2 hours. This step removes excess gilding.

Tie a simple bow and add your wedding rings to the ends! Just lovely… and such a sweet keepsake to store your cherished jewelry in after the wedding!

////////// OPTIONAL //////////
If desired, add a coat of Martha Stewart Crafts Satin Enamel Finish to seal and protect your gilded surface. Normally with gilding you would choose ‘gloss’ but with the wood, we think satin looks better. Don’t worry, it doesn’t dull the brilliance of the gilding at all!

![]()

As with all our DIY tutorials, if you create one of our projects please send us a picture or a trackback – We Love Seeing Your Creativity! If you use Instagram or Twitter please use the hashtag #SomethingTurquoiseDIY. Happy Crafting!
Photography: Studio 11 Weddings // DIY tutorial by: Jen | Something Turquoise // Martha Stewart Crafts Gilding Supplies; silver gilding sheets, gilding adhesive, paint and gilding brushes, gilding gloves: Editors at Martha Stewart available at Michaels and on PlaidOnline.com // 6″ unfinished solid beech wood bowls: Amazon // wedding dress: Nordstrom // nail polish: OPI – You Don’t Know Jacques!

Comments