
DIY | ‘Just Married’ Window Cling
I am absolutely thrilled to share today’s DIY project with you! As some of you hardcore crafters know, Martha Stewart just released an amazing new line of craft paint specifically designed for glass. In dreaming about all the amazing glass surfaces I could paint… I realized that there are some glass surfaces that simply cannot be painted. Which is exactly why Martha created customizable glass cling sheets! I was among a lucky group of bloggers that was sent a giant box of Martha Stewart Crafts to get creative and blog with… so here is my project: the ‘Just Married’ Car Window Glass Cling!!! Happy Crafting!!!
SUPPLIES // the free downloads below – printed on regular computer paper (or design your own!), the new Martha Stewart Glass Paint in the colors of your choice (the ones I used are listed in the credits), Martha Stewart customizable cling sheets, stencil tape, and her foam pouncers, small scissors, and a little dish for your paint.

First, download these free page designs and print them on regular computer paper. Or you can get creative and design your own! That is the beauty of the Martha Stewart Customizable Glass Clings – you can create any design that you like!

Start with one printout, the stencil tape and one piece of glass cling. Each clear cling sheet comes with a glossy backing that you can save and store your fancy new cling designs on.

Set up a work station for yourself where you can tape the paper and cling down. Place the clear cling over the top of your design – so that you can perfectly paint the design on top of the cling sheet. Because of the nature of the flimsy glass cling and the paper, use the stencil tape to carefully tape the edges of the cling to the paper and down to your workstation. This is to ensure that nothing will move on you while you are painting. The cling sheets themselves are 8″ x 10″ which leaves the perfect amount of room to tape the cling to your 8.5″ x 11″ computer paper.

Once you are taped and ready to go, pour your paint into a little dish and start pouncing. For this step I choose to use the glitter glass paint. You only need to paint the areas of the cling where the designs are…

If little bubbles form from the pouncing motion, blow on them and they will disappear.

You will need at least two coats of glitter paint maybe three, depending on the color you choose. Let the paint dry for one hour in between each coat.

After you are happy with the coverage of your paint layers and they have dried at least an hour, outline the designs! With the fine tip applicator of the glass paint carefully outline each and every letter or design – using the same paint color or a different one! I chose a metallic style paint for my outline. Make sure to have a scrap piece of paper handy to practice with…

Very carefully outline each letter or design…

Let the outline paint dry for about 24 hours or at least overnight before you cut them out!

For the arrows I used the same pearl paint for the interior and the outline of the design. I only applied one coat of paint to the interior of the arrows.

When all your paint has dried it is time to cut out your fancy new clings! Carefully remove all the tape and discard along with the printer paper.

Carefully cut out each of your letters right on the edge of your outline, one by one…

After you are finished cutting out each design, place it onto the glossy backing paper that came with the clings. It is the perfect place to store your clings so they stay flat and pretty.

Cut out all your pieces!!! That’s all there is to it! Paint and cut!

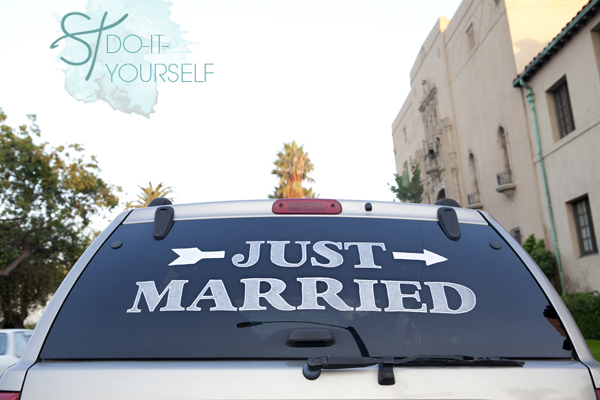
Starting with a VERY VERY clean car window… firmly apply your clings!

What is so fantastic about these clings is that if the spacing is off, it’s no big deal – remove it and replace! It’s wonderful because you aren’t making a mess on your car! You can save these clings for a friend to use or maybe put them on your mirror at home as a keepsake!

CRAFTER TIP! Very important! These clings are not ‘made’ for the great outdoors! Meaning they will probably come off in the rain and I know for a fact that when left baking for hours in the blazing California sun, the edges will lift up a bit and possibly come off completely. I test drove these baby’s on the freeway and all was well! Just know that they will last from the church to the reception, they will be a darling touch for pictures and make a wonderful keepsake – but try to keep them away from extreme/harsh weather conditions.

Are you as obsessed with this project as I am!!?? This project was extremely simple – just a little time consuming… but so worth it because it’s adorable. I wish I could show you how the glitter gleamed brightly in the sunshine! Have fun with this tutorial, get creative and design your own car cling fun!

As with all our DIY tutorials, if you create one of our projects please send us a picture or a trackback – We Love Seeing Your Creativity! Happy Crafting!
![]()
DIY CREDITS // Photography: Studio 11 // DIY tutorial and free download designs by: Jen | Something Turquoise // Everything you need for this tutorial can be found at Michaels – NEW Martha Stewart Glass Craft Paints in Mother of Pearl – Pearl, Pure Platinum – Metallic, and Sterling – Fine Glitter, Martha Stewart Customizable Cling Sheets, Martha Stewart Stencil Tape and Foam Pouncer, scissors: Michaels // nail polish: Essie, Turquoise & Caicos

Comments