
DIY | fabric push pins
Looking for a fun, small DIY gift – how about these scrappy fabric push pins! There are quite a few steps to this weekend’s project but it is so worth it, because they are just so cute. Lot’s of ways you could use them in your wedding.

SUPPLIES:
- any type of fun fabric; I used fat quarters from JoAnn’s Fabrics – they are sold as quilting squares – an easy way to buy lots of smaller pieces of fabric
- your choice of coordinating beads
- large furniture tacks; I got mine at Ace Hardware
- 1/2″ Adhesive backed foam circles – mine are from Michaels
- needle, thread, and scissors

Start by creating yourself a circle cardboard pattern – two inches in diameter, I traced the bottom of a tea light holder to get my circle. You only need one of these – it is just a pattern.

Using your cardboard circle pattern cut out your choice pieces of fabric. The quickest way to do this is to cut a rectangle of fabric larger than your circle pattern, fold the fabric in half – and in half again. Do the same thing with your pattern and then cut – see below. Or you can just cut around the whole circle, up to you.

Next, take your adhesive backed foam circle, remove the adhesive from both sides and insert your large pin right in the center of the circle. This means the foam circle is now firmly attached to the underside of the pin and the opposite side of the foam is tacky as well.

Now take your fabric circle and sew around the outside edge, all the way around – keeping your stitches about an 1/8″ apart. DO NOT TIE A KNOT – leave the string free – we are going to need it later.

After you have sewn all the way around your fabric circle take your tacky pin and insert it all the way through the center of your fabric circle.

Since the underside of your pin has the tacky foam circle – it will now adhere nicely to your fabric circle.

Now comes the fun part! Holding onto the stem of your pin – start pulling the ‘free’ string on your fabric circle. If sewn correctly, your circle will start to gather to the center. When completely gathered, flatten out with your thumb.

Now with the gathers flattened down onto the head of the pin, sew the opening closed with a few cross stitches.

Using your choice beads, sew them across the center of your new fabric push pin. I chose to make three rows of 5 seed beads. For some very small beads you will need a beading needle – they are super skinny and you can find them in any bead store or in Michael’s bead section.

For some designs like the brown one I chose below – it only needed one large bead…

Congrats! You made a fabric push pin! Now go pin something! You could pin seating cards onto a board for your guests, wedding reminder notes up in your home, or pictures of you and your fiance all over trees outside at your reception… the possibility for these adorable creations are endless!
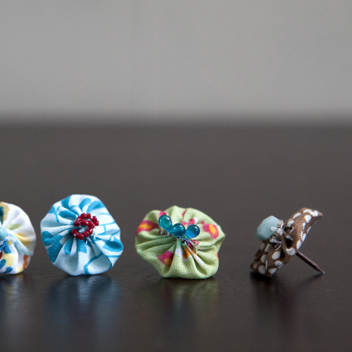
Here are a few of my other color choices with their corresponding beads…

As with all our DIY tutorials, if you create one of our projects please send us a picture – We Love Seeing Your Creativity! If you use Instagram or Twitter please use the hashtag #SomethingTurquoiseDIY and it will show up on our Get Social page. Happy Crafting!
DIY Tutorial Credits
Photography + DIY Tutorial: Jen Carreiro of Something Turquoise // Fabrics: JoAnn // Thumb tacks: Ace Hardware // Beads: Ruby Tuesday // Adhesive circles: Michaels // Nail Polish: Sally Hansen Stickers

Comments