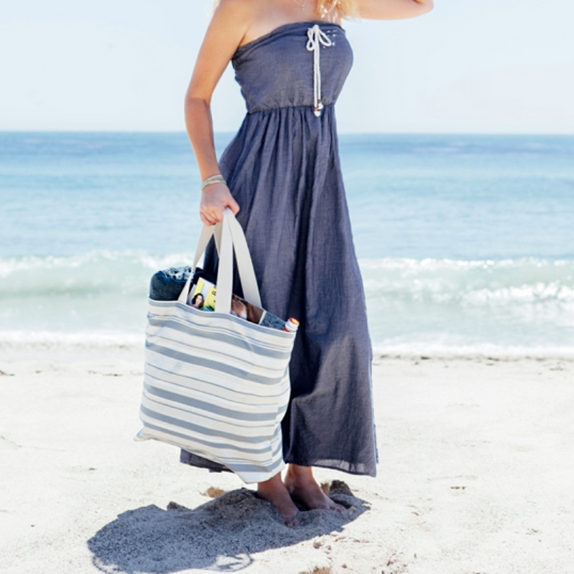

DIY | Honeymoon Beach Bag
I’m so excited to be sharing this simple DIY beach bag pattern with you today because I have literally been making this same bag (in various sizes) for at least 15 years! It’s fabulous, quick, completely reversible and I’m slapping myself for not thinking of sharing it sooner. This is the perfect travel bag – big and sturdy – which means it will make an awesome honeymoon bag! From the plane to the beach, you’ll be covered… remember you can make it in ANY size you want! Happy crafting…


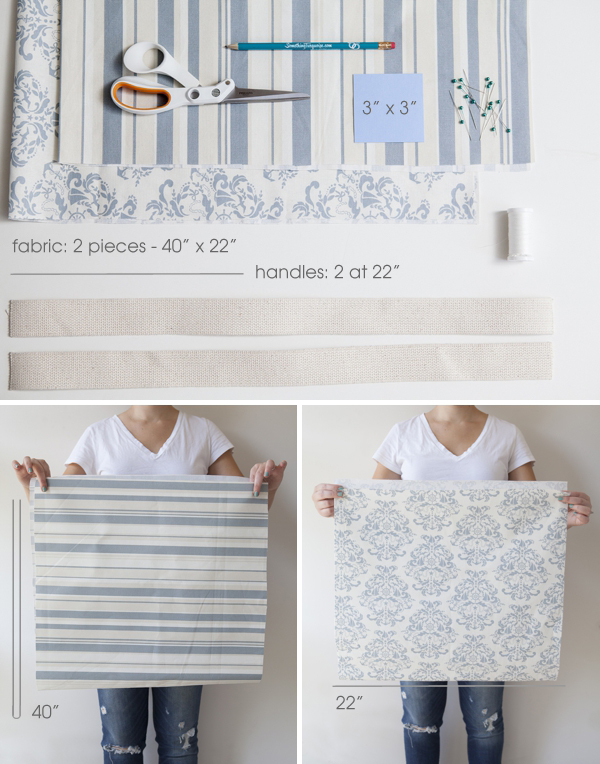
SUPPLIES:
- heavy weight fabric – I used home decor fabrics
- material for handles – I used 1.5″ belting
- thread to match
- sewing machine
- fabric shears
- 3″ x 3″ paper square
- pencil
- pins
- iron
Bag Measurement Tip!
This style bag can literally be made in ANY size you want… so if you want a small, medium or a large bag like ours – you can do it, it’s just up to you! When the size of the fabric decreases so should the paper square size – and vice versa, you’ll see what I mean… read on.
Wash, Iron and Cut your Fabric
The first step is to wash, iron and cut your fabric. You will need two different fabrics, one for the outside of the bag and one for the lining – both cut to 40″ x 22″ to make this exact bag – which is reversible! Make sure that the fabrics are of similar weight… I’m using home decor fabric, meant for pillows and such – because I am hard on my bags! Example: don’t pick silk and burlap = they don’t mix. Heavy fabrics are best for this bag… so is a ‘jean’ needle.
Fold each piece of fabric in half (right side in – wrong side out) like in the picture and sew along each edge from the fold to the cut edge – making it a 20″ x 22″ square – not sewing the top closed! Again, because I am hard on my bags I did a double – seam. ***During all your sewing make sure to take the same exact seam allowance – I did a 1/2″.

Now in each corner (I’m talking at the bottom of the bag, you’ll have the folded edge along the bottom and your fresh seam on each side), take your 3″ x 3″ paper square and line it up to each edge – then trace with a pencil. Do this on both sides of the fabric, meaning 4 times. ***Double the size of your square and that will be the width of the bottom of your bag!

Now it’s time for magic! Take each corner and pull the fabric apart – folding it until you see the two pencil lines line up. This is your next seam!

Make sure your fold is even on both sides and pin. Do this for both sides.

Align your presser foot with the edge of the pencil line – then sew! Again I did 2 seams… then you can cut the excess fabric point off.

Once both corners are completed you will see your bag start to materialize!

Next, we are going to make the top seam of the bag. Fold a 1″ flap from the inside out – make sure it’s even (pin if you need to) and then iron. This will be the top edge of your bag so make sure you are happy with the fold!

Next sew one seam along the edge of this fold… all the way around the bag.

You will need to do all the above steps to the lining material of your bag as well… including folding the edge and sewing it.

Now the fun part! By now your fabric is truly resembling a bag… so turn the outer fabric right side out… then place the lining fabric inside the outer fabric. Smooth and press into place – they should exactly mirror each other.

Ok… now line up all the edges… and pin them together! Your bag is almost done…

Now to add the handles. I added my belting at inch 6.5″ and 13.5″ – which means they are 4″ apart. Pin the belting in place, at least 1″ deep… wherever you would like.

Now sew EVERYTHING together! One seam 1/4″ from the edge and the second 1/2″ from the edge – make sure to reinforce (sew back and forth a few times) at the edge of each handle.

That’s it – that’s all there is to making a simple – reversible bag! If you are handy with your sewing machine, literally from start (cutting) to finish this bag should be 100% complete in less than 2 hours. If you are seasoned like me, it took 23 minutes after the fabric was cut – I set a timer for fun ;)

The perfect honeymoon bag for the DIY Bride…

We are in love with the metallic pink polka dot burlap… aren’t you! FYI: it sewed like a dream.


As with all our DIY tutorials, if you create one of our projects please send us a picture – We Love Seeing Your Creativity! If you use Instagram or Twitter please use the hashtag #SomethingTurquoiseDIY and it will show up on our Get Social page. Happy Crafting!
DIY Tutorial Credits
Photography: Studio 11 Weddings // DIY tutorial by: Jen | Something Turquoise // all fabric + supplies, (blue bag: Sand Stripe + RTC Nautical Map; pink bag: Beach Umbrella Quartz + polka-dot burlap): JoAnn // scissors: Fiskars // dress: Gap // beach: Malibu // nail polish: Essie – Turquoise & Caicos![]()

Comments