
DIY | pocket escort card display
Spring is on it’s way and so I thought I’d bring you a bright, sunshiny tutorial today! Here I will show you exactly how to create this fabulous “pocket escort card display” to easily guide your guests to the right table! So grab your guest list and let’s get busy!

SUPPLIES:
- 2.25″ x 3.5″ baby envelopes from Paper Source
- 2″ x 3.5″ business cards from Paper Source
- fancy scissors
- home printer
- wrapping paper
- large frame
- scrapbooking adhesive like Glue Dots

Start by removing the glass and backing from your large frame, the one I’m using here is 16″ x 20″. Then wrap the frame backing in your choice of wrapping paper. I’m using ‘paper bag‘ wrapping paper from Paper Source. Reassemble your frame without the glass.

Using your computer and favorite design software, print out escort cards for your guests. I’m using the business cards from Paper Source to keep things easy. You can use full sheet cardstock and cut the cards down to fit – it’s your choice. **When designing your cards make sure that only the guests names will peek out beyond the envelope pocket! The font we used here “Sofia” is free to download from Font Squirrel.

These adorable baby sized envelopes make the perfect pockets! Trim 1″ off the top of each envelope to create the pocket.

I love these colors together… aren’t they so bright and cheery?!!

Then take each guest escort card and place into a pocket!


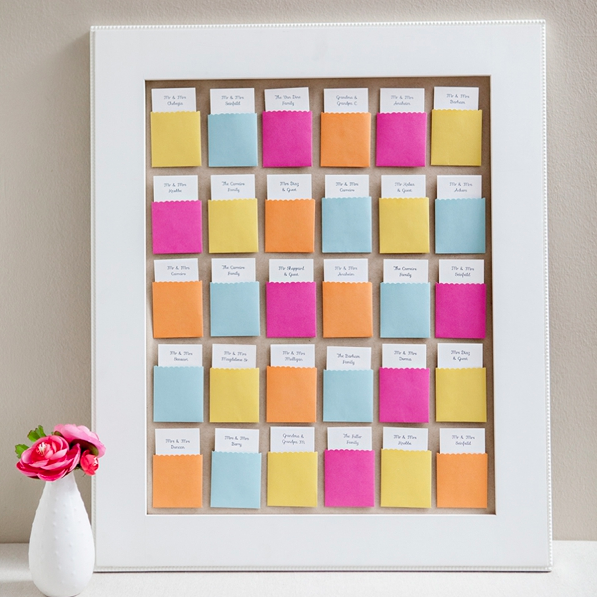
Start to arrange them within your frame… 16″ x 20″ fit 30 escort pockets perfectly. You can use a larger frame or multiple frames if you need to. ***Arrange the cards as you choose; by alphabet, color, table… whatever makes sense to you.

Once you are happy with the placement, attach only the pocket to the wrapped frame backing using your favorite scrapbooking adhesive. Mine of course, is Glue Dots.

I’m completely in LOVE with how this display turned out…

What’s great about Paper Source is they make choosing colors simple, everything matches and everything looks good together… what colors will fit your event?

This little display will definitely have your guests smiling on the way to their tables… 
As with all our DIY tutorials, if you create one of our projects please send us a picture – We Love Seeing Your Creativity! If you use Instagram or Twitter please use the hashtag #SomethingTurquoiseDIY and it will show up on our Get Social page. Happy Crafting!
DIY Tutorial Credits
Photography: Studio 11 Weddings // DIY tutorial by: Jen | Something Turquoise // baby envelopes in Fuchsia, Pool, Poppy and Curry, business cards in Eco White, wrapping paper in Paper Bag: Paper Source // large white 16″ x 20″ frame, Glue Dots and scallop edge scissors: Michaels // card font: Sofia free via FontSquirrel.com // nail polish: Essie – Resort Fling

Comments