
How To Make Distressed Chalkboard Mason Jars
This past year we have definitely seen chalkboard styles trending… and of course everyone loves a pretty mason jar – so today I’ve combined the two! Here in our first “12 Months of Martha” post for 2014, I’m sharing a super easy technique to achieve a Distressed chalkboard mason jar look – which would add the perfect rustic look to your wedding decor! For those of you who might not have heard of the #12MonthsofMartha program; the MSC Editors send their favorite crafty bloggers a box full of fun goodies every month and we get to create something with the ingredients… it’s a blast!

SUPPLIES:
- Martha Stewart Crafts chalkboard paint (blue, green, and clear)
- mason and jelly jars, with texture!
- coarse grit nail file or sand paper
- soft bristled paint brush
- chalk
- wax paper

On a waxed piece of paper (or the like) start painting your first coat of chalkboard paint onto your mason jar with a soft bristled brush, the softer the better – it will leave less ‘paint lines’ behind. It’s always best to start with a clean jar… clean with rubbing alcohol if needed.

Let the first coat dry completely; at least one hour if not a few.

Then add a second coat, if you’d like. You might be totally happy with the coverage of the first coat, which is fine. The lighter the color, the more coats you might need… it’s completely up to you. Let dry for 24 hours.

MIXING PAINTS:
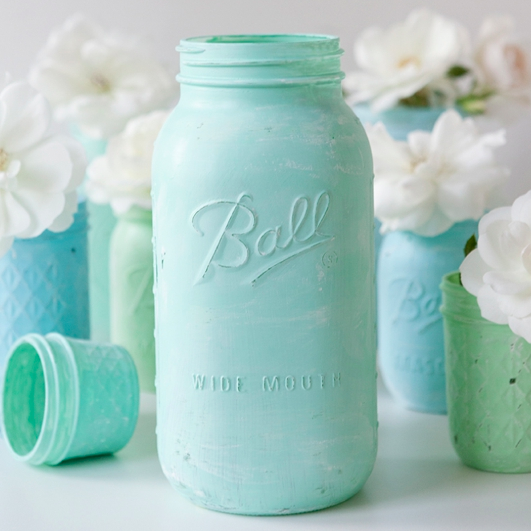
I made all these shades below with the three chalkboard paints pictured above. Green, blue and clear (looks like white and dilutes like it too!). For the turquoise shade we mixed the blue and green! Get creative… the colors are up to you and your theme!

Once your paint has dried at least 24 hours you are ready to sand. This technique works best on jars that have a raised detail, like “Ball”, “Kerr”, or jelly jar hexagon patterns.

Using a coarse grit nail file or piece of sand paper, gently sand the paint off the raised design areas of your glass jar…

You can also sand the smooth areas of the jar to add extra texture and don’t forget the top!

I love seeing that lovely old-school logo…

Jelly jars (and tin cans) make this technique look good!

Now for the chalk. To finish the distressed look, you need to rub your entire jar with chalk. Once the jar is covered, wipe the chalk dust away with your fingers and then go back and add a little more for decoration.

The chalk step really finishes off the distressed look of the jars…

Add some chalk…

…rub it in and then add a little more!

![]()

As with all our DIY tutorials, if you create one of our projects please send us a picture – We Love Seeing Your Creativity! If you use Instagram or Twitter please use the hashtag #SomethingTurquoiseDIY and it will show up on our Get Social page. Happy Crafting!
DIY Tutorial Credits
Photography + DIY Tutorial: Jen Causey of Something Turquoise // Martha Stewart Crafts Chalkboard paint in Green, Blue, and Clear and MSC soft bristled paint brush: courtesy of the Editors at Martha Stewart Living // Flowers: picked from my garden // Jars: courtesy of Ball // nail polish: Essie, Mint Candy Apple + Turquoise and Caicos
Shop The Supplies:
Find the supplies you’ll need for this project from our affiliate links below:

Comments