
DIY | custom wedding cufflinks
We have a super fun tutorial for you today… how to make custom wedding cufflinks for your favorite men!!! They are so easy and inexpensive you will want to make them for your entire bridal party and any other special guys that are included in your wedding day. The supplies and steps below create such a lovely finished look, that the lucky chaps who receive these little gifts probably won’t guess that they are handmade!

SUPPLIES:
- cufflink blanks and glass tile inserts (ours are from Discount Beads via Etsy)
- Tacky Glue
- scissors
- paint brush
- the FREE design download below

///// FREE wedding cufflink design DOWNLOAD /////
Print out the free design download above onto your choice of 8.5″ x 11″ paper that matches your wedding; cardstock, text weight, cover weight and photo papers all work the same. If you don’t like our designs feel free to create your own! *CRAFTERS TIP // Make sure to let your inkjet print dry for at least an hour before gluing, if it’s laser there’s no need to wait. We are going to start by gluing the glass tile insert on top of the design of your choice. Place a small dot of glue on the paper and then paint it evenly across the design…

..then quickly push your glass tile into the glue. Press it evenly and firmly until you can see the design through the glass tile. Carefully center the tile over the design. Make sure there aren’t any air bubbles between the glass and the paper, if there are you can usually wiggle the tile around to pop them. *CRAFTERS TIP // If your paper pops up a little from the moisture of the glue, simply hold it down for about a minute and it will continue to dry just fine.

This is what it will look like when the glue is wet. Do not move or touch these until they are absolutely dry, at least 4 hours… we left our sit overnight just to make sure.

When it dries, the glue is absolutely clear like this.

Now, cut out your tiles! Carefully and closely, cut your tile off the paper. Try to trim it as close as you can, clipping the corners if need be. If there is any glue that has dried on the sides of the glass tile you can cut or scrape that off as well.

Carefully cut out each of your darling little tiles…

Now, place the embellished glass tile into the cufflink blank to make sure it fits. If it doesn’t, you will need to trim the paper until it does.

Next up, gluing the tile to the cufflink blank. Place a small dot of glue on the inside of the cufflink blank, evenly distribute it with a paint brush and then carefully press your glass tile into the cufflink blank. If glue squeezes out around your tile, it’s no problem – wipe it off. The glue will dry 100% clear. Let these dry for at least 4 hours (or overnight) and you’re done!

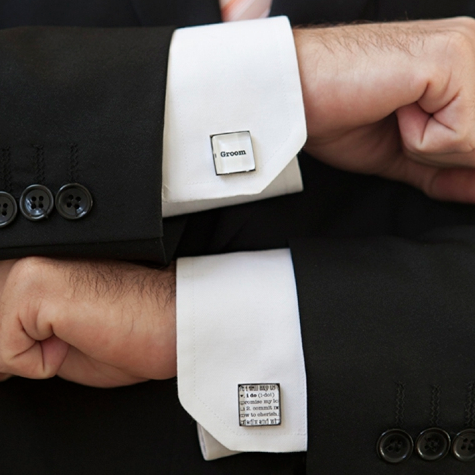
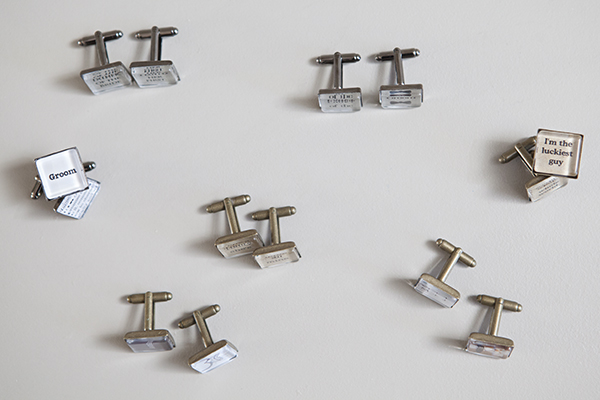
Aren’t they darling!?! We have 25 free designs available to download above… but don’t feel like you have to use ours, you can easily design your own! Another great option is using a special photo or the recipients initials…

These are such inexpensive little gifts that you can make them for the entire bridal party…

…your fathers will love them, and so will the groom…

You can also use this same technique on photograph copies or patterned scrapbooking paper. The same steps apply… glue the glass tile to your image, let it dry, cut out the glass tile, glue the tile into the cufflink blank and.. voila!
*CRAFTERS TIP // Here we used Photoshop to design and measure the right picture size, and as you can see we only used a tiny bit of the picture itself. We recommend doing a few trial prints to make sure the picture size is what you are looking for. As long as you can see the part of the image you want to show through the glass tile – you’re golden.

We got these cufflink blanks from Discount Beads via Etsy. They have lots of different colors and shapes… check them out!
I’m in love… aren’t you?

Which set will you make for your handsome groom?

As with all our DIY tutorials, if you create one of our projects please send us a picture – We Love Seeing Your Creativity! If you use Instagram or Twitter please use the hashtag #SomethingTurquoiseDIY and it will show up on our Get Social page. Happy Crafting!
DIY Tutorial Credits
Photography: Studio 11 Weddings // DIY tutorial and free download by: Jen | Something Turquoise // square 16mm gunmetal and antique bronze, square cufflink blanks and glass tile inserts: Discount Beads via Etsy // 8.5″ x 11″ paper in Pure White, Paper Bag and Gravel: Paper-Source // Tacky glue, Martha Stewart Crafts scissors and paint brush: Michaels // nail polish: Essie – Mint Candy Apple

Comments