

DIY | easy string art table numbers
We are 100% in love with the new ‘string art’ trend.. and decided we’d bring you the easy way to DIY string art table numbers for your wedding! With the simple steps below, you can make these adorable yarn-wrapped table numbers in no time… and it’s cheap too!

SUPPLIES:
- wood plaque
- hammer
- small nails with heads (ours are 1″ wire nails)
- yarn
- thumb tacks
- stenciling tape
- paint is optional
- number print outs

Obviously, painting your wood of choice is optional. We were looking for a soft mint color… so we mixed Martha Stewart Crafts ‘wedding cake’ and ‘beach glass’ in a little paint jar.

For this color we were happy with only once coat of paint. Let it dry for at least an hour before you proceed to the next step… it’s even better if you can paint them the night before.

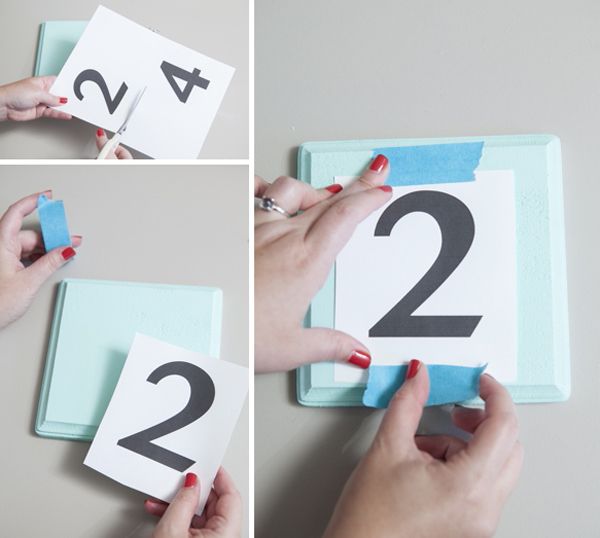
On your computer, print out each table number using your favorite font. Cut the letter down to size and tape it onto your wood plaque using ‘paint safe’ tape.
Using a simple thumb tack, keeping even spacing in mind… pierce little holes along the outline of the number. Every half-inch or so will be perfect, but it doesn’t need to be precise! If detail in the number calls for more holes – then pierce away! This will give you the perfect number outline and the starter holes for your nails!

Next, simply hammer a nail into every little starter hole that you created! See how our nails have a nice little head on them, if that wasn’t there – the yarn would slip right off the nail.

Now the fun part! Wrapping all the nails with yarn! Start by tying a knot onto one nail and wrap, wrap, wrap… keep a slight tension on the yarn or else it will pop off. Feel free to tie off smaller sections at a time if need be. Don’t forget to wrap the entire outline of the nails!

Wrap and keep wrapping every which way until you are satisfied with the yarn coverage. Tie a simple knot onto a nail when your design is complete. Tuck the cut yarn end.

There you have it, the easiest way to make string art…

The great thing about this technique is that you can use it to create almost any design… from these darling table numbers to your initials… or possibly even your wedding logo ~ we can’t wait to see what you come up with!

I love how crafty this yarn looks… I love it so much that I’m going to take on a few larger projects and let you know how it goes!

As with all our DIY tutorials, if you create one of our projects please send us a picture or a trackback – We Love Seeing Your Creativity! If you use Instagram or Twitter please use the hashtag #SomethingTurquoiseDIY. Happy Crafting!
Photography: Studio 11 Weddings // DIY tutorial by: Jen | Something Turquoise // Martha Stewart Crafts paint in Satin finish in ‘wedding cake’ and ‘beach glass’, MSC yarn in ‘gray pearl’, MSC scissors, MSC paint brush and stenciling tape, ArtMinds 6.5″ square wood plaque, paint jar: Michaels // gray chevron fabric: JoAnns // 1 x 16 wire nails: Lowes // font used: Malayalam MN Bold // nail polish: OPI – Paint My Moji-toes Red

Comments