
DIY | Glitter High Heels
Still looking for the perfect pair of glam shoes for your wedding day? If you can’t find the right fit… why not make them yourself! Today we are sharing fail-proof steps on how to perfectly glitter a pair of high heels for your special day… or any other day for that matter!

SUPPLIES:
- pair of heels (any fabric will work!)
- Martha Stewart Crafts Decoupage glue in Gloss Finish
- your choice of glitter
- paint brush
- small container and/or wax paper

////////// CRAFTERS TIP //////////
To make these heels look superb, it takes time! This project will not be complete in one night… or even one day! Give yourself at least three days to complete the steps below.
It will be worth it ~ I promise!!!
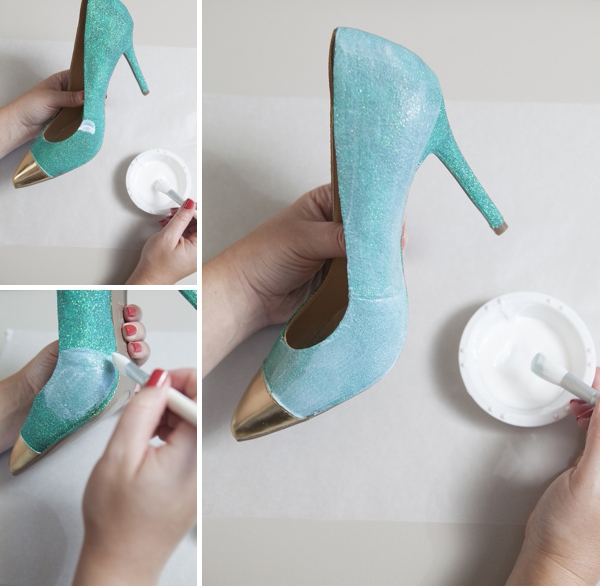
We will start by painting a coat of decoupage glue onto a small section of the heel. It’s best to work in small sections; if doing an entire heel you might want to break it up into five sections. Two on each side and then the heel itself, this will help to keep your coats organized. If your heels are made of fabric like these, it will soak up the glue ~ so make sure you apply enough that the glitter will stick. Don’t be stingy. If using a patent leather or other shiny material you will need less.
////////// Glue Strokes //////////
Keep your glue strokes as even as possible, like shown in the large picture below. If you have excess glue lines after your stroke you need to smooth them out, otherwise you shoe will end up looking wrinkled and/or possibly having lines.

Then shake on the glitter! Apply it liberally and tap the shoe on the desk to remove excess. Here I am doing this over a piece of wax paper to protect my work surface and save the excess glitter.

You can carefully pat certain areas of the glitter into the fabric if you need to.

When that section is complete, carefully move onto the next. If there are areas of the heel that you don’t want glitter, you can tape them off if you feel necessary. Since holding the shoe can be a bit awkward, only paint one side at a time and let it dry for at least an hour before moving on. Taking the time to apply the glitter in steps will pay off in the long run!

Keep on glittering! The amount of glitter you will need for each shoe will depend on the area that you are glittering and the color of the shoe. ***Each of these heels took exactly one of these small vials of glitter. I recommend buying a larger container of glitter.

////////// Save what glitter you can! /////////

Since the shoes I started off with were not the same color as my glitter, I needed to do TWO coats of glitter. The picture on the left is showing what one coat of dried decoupage and glitter looks like compared to two coats.
Whether you need one or two coats of glitter will be up to you!

The steps are the same for the second coat, paint on the decoupage and add the glitter.

////////// Sealing the Glitter //////////
Unless you want to leave a glitter trail behind you… this step is VERY important! You will need to paint your new glitter shoe with TWO coats of decoupage to completely seal the glitter. Each coat needs at least an hour of dry time, if not more. To be safe, let them dry for 24 hours before you wear them. After the two coats are complete, you won’t loose one sparkle!
Naturally you will have tons of loose glitter on the inside of your shoe, so take a loose bristled brush and brush it all out.

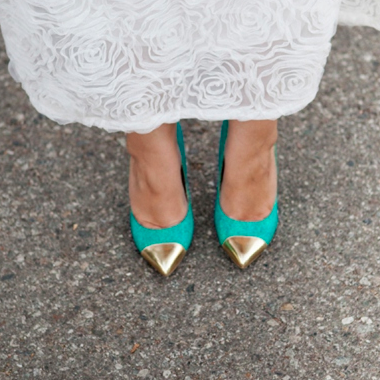
These shoes are to die for… and if you take the time to do the steps correctly ~ they will be SO gorgeous that no one will ever expect that you made them yourself!

What color glitter would you use???

As with all our DIY tutorials, if you create one of our projects please send us a picture or a trackback – We Love Seeing Your Creativity! If you use Instagram or Twitter please use the hashtag #SomethingTurquoiseDIY. Happy Crafting!
Photography: Studio 11 Weddings // DIY tutorial by: Jen | Something Turquoise // Martha Stewart Crafts Decoupage glue in Gloss Finish, paint brush, and Fine Glitter in Wintermint: Editors at Martha Stewart available exclusively at Michaels // gold-tiped high heels: Payless // wedding dress: Nordstrom // nail polish: OPI – Paint My Moji-toes Red

Comments