
DIY | wedding bouquet charm bracelets
Well, I’m just thrilled because it’s DIY Friday… and we have a very special project to share with you today! How to easily make darling ‘wedding bouquet charm bracelets’! Adorn your beautiful blooms with personalized bling that could be the perfect ‘something blue’ or add a locket to carry that special person down the aisle with you… I love this one, xoxo.

SUPPLIES:
- your choice of pretty new beads and charms from Martha Stewart
- .5mm Stretch Magic bead and jewelry cord
- crimp beads
- jump rings (if adding a charm)
- Martha Stewart Crafts jewelry glaze, silicone work mat, and brush
- Martha Stewart Crafts crimper
- small scissors

Let’s start with the glazing technique. Essentially painting jewelry, glazing is a super easy way to add color to any metal accessory. The silicone work mat is a safe workspace which cleans up easily. To this locket, I added one coat of Ivory glaze. ***make sure to clean your piece with rubbing alcohol before you start!

With glazing you can leave the paint as is – or wipe it away to leave it in relief areas like I did below. After the paint dried for about 10 minutes I carefully wiped the top layer away with my finger, leaving the white paint in the design recesses of the charm. Glaze needs to dry one hour in between coats and at least the same before working with the accessory.

////////// steps to make a simple stretch bracelet //////////
I like to work on a soft piece of fabric so that my beads don’t roll around on me. Remove the beads from their packaging and cut your desired length of Stretch Magic cord.

Slide a crimp bead onto the end of your cut cord and crimp it onto the cord, leave about 2 inches of excess cord. *Make sure that the crimp bead is completely crimped onto the string – give the string a tug – if not secure the bead may very well slide off. This first crimp bead acts as a stopper for the beads that you will add to the cord. Add your beads to the cord.

When you are finished adding the beads, add a second jump ring behind your last bead. Then slide the extra 2″ of cord (on the other end of the string) into that new crimp bead – both pieces of cord should be inside the open crimp bead. Hold the ends carefully and crimp the second bead nice and tight.

Cut the excess stretch cord and there you have it! A simple stretchy bracelet! This specific color combination would make a wonderful ‘something blue’!!!

Wrap your new ‘bouquet bracelet’ either once, twice or three times around the base of your bouquet! Everyones bouquet size will be different – the tighter the bracelet the better!

////////// let’s talk bouquets //////////
Please discuss this project with your florist! Most bouquets average about 4″ in circumference… yours might be smaller or larger. If you want your special bracelet to show you should let your florist know so that they can build your bouquet appropriately – like mine below. The leaves underneath allow visual space for the bracelet to shine! *The tighter the bracelet the better – you want it to stay on.

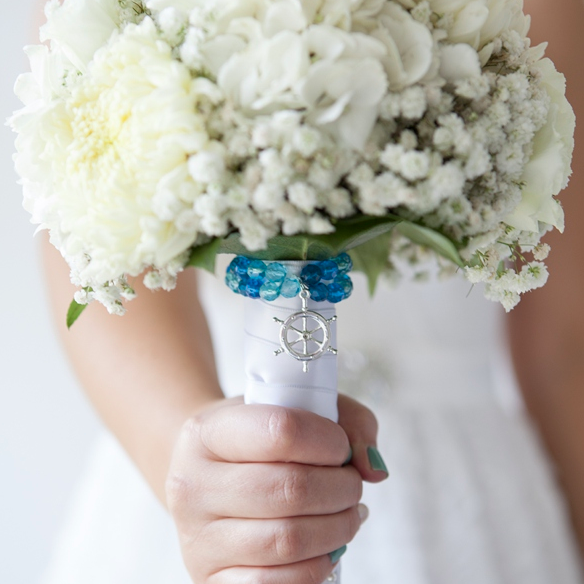
Style number 2! Make your simple stretchy bracelet using the same steps above.

Now to add a charm. Using an open style jump ring, slightly bend it open enough to slip it onto your charm – then slip the jump ring (with the charm) onto the string of your bracelet. Carefully use your pliers to move the metal ends of the jump ring closed. *Make sure it’s closed tightly – if not your charm will slip off your bracelet.

This style is perfect for a nautical wedding… and would make a darling ‘something blue’!

The terrific thing about these ‘bouquet bracelets’ is that before your bouquet toss you can easily slide it off and slip it on your wrist – no more loosing your special heirloom!

And back to the locket version…make your simple stretchy bracelet using the steps above.

Carefully cut out a picture of the loved one you can’t bear to walk down the isle without and place it inside your locket. If you have more than one person you need to include – simply add more lockets! **this is a picture of my dear, sweet aunt Karen who I miss terribly.

Using an open jump ring, add your beautifully glazed locket onto your special bracelet.

Then simply slide it onto your bouquet the day of your wedding!


It’s become popular for the bride to carry special heirlooms down the aisle within her bouquet. Sadly I’ve heard of too many brides who have been enjoying their day so much that when they toss their bouquet they completely forget that they had something special in it – sometimes to be lost forever! I hope that this project helps you easily add that something special to your beautiful bouquet – that you can also slip off in a jiffy! Not only that but you can wear this special bracelet well beyond your wedding day.

![]()
As with all our DIY tutorials, if you create one of our projects please send us a picture or a trackback – We Love Seeing Your Creativity! If you use Instagram or Twitter please use the hashtag #SomethingTurquoiseDIY. Happy Crafting!
Photography: Studio 11 Weddings // DIY tutorial by: Jen | Something Turquoise // beautiful bouquet: Floral Design by Jacqueline Ahne // Martha Stewart Crafts brand NEW line of fabulous jewelry is available exclusively at: Michaels // jump rings, crimp beads, Stretch Magic and cute scissors: Michaels // wedding dress: Nordstrom // nail polish: OPI, Up Front & Personal – and Essie, Turquoise & Caicos

Comments