
DIY | lace covered mason jars
I’ve been getting a lot of emails lately about the best type of glue to use when attaching lace to glass jars… my answer is – none! It is SO much easier to SEW your lace or ribbon together to create a sleeve that fits around your jar, rather than glue lace to a jar. This way you can change it if you want, no need to ruin a nice jar or vase and there is no mess with glue seeping through your lace! Here we go… DIY lace covered mason jars… or any other type of jar for that matter!

Supplies: jars of any kind, two of mine are mason jars and the other three are old jam, and olive jars; lots of wide lace mine was 7″ wide; sewing machine, measuring tape, thread, scissors and the yarn is optional. In this DIY I am keeping it simple and using the same exact lace for all the jars, cutting each to make the perfect fit.

Start by measuring the circumference of each jar, then write it down.

The total length of lace needed for each jar will be it’s circumference plus one inch, which gives you a half inch seam allowance for the sleeve.

Cut the appropriate amount of lace for each jar, the circumference plus 1″. If the jars circumference (distance around the jar) is 8″ you will need 9″ of lace. To keep organized, I stored each cut piece of lace it it’s jar.

Keep measuring and cutting lace until all your jars are completed.

Next, sew the lace together to create the sleeve. Start by folding the lace in half and mark a 1/2″ in from the cut side of the lace, top and bottom – this is where your seam will start and end. Remember, we added 1″ to the jar measurement so that we would have a 1/2″ seam allowance.

Sew your lace together to create a sleeve, using the marked guides that you added. Most sewing machines also have measurements listed on the base to help you keep sewing evenly.


Once the sleeve is sewn, slip it onto it’s jar – if measured correctly the sleeve should fit perfectly, {if too large, go back and sew a little deeper of a seam – if too big, rip out the stitching, measure again and re-sew} I put the sleeve on inside out to prepare for the next step.

Find where you want the lace to hit your jar and cut a notch across your seam that is sticking out, this way you will know exactly where to cut your lace. Cut straight across the sleeve to make your lace fit the jar. Slip your sleeve right side out and onto it’s jar. Cute!

Now do the same for the rest of your jars! Cute and easy!


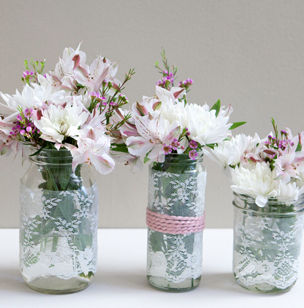
Added touch: to add a little extra color to your lace mason jars – wind some cute yarn around the middle! Wrap a couple times and then holding one end keep turing the jar, wrap 5 or 6 times then cut and tie a little knot or bow. This step can be done in multiple colors!

Add flowers or candles and you have adorably chic wedding decor!

As with all our DIY tutorials, if you create one of our projects please send us a picture or a trackback – We Love Seeing Your Creativity! If you use Instagram or Twitter please use the hashtag #SomethingTurquoiseDIY. Happy Crafting!
![]()
Photography: Studio 11 // Diy: Jen | Something Turquoise // Mason Jars: Ralphs // Sewing machine, lace, yarn, and measuring tape: JoAnn Fabrics // nail polish: OPI Pink of Hearts

Comments