
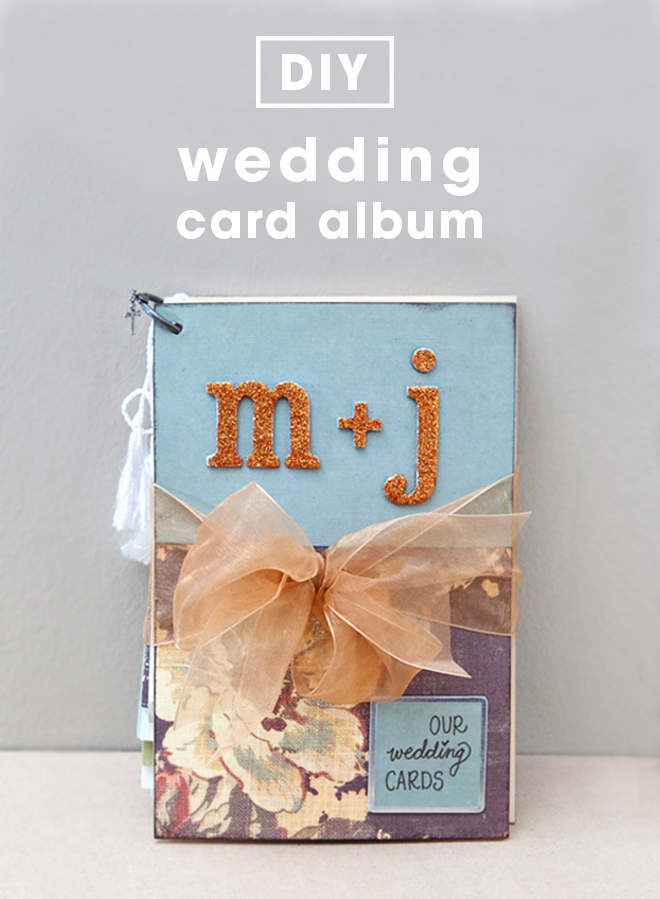
DIY | Wedding Card Keepsake Album
Wow, do I have a long – but fantastic DIY post for you today! Today is November 11th… and it’s my 5th wedding anniversary – as well as my parents 33rd wedding anniversary. We are celebrating on the beautiful island of Catalina, where we got married, and I’m typing this as I’m looking out at the beautiful scenery!
THE GREETING CARD MINI-ALBUM
This album is perfect for any type of special cards that you receive and want to keep – especially great for wedding cards, shower cards… or christmas cards! The beauty of this album is that you can completely open it to read every single card!
Two pieces of cardboard and a little glitter, hold tight your treasured memories.

SUPPLIES:
- Paper Trimmer
- Crop-a-dile Hole Punch
- Making Memories Tag Maker and Tags
- Ruler
- Scissors
- E600 Glue
- Pen/pencil
- Scrap Cardboard (like from a cereal box or new sheet set)
- Wide Ribbon
- Cute “Bride & Groom” Rubber Stamp
- Stamp Pad
- Scrapbooking Brads
- Glue Dots
- Large Album Ring

We will start by gathering your all your greeting cards, shuffle them together to find the largest card of the stack.

The size of your album will depend on the largest card in your group. You will need two pieces of cardboard, mine was saved from my last sheet set that I bought – always save good cardboard! From the cardboard you will make the front and back pieces of your mini-album. Measure about a quarter of an inch past each side of your largest card.

Trace a your measurement and cut two pieces – one for the front and and one for the back.


CRAFTER’S TIP: If your cardboard edges are a little rough after you cut them, use a nail buffer to sand down the edges and smooth them out.

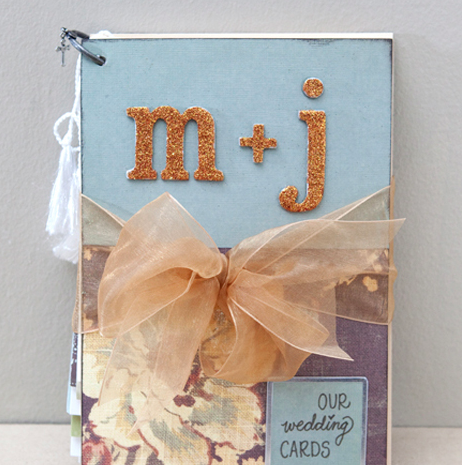
For your cover you can choose anything! A wedding picture, the date, your initials…

Now we will work on the album covers. You will need three pieces of patterned paper that all complement each other (forgive me – I lost the picture of the papers together). Based on the design you choose for the front of your album, measure and cut your desired papers. My favorite paper trimmer is from Martha Stewart of course.


Inking the edges of your paper is a technique used to add dimension, just dab/swipe your ink pad across the edges of the paper.

Next, work on your second piece of patterned paper. If you are following my design, choose a plain paper – one that doesn’t overpower your chipboard initials.

Now for the backside of your album, trace the back panel and cut your choice of paper to cover it.

I choose to stamp a cute bride & groom on the backside, the stamp is from Paper-Source.

Attaching your cover patterned paper to your cardboard: using Glue Dots, press your paper firmly to the glue dot roll and peel off. The glue dot will come away from the roll and be stuck to the backside of your paper, do this all along the edge of the paper – leaving and inch or two in between each dot. They are very sticky. Then apply to your cardboard base.

Use the same technique for the front. I wanted the flower pattern paper to cover the teal paper so I attached the teal paper first and then the flower paper.

Remember to firmly press your paper into the glue dot, if you don’t, when you pull the paper away from the roll it could tear your paper.

There you have it, the front and the back!

Next, the wrap around bow, this part is very important. When tied, it is what holds your whole entire album together. You will need about 30″ of your desired ribbon. I wanted my bow to tie directly over the line of my two patterned papers on the front of my album so I measured accordingly. My teal square was 4″ long, so on the back album cover I measured 4″ from the top. Put a mark about one inch in from each side – this is where we will attach the ribbon.

Placing the ribbon over your marks, stab through the ribbon with scissors or an Exacto knife to create a hole for your brads. It is best to do this on a spongy surface like a foam board or a couch pillow that you don’t care about. Make sure the holes go all the way through the ribbon and the cardboard.

Once your holes are ready, put two large brads through the ribbon and cardboard and secure them on the backside. Now your ribbon is completely attached.

Now we will cover the inside of your album covers. Trace your cardboard and cut out your choice of paper to cover the inside of the cardboard covers, attach with glue dots.

It is important to do this step after the ribbon is attached so that the paper covers the brads that come through the backside of your album.

Now for some embellishments. I created a tag using the Making Memories Tag Maker, to say ‘Our Wedding Cards’. The tag maker kit comes with metal rims, templates, and the tag press. Trace your choice of template to match your tag rim. Cut it out and make sure it fits within the metal rim.

Then write your desired saying onto your paper, I always practice, then write in pencil, trace in pen, and then erase the lingering pencil.

Place your paper inside the metal rim, at this point the edges of the rim stick out – once punched it will lay flat and the paper will be completely encased within the metal rim.

Place inside the tag press and press firmly. Voila! A perfectly pressed tag.

Now attach your tag with glue dots to your album cover.

Next up, the initials. You can buy chipboard (fancy name for embellished cardboard pieces) alphabets anywhere and everywhere. I attached mine with E600 because I don’t like using glue dots with chipboard, the layers of chipboard will easily peel away from the Glue Dots. Chipboard (or cardboard) has many layers – and like I said when pulled from the glue dots roll, sometimes your paper can tear. This happens a lot with chipboard, you press it down, pull away, and are left with part of your chipboard on the glue dot still attached to the roll. Glue is just easier. Glue on your initials.


Now for the album ring. Draw a little dot where you want to punch your hole, I did it about a half an inch in from each side. Place your album covers together, insert into your trusty Crop-a-dile hole punch and chomp away. Crop-a-dile’s cut through cardboard like butter, this tool is a must for this project.

Now stack your cards together and in sets of four to five, punch the same type holes. For ease I set the correct measurement on my crop-a-dile. Punch every single card.

Now you will need a large ring, mine is from a scrapbooking store and it is specifically for albums. Open it up, insert your album cover, then all your cards, and then finally your back cover!

Close your ring and you have yourself a card album! The next step is tying the bow, from the backside – around your album. Trim the edges up nice.

My album ring had a little loop for a charm, so I decide to add a cute little cross to it.

There you have it, lots of work – but SO worth it!

As with all our DIY tutorials, if you create one of our projects please send us a picture – We Love Seeing Your Creativity! If you use Instagram or Twitter please use the hashtag #SomethingTurquoiseDIY and it will show up on our Get Social page. Happy Crafting!
DIY Tutorial Credits
Photography: Something Turquoise Photography for SomethingTurquoise.com // DIY tutorial: Jen | Something Turquoise // Ribbon, patterned paper (brand Wild Asparagus), brads, pen, chipboard initials, and E6000: different scrapbooking stores // Album ring: 7gypsies // bride + groom rubber stamp: Paper-Source // Stamp Pad: Stampin Up! // Crop-a-dile Hole Punch + Eyelet Setter: Amazon // Tag Press Maker: Making Memories // Craft Glue Dots: Amazon // Cross charm: Ruby Tuesday Bead Company // Paper Trimmer: Martha Stewart // Nail polish: Turquoise & Caicos by Essie
Shop The Supplies:
Find a few of the supplies you’ll need for this project from our affiliate links below:
I actually created this exact album (only for christmas cards) and it was published in Fast & Fresh Scrapbooks, a special edition of Creating Keepsakes Scrapbooking Magazine, a couple of years ago. Isn’t it a fantastic idea to make one for each year’s christmas cards!!?? Here is the spread:


Comments