
DIY | painted brick table number
Happy DIY Friday! This project was originally created as a guest post for the terrific Sparkle & Hay. If you are planning a rustic, down to earth, outdoor, style wedding… these hand painted brick table numbers would be perfect {and ridiculously cheap} for your event! Customize with your wedding color and choose a glaze to fit your style… within an hour or so your table numbers will be done and completely adorable!

Supplies: bricks – one for each table you have, Stucco Paint medium from Martha Stewart Craft Paints, your choice of paint color to match your wedding decor, felt – approximately one craft sheet per 4 bricks, E6000 glue, Mod Podge, scissors, paint brush, pencil, and a container to mix your stucco paint in.

Start by tracing each table number onto each brick.

Next, you will need to mix your choice of paint color with the stucco paint medium. Start by thoroughly mixing up the stucco medium, I used the end of my paint brush to do this. Then add some of the medium to a separate mixing container. My container is from Michaels, and what I like most is that it has a lid.

Next add your choice of color. You only need a drop or two of paint for about a tablespoon of the stucco medium. Thoroughly mix the two together and clean the end of your brush.

Now start painting your numbers on each brick. We will be painting three coats. If you are using a lighter color paint, don’t worry if the pencil line smudges with the paint, it will be completely covered by the third coat. Bricks absorb moisture very easily so your paint will dry quickly.

Make sure to cover your mixed paint in between each coat so that it doesn’t dry up, this is why I used a container with a sealable lid. If you choose to use a small dish that has no lid, just place it into a zip lock bag and seal.

Coat number two!

Coat number three! By this coat you will have a nice thick texture formed with the layers of paint. That is what I loved about the stucco medium – it resembles the texture of a brick!

In this example on the #7 brick I used Martha Stewart Craft Paint in ‘Deep Sea’. Here is where your wedding style can determine the rest of the project, for the #7 brick – I wanted to keep it rustic and chose not to seal it with Mod Podge.

In this example, on brick #4 I used Martha Stewart Craft Paint in ‘Sea Glass’. Using the regular Mod Podge with gloss finish, I painted a thin layer all over the brick to give this version a more finished look. The picture below is actually the finished product.

Gloss finish, yet still rustic. Only one thin coat necessary.

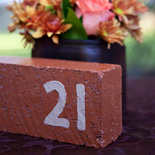
Brick #21 however, is sealed with ‘Glitter’ Mod Podge for a fun rustic-glam look – this is my favorite! Same steps, apply a thin layer of ‘glitter’ Mod Podge to cover your brick. This paint color from Martha is called ‘Root Beer Float’.

Below I am showing an option for finishing your project; applying felt to the bottom of your brick. This is definitely not necessary, but if these will be sitting on top of nice tablecloths or something even semi-delicate, you might want to consider this step. Bricks are actually very rough!

Measure a rectangle of felt, roughly 1/2″ shorter than the dimensions of your brick. So that when the felt is glued to the bottom of your brick, it won’t be sticking out – we want no one to see this part! It is only for protection of the surface that your brick will be sitting on.

Cut your rectangle out of the felt and using your E6000 glue apply a thin bead around the edge and a little in the middle. Firmly press your felt onto the bottom of your brick and stand right side up to dry. The weight of your brick will hold the felt snug while drying.

As with all our DIY tutorials, if you create one of our projects please send us a picture or a trackback – We Love Seeing Your Creativity! If you use Instagram or Twitter please use the hashtag #SomethingTurquoiseDIY. Happy Crafting!
![]()
photography: Studio 11 – my handsome hubby! / DIY: Jen | Something Turquoise / Martha Stewart Craft Paint and Stucco Medium: exclusively sold at Michaels / bricks: $0.45 at Lowe’s / Mod Podge, felt, scissors, E6000, paint brushes and paint container: all from Michaels / Nail Polish: turquoise + caicos from Essie [this DIY project was created specifically for Sparkle & Hay ]

Comments