
DIY | Wedding Ceremony Wine Box
Yay!!! Happy 2014!!! This is our very first DIY tutorial of the New Year and so we thought we’d rock your socks off… this project isn’t for the faint of crafty heart ~ it’s for you hardcore DIY brides. Girls, I know you are out there and I love you to death!
We absolutely love new traditions especially when they are this darling! It has become quite popular for wine loving couples to seal (by hammer and nail) a special bottle in a darling custom box during their ceremony – only to be opened on their first anniversary. Gaahhhh… are you dying ~ isn’t it an adorable idea!!! Who wants to eat year old cake anyway!? Seriously, I would have done this in a second if it was a thing.. way back when we were married. So me and my Dad measured almost every wine bottle out there and made the perfect blueprint just for you… to make a very special, handmade keepsake wedding ceremony wine box…

////////// Choosing + Cutting Your Wood //////////
Following our specific blueprint below will produce the perfect size wedding ceremony wine box for MOST bottles of wine, be it white, red, or bubbly… unless you buy a super crazy weird shaped bottle, lol. The wood we are using here is ‘clear pine’ and we used a chop saw and a table saw to cut it down to size. If you can’t cut the wood yourself or you don’t feel like doing it, you can always have the guys at your local hardware store do it for you for a small fee. ***This blueprint uses wood that is 3/8″ thick, which makes a sturdy but light box.

////////// Putting Your Box Together //////////
You have three different options for putting this box together; although we are only sharing two here today. One: using strong wood glue and bricks. Two: using a drill and screws. Three: using a nail gun. All three options are terrific, choose what makes you feel most comfortable.

////////// Decorating Your Box //////////
There are MANY ways that you can decorate this box… we are sharing two techniques today – stickers + stain and house numbers. You might want to paint the box with craft paint, burn a design into it with a heat tool… or draw on it with Sharpies (which if you do, to prevent bleeding you will need to seal the wood with a clear spray sealant first; pictured). You might want to use your initials, your wedding date, or you might want it to read “do not open until…”, the choice is yours!

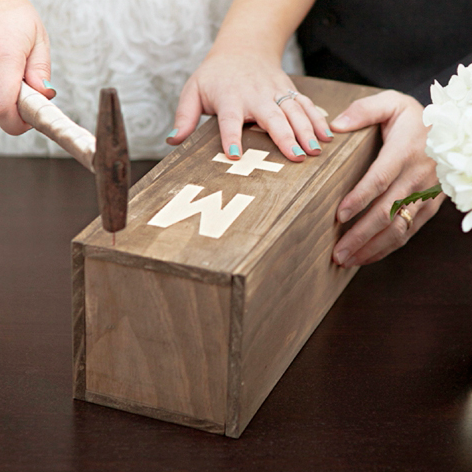
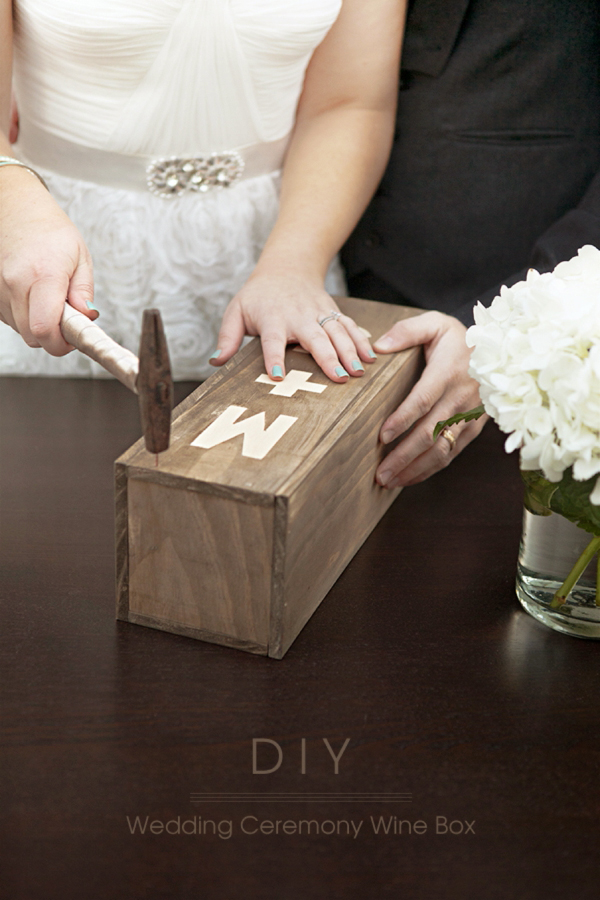
If you are using an old (or boring!) hammer, you can dress it up by wrapping it with a little ribbon or twine. Also, make sure to choose pretty nails/screws for your box, there are may decorative hardware options out there. **Make sure to bring a few extra nails to your ceremony, just in case a few roll off the table!

////////// USING STAIN + A NAIL GUN //////////
The first technique we are sharing is how to stain your box and personalize it with oversized stickers. Staining your box is easier to do piece by piece, before you assemble it. You can use any stain or color you would like. Here we are using Martha Stewart Crafts wood stain in Espresso. There are different ways to apply stain for different looks; here we gently wiped it on using a cotton cloth, with the grain of the wood until the level of desired depth was achieved. We did one coat. Let it dry completely before assembling the box.

To make the sticker outline design, we stained each piece of wood front and back – except the top of the box. Firmly apply your desired stickers to the TOP of your wood box. If you want a “+” sign you might have to get crafty and cut up a capitol “T”…

Then gently wipe the stain across your wood and the stickers…

Peel your stickers away immediately and you are left with a rustic and charming monogram.

////////// ASSEMBLY WITH A NAIL GUN //////////
Using a nail gun to assemble your box is a very quick method, but requires a bit of precision.

Start by nailing SIDE 1 to the BOTTOM. We placed the TOP on the opposite side just for balance. Start nailing an inch away from the edge to avoid splitting. We used seven nails across the edge. CRAFTERS TIP // Make sure you have the nail gun centered perfectly to nail through the SIDE and BOTTOM or else you can have rouge nails inside your box!

Next, nail each END piece into each corner – holding it however you are most comfortable.

SIDE 2 is super easy. Lay the box on it’s side and nail all three sides.

Isn’t it super rustic and chic… we are totally in LOVE…

Next step, drilling pilot holes for your ceremony nails. Although this step is optional, it’s highly recommended! To simply seal this box, we are only going to add 4 nails during the ceremony – you can nail two, and he can nail two. Mark holes about an inch in from each side and with the top on your box, drill little pilot holes (we talk more about drill bit size in the next design). “Pilot Holes” meaning the diameter is smaller than your choice of nail size and they make nailing an absolute breeze! So you won’t mess up the hammering during the ceremony!

Add some gift wrap grass and a special bottle of wine (of course I love Greg Norman)… and don’t open until your 1st Anniversary! Aaawwee….

////////// USING WOOD GLUE + HOUSE NUMBERS //////////
Gluing is very easy but it needs to dry for at least 24 hours. You will need three bricks (or the like) to help hold your box square. Do this step on a piece of wax paper and on a surface where you can leave your box to dry completely without moving it. To start, place SIDE 1 down on your surface with a brick right behind it…

Then apply a bead of wood glue to the edge of the BOTTOM piece. Press it firmly to SIDE 1, press it into the brick to make sure it’s square and line the edges up as best you can. **Do not worry about excess glue at this point.

Next up, the END pieces. Apply a bead of glue to two connecting edges of each END piece and carefully press into each corner, lining up the edges as best you can. We added a second brick inside to steady the BOTTOM piece.

Now, add a bead of glue along all three edges showing and firmly press SIDE 2 down into the glue to complete your box. Line up ALL the edges as best you can and place a brick on top to make sure that your box dries perfectly pressed together.

After you are happy with your glue job, carefully wipe off all the excess glue with a paper towel. Make sure to really wipe the glue off the top edges so that your TOP piece will slide right in. Don’t worry it will dry clear. CRAFTERS TIP // If you want to GLUE your box and STAIN it – you will NEED to stain it BEFORE you glue it. Otherwise the glue will create a barrier for the stain and you will see all the glue lines, yuck.

Isn’t it gorgeous! You’d never know it was glued!


Now for the “pilot holes”- which are small holes drilled where you will nail the box closed. *Doing this step ensures that your nails will hammer in with ease during your ceremony! For this step you will need to choose a drill bit that is smaller than your choice of nail; when ‘eyeballing’ the size always choose smaller than you think – you can always go back and drill the hole bigger. Also, make sure that you set your bit in your drill – shorter than your nail (pictured below). Think of these holes as ‘starter’ holes… you don’t want to fully drill them or else the nails won’t hold. Place them about an inch from each side. Your nails should just sit on the top of these holes, not slide through.

Now for the address numbers! Yay ~ how fun!!! We are using furniture tacks as periods.

Align your address numbers and trace the screw holes onto the TOP board. Using the same drill bit from the pilot holes, drill each of the address number holes. If you aren’t on a surface that you can drill through, use a scrap piece of wood underneath the TOP.

Then screw in each address number. CRAFTERS TIP // My screws went through my 3/8″ thick wood – so I screwed them on while my TOP piece was on the box. I could have bought shorter screws but the finish wouldn’t have matched my numbers. So we sliced the tips off the screws underneath the TOP using a Dremel tool once I was done, for safety.

Now to add the tack punctuation… press the tacks into your wood to start and finish with a rubber mallet. *If you use a regular hammer it can ruin the finish of the tack. Make sure you are hammering with a solid surface underneath your wood.

We are completely in LOVE with this box!!!

Add some gift wrap grass and a special bottle of champagne… and look forward to toasting and celebrating your first year of marriage!

Love, love, love!!! Pop, fizz, clink…

Sealing this special box with your MR during your ceremony will be such a sweet memory and will make for super fun pictures! And it really is such a great idea… who wants to eat year old cake anyway!

As with all our DIY tutorials, if you create one of our projects please send us a picture or a trackback – We Love Seeing Your Creativity! If you use Instagram or Twitter please use the hashtag #SomethingTurquoiseDIY. Happy Crafting!
Photography: Studio 11 Weddings // DIY tutorial by: Jen | Something Turquoise // Martha Stewart Crafts Wood Stain in Espresso and ribbon: Michaels // clear pine wood, house numbers, Gorrilla Wood Glue, furniture tacks, decorative nails and M + J stickers: Lowes // nail gun and grandpa’s hammer: Dad’s garage, lol // nail polish: Essie – Turquoise & Caicos

Comments