
DIY | bridal statement necklace
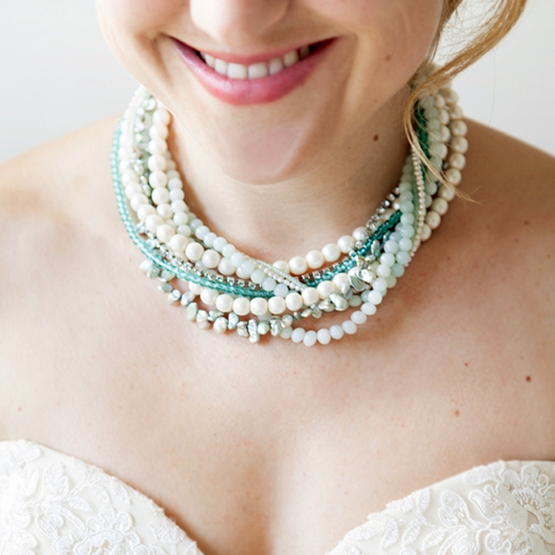
Since last weeks project was beyond simple… I decided to flex my DIY muscles – so beware, this project is not for the beginner! This very detailed, step by step tutorial shows how to create a multi-strand statement necklace, perfect for the hardcore DIY bride! Bold jewelry has become quite the rage, so take this trend by it’s horns and create something no other bride will have – a necklace fit only for you, the DIY Wedding Queen…

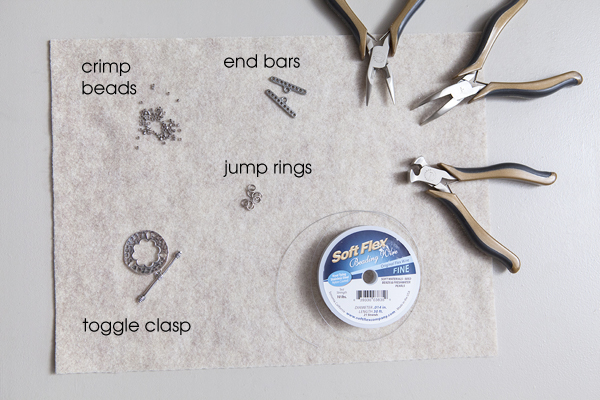
SUPPLIES:
- your choice of beads, lots of pretty beads
- wire cutters, small pliers, and crimp pliers
- soft flex beading wire
- 18 crimp beads
- 26 open jump rings
- two 9 hole end bars
- large toggle clasp
- tape
- felt (or the like)
I recommend using at least 5 different strands of beads if not more, here I chose 7. From left; aqua seed beads, white potato fresh water pearls, turquoise glass beads, crystal chain, 8mm round Amazonite, faux-matte glass pearls, and sage fresh water pearls. To recreate this look you need to choose strands of different color and texture. I like working on a piece of felt or material so stray beads don’t roll around on me.

Measure your neck to see how long your necklace should be. I made mine 17″.

Start by cutting your Soft Flex wire, add at least 8″ to your neck measurement… you will need extra wire to work with while beading. Cut 9 wires; one for each end bar hole.

***There are many different ways you could assemble this necklace; here I tried to break the steps down and make them simple – but do what you feel comfortable with.
Start by adding jump rings to your end bars; these will hold all your bead strands. Make sure to completely close each jump ring with your pliers. Complete both end bars.

The next step is to form a jump ring chain to add each piece of the toggle clasp to each end bar. I added 4 jump rings to this connection to add length for ease of operating the clasp.

Now, plan out your strands. I chose 7 different beads, but I needed 9 strands – so I doubled up on the amazonite and the faux glass pearls. Pick your pearly poison.

Now add each of your cut pieces of Soft Flex to one end bar.
Do this by threading the Soft Flex with a crimp bead, then thread the Soft Flex through one jump ring and back through the crimp bead, crimp the crimp bead with a pair of pliers, and tug to make sure it’s secure. ***The first picture is only showing the Soft Flex threaded through the crimp bead twice.

Add all nine pieces of Soft Flex to one end bar.

Start beading each of your Soft Flex wires! You should bead at least the amount that you measured earlier… if not a little more just in case. When braiding and wrapping the strands, you will need a little slack.

When you are finished with each strand, tape it off so you won’t loose your beads.

Continue with your beading…

Finish all your strands.

Now to twist the strands! I softly braided the strands here…

…and then gave them a little nudging and situating until I was happy with the composition. ***CRAFTERS TIP: While assembling this last part of the necklace, keep the strands in a “U” shape to mimic your neck!

Figure out which strands should go to what hole in the last end bar.

The next step is to finish the necklace. Start in the middle and work out. Carefully remove the tape from the middle bead strand, add a crimp bead, and then thread through the appropriate jump ring…

Then thread back through the jump ring and pull the strand tight, making sure there is no slack throughout the entire strand. There is nothing worse then a gap in the strand! Then crimp the bead and trim the excess wire.

Continue to move throughout the strands. Since you added extra beads just in case, you might have to remove a few to make the strand fit perfectly up to the end bar.

Keep crimping and moving along through the strands until complete. Carefully cut off excess Soft Flex, making sure not to cut what the beads are strung on!

FINISHED ~ and gorgeous!

This project might not be quick, or easy… but it is beyond worth it. Such a special piece of jewelry to wear on and beyond your wedding day!

**This necklace could even be your *Something Blue (…or something turquoise!).

As with all our DIY tutorials, if you create one of our projects please send us a picture – We Love Seeing Your Creativity! If you use Instagram or Twitter please use the hashtag #SomethingTurquoiseDIY and it will show up on our Get Social page. Happy Crafting!
DIY Tutorial Credits
Photography: Studio 11 Weddings // DIY tutorial and necklace design by: Jen | Something Turquoise // all beads and findings from my favorite bead store: Ruby Tuesday // gorgeous wedding dress: Allure Bridals #2569 // pliers: Craftsman // nail polish: OPI – Love Angel Music Baby![]()

Comments