
DIY | painted wedding card jar
Most likely each guest that attends your wedding will bring either a gift or a card… but where should they put the cards!? In this adorable glass jar of course! Making a super cute wedding card jar like the one below is not only easy and inexpensive but will make a great memento to have in your new home after the wedding… I’d put cookies in mine!

SUPPLIES:
- 2 gallon glass jar
- Martha Stewart Crafts adhesive silkscreens
- Martha Stewart Crafts glass paint
- Martha Stewart Crafts paint roller, pouncer and stenciling tape
- rubbing alcohol

We are going to start by measuring the distance of two lace silkscreens… we will be repeating this design twice. We want to paint a background for the lace and wording so your guests can read it clearly and this will let us know how large it should be.

Marking where the end of each silkscreen will land – this will be where we will tape off the jar to paint the background color.

Tape a giant square across the back of your jar. Go back and measure with your silkscreen to make sure that you have taped off your jar correctly. We want the lace stencils to go right up to the background color.

Make sure to clean the glass surface with rubbing alcohol before you paint.

Here we are using the ‘frost’ finish from MSC in Blue Calico. Applying the paint with a roller gives it a smooth and even look across the glass.

In between coats you can save your paint roller in a plastic baggie.

Paint as many coats as you like! With at least an hour of dry time in between each coat.

We did three coats of paint on our jar. Remove the stenciling tape as soon as you are finished with the last coat of paint.

Now it’s time to paint your first lace stencil! Line it up with your painted background and with a ruler, check to make sure it’s even on both ends from the base – then tape to secure.

For this lace silkscreen we will use a pouncing motion, which will give a textured look to the ‘lace’ when complete. Pounce the entire design. We are using ‘mother of pearl’ in pearl finish.

Once finished painting quickly remove the silkscreen and wash it immediately.

Let that design dry for at least an hour before moving onto the next step.

With your choice of Martha Stewart Crafts silkscreen letters, cut out the word ‘Cards’.

Apply the second part of your lace silkscreen, being careful of the first coat. At the same time apply the word ‘cards’ starting in the middle with the letter ‘r’ and working out from there.

For the word we will use a swiping motion to leave the design smooth. Use the same pouncing method for the second part of the lace design.

Again, as soon as the design has been painted, remove the silkscreen and wash.

These gorgeous silkscreens give such beautiful detail with little effort!

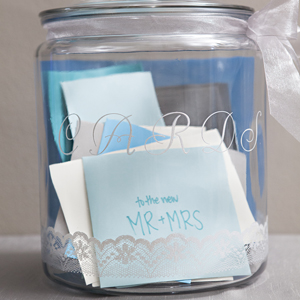
When your jar is dry add a pretty bow… or embellishment of the like.

Your guests will be delighted to put their wedding cards in this adorable jar!

This jar will make such a great memento to keep in your home…

After your wedding it would make a great cookie jar, at least that’s what I’d use it for – what would you use it for after your wedding?!

![]()

As with all our DIY tutorials, if you create one of our projects please send us a picture or a trackback – We Love Seeing Your Creativity! If you use Instagram or Twitter please use the hashtag #SomethingTurquoiseDIY. Happy Crafting!
Photography: Studio 11 Weddings // DIY tutorial by: Jen | Something Turquoise // Martha Stewart Crafts glass paint (in Blue Calico, frost and Mother of Pearl, pearl), adhesive silkscreens (in Elegant Alphabet and Antique Lace), paint roller, pouncer and stencil tape: Editors at Martha Stewart all available at Michaels, Jo-Ann’s Fabrics, and Amazon.com // Anchor Hocking 2 gallon glass jar $13 : Target // nail polish: OPI – Ski teal we drop

Comments