
DIY | ribbon bunting banner
Bunting style banners are such a cute addition to any type of decor, be it an engagement party, bridal shower, cake table decor, or any other type of party! Here is a quick and easy technique to create an adorable banner using just ribbon and hot glue!

Supplies: ruler, sharp scissors, heavy duty jute twine, wide ribbon + thin ribbon (or whatever kind you like), hot glue gun, and a bone folder or a popsicle stick.

Start by cutting the heavy duty jute twine to your desired length, this will be the length of your banner. I started with 10 feet of twine and ended up cutting it down to about 8 feet. Next, cut your ribbon; I cut 10″ lengths of both ribbons. The amount of ribbon you will need will be determined by the length of banner you want. For this exact banner, you will roughly need 1 wide ribbon and 1 thin ribbon for every 6″ of twine.

To attach your first ribbon, start about 2 feet from the end of your twine – place the ribbon underneath the twine and have your glue gun hot and ready…

Next, working very quickly, add a few lines of hot glue – place the twine in the hot glue, fold the ribbon over, place the bone folder (or popsicle stick) hard at the base of the twine and swipe down the ribbon. Do this step very quickly! If too slow, the glue will get hard before the ribbon adheres to itself – not to worry – carefully pull the glue off the ribbon and start over. That’s it, the wide ribbon is attached.

For the second ribbon, fold it in half, with the folded edge facing you place it under the twine, fold the ends over the twine and through the loop, then pull! Place this ribbon a few inches away from the wide ribbon, when the banner is complete you can adjust the spacing.

The first two are complete!

Now do it over and over until you have the desired length of banner…

The color options with this project are endless…

Continue gluing and knotting, gluing and knotting…

If you get a gap in the top of your ribbon like below, add a little more glue.

Almost finished…

Go back through your banner and adjust the spacing of the thin ribbon, you can glue it as well – but as long as the knot is tight it’s not necessary.

Next cut pretty ribbon edges. Using sharp scissors, fold your ribbon in half and cut at a diagonal.

Do the same cut to the thiner ribbon, no folding necessary.

Cut the length of your twine ends to match and your banner is complete!

Such a quick and adorable project!

As with all our DIY tutorials, if you create one of our projects please send us a picture or a trackback – We Love Seeing Your Creativity! If you use Instagram or Twitter please use the hashtag #SomethingTurquoiseDIY. Happy Crafting!
![]()
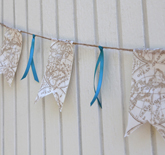
photography: Studio 11 // DIY: Jen | Something Turquoise // wide nautical map ribbon, Martha Stewart Hot Glue Gun, heavy duty jute twine, and scissors: Michaels // thin ribbon in ‘Peacock’ from: Paper-Source // I have no idea where I got my bone folder, but you can get them at any craft store // nail polish: Sally Hasen Salon Effects Polish Strips

Comments